28+ May Nails Ideas That Are Absolutely Stealing this Spring Season
Fresh Spring Nails That Actually Deserve a Spot on Your Pinterest Board
Okay, let me be real with you — May is genuinely my favorite month to do nails. Not because it’s easy (it’s not), but because the color palette basically opens up completely. You’re not locked into the deep, moody hues of winter anymore, but summer hasn’t gone full neon on you yet either. It’s this perfect in-between window, and the nail designs? They reflect that energy perfectly.
I’ve been doing nail sets all spring, and May always brings in the most adventurous clients. The girl who’s been wearing bare nails since February suddenly wants florals and chrome in the same appointment. The one who said “just keep it neutral” in March is now sliding me reference photos of 3D sculpted flowers. I live for it.
What I love most about May nail designs is how versatile they are. Pastels are still in play, brights are creeping in, florals are everywhere, and if you’re team “no color ever,” there’s still something gorgeous waiting for you. Whether you’re heading to a graduation party, a Mother’s Day brunch, a casual weekend picnic, or just want something pretty for your everyday rotation — May nails have you covered on every front.
I’ve pulled together 20+ of my favorite designs from this season. Some I’ve done on clients, some I’ve tested myself, and a few I’m genuinely obsessed with right now. Let’s get into it.
Why May Nail Designs Are Trending Right Now
May sits right at the intersection of late spring and early summer energy — and nails are reflecting that shift. After months of quieter, more muted palettes, people are ready to go a little louder. Floral nail art has fully exploded on NailTok and Pinterest. Chrome finishes got a spring refresh. And textured 3D nails are everywhere — from wedding season appointments to everyday wear.
One thing I’ve noticed personally: clients who usually stick to solids start requesting nail art in May. Something about the season just makes people want a little more. And honestly? I’m here for it every single time.
Tools & Accessories Needed
What You’ll Want to Have Ready
Before diving into any of these looks, there are a few things worth having on hand. A good LED or UV nail lamp is non-negotiable for gel finishes — it makes a real difference in how long your design holds up. For detailed work like florals or swirls, a fine nail art brush (the thinner the better) is your best friend.
If you’re doing 3D designs, you’ll need nail sculpting gel or acrylic powder, and for anything involving charms, rhinestones, or floral embellishments, a nail art glue or thick gel will keep them in place far better than regular top coat. A good matte or glossy top coat is essential for finish, and a cuticle oil should honestly just live on your desk at this point.
For tools: a nail file and buffer, a dotting tool for clean dot work, and a striping brush for any fine line details. Press-on wearers, a solid nail glue or adhesive tabs will carry you through.
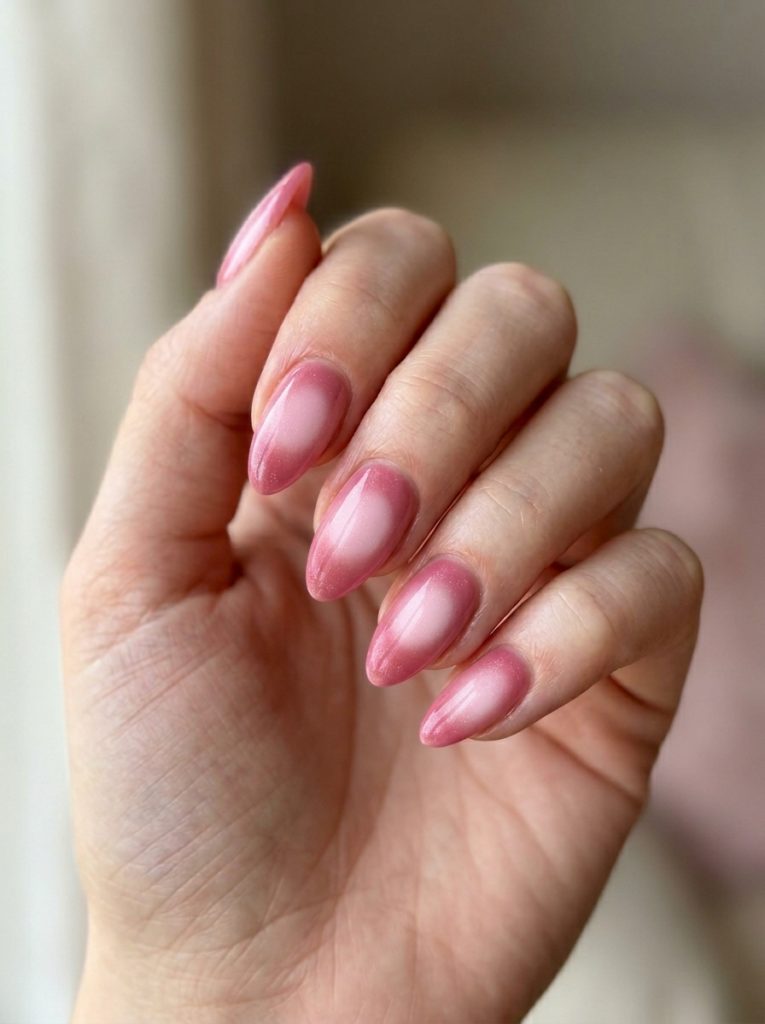
1. Pink Aura Nails
Nail Styling Advice
This is one of the sets I keep coming back to for clients who want something soft but still impactful. Aura nails have that blurred, diffused gradient effect that honestly looks like light is coming from inside the nail — and in a double-pink version, it’s giving total spring glam without trying too hard.
I’ve done this on almond and oval shapes mostly, and the soft edges of those shapes really complement the blended, hazy finish. For skin tones on the warmer side, pairing a dusty rose with a brighter baby pink gives the most gorgeous contrast. Cooler tones look stunning with a mauve-pink and hot pink combo.
The finish is full glossy — don’t even think about going matte here. The whole look lives in that reflective, almost glowy shine. The one mistake I see people make with aura nails is blending too far into the center. Keep the gradient mostly toward the edges for that floating color effect.
How to Create This Nail Look
Step-by-Step
Apply your base gel coat and cure. Take a small sponge or fluffy brush and dab your first pink shade around the edges of the nail. Before curing, layer the second (deeper) pink toward the outer edges and softer toward the middle, blending with a clean brush in circular motions. Cure. Add a second layer if the gradient needs more depth. Finish with glossy top coat and cure again.
Tools: Sponge or fluffy gel brush, LED lamp, two pink gel shades, glossy top coat Skill level: Intermediate — the blending takes some practice but is totally learnable
Occasions to Wear
This set is incredibly versatile. I’d wear it to a Mother’s Day brunch without hesitation. It’s pretty enough for spring weddings as a guest, polished enough for everyday wear, and fun enough for a weekend rooftop with friends. It photographs really well too — major bonus for anyone who’s event-heavy in May.
2. Milky Floral Nails
Nail Styling Advice
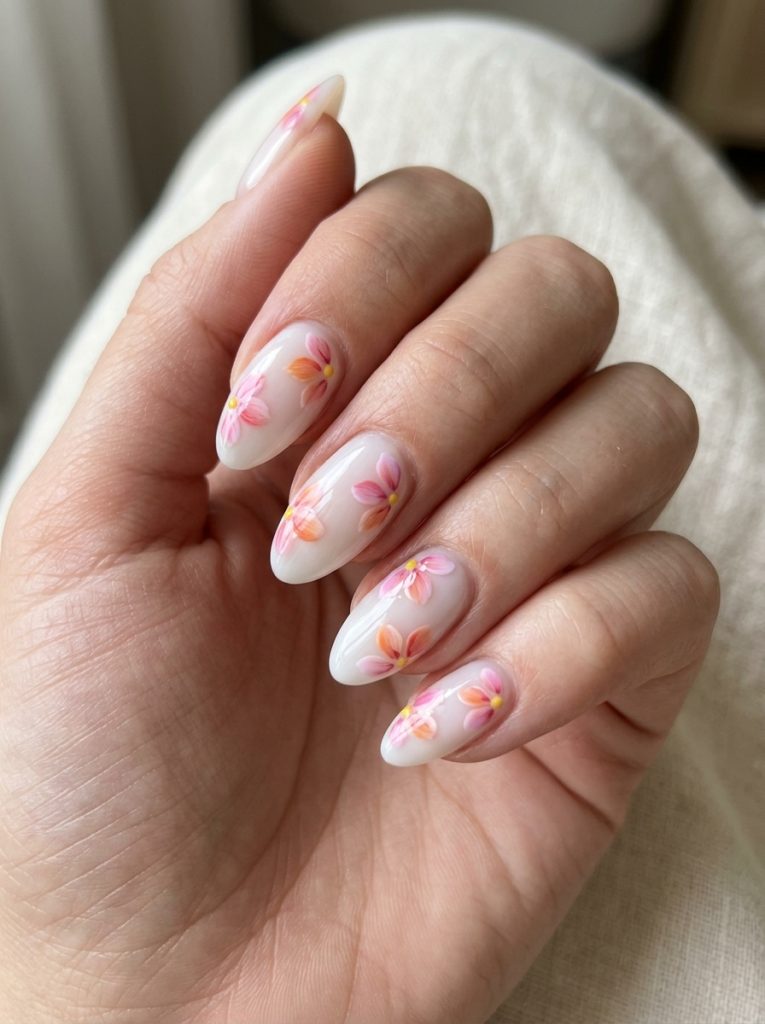
If there’s one design I’ve recommended more than anything else this spring, it’s this one. A milky white or sheer base with hand-painted florals in pink and orange is simultaneously delicate and bold — which is a combination that’s genuinely hard to achieve.
I tried this nail set with a client who swore she “only does neutrals,” and by the end of the appointment she was asking for slightly larger flowers because she loved it so much. The milky base keeps it feeling refined, not overwhelming. The gradient petals — going from soft pink into a warm orange — add warmth without tipping into loud territory.
This works beautifully on medium-length almond or oval nails. Square shapes can carry it too, but the rounded edges make the florals feel more organic. For deeper skin tones, the contrast against the milky base is genuinely stunning. Lighter skin tones can opt for a slightly warmer milky shade (think cream rather than bright white) to keep it from washing out.
How to Create This Nail Look
Step-by-Step
Apply two thin coats of sheer milky gel, curing between each layer. Using a thin nail art brush, paint petals freehand in a light pink gel — start with the outer petals and work inward. Before the gel cures, sweep a touch of warm orange over the tips of the petals for a gradient effect. Add a tiny yellow dot at the center with a dotting tool. Cure and seal with glossy top coat.
Tools: Fine nail art brush, dotting tool, pink and orange gel polish, milky base, glossy top coat Skill level: Intermediate — the freehand painting takes a steady hand but doesn’t require perfection. Imperfect petals actually look more organic.
Occasions to Wear
Garden parties, obviously. Mother’s Day is where I’d reach for this first. Also perfect for outdoor weddings as a guest, springtime work events, or just a Sunday brunch situation where you want to look put-together without overdoing it.
3. Textured French Tip Nails
Nail Styling Advice
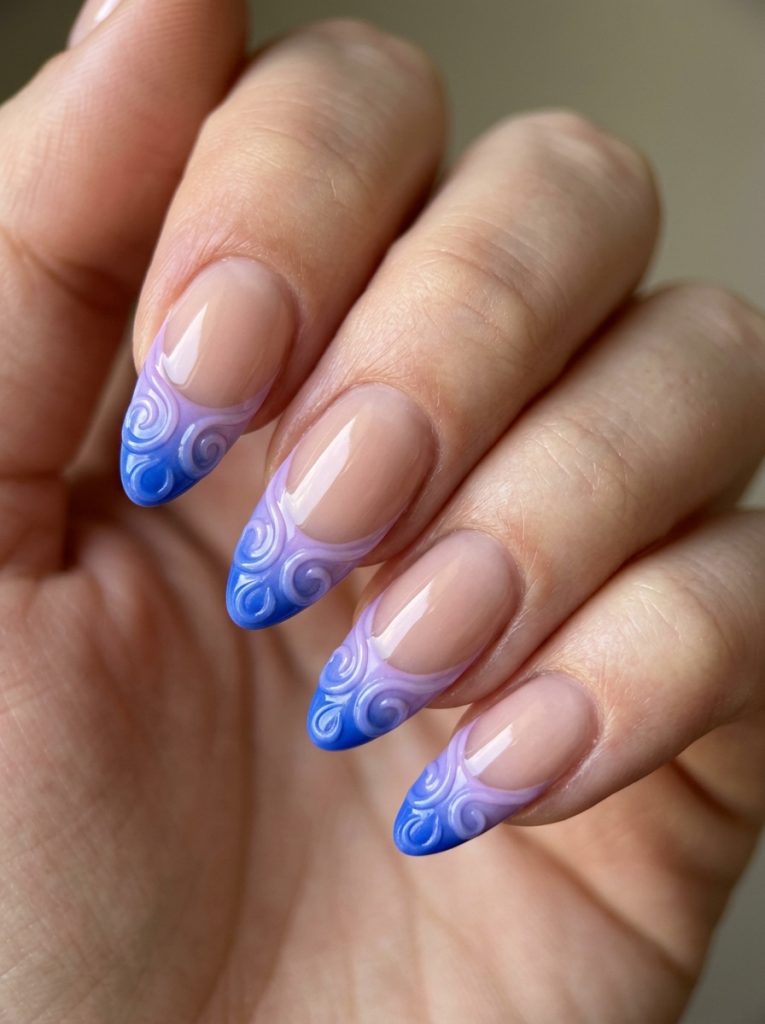
This is where it gets tricky — and also where it gets really fun. The standard French mani has been done to death, but the textured, 3D version is a completely different conversation. I’m talking raised swirls or sculpted borders along the French line, in gradient blue and lilac.
I’ve done this on clients with medium to long nails — it really needs a little length to let the design breathe. Coffin and almond shapes are my go-to for this look. The elongated nail gives the French tip more visual real estate, which means the texture has room to actually show up properly.
Skin tone-wise, the soft blue-lilac palette reads beautifully across pretty much every complexion, which is one reason I love it. If someone has a warmer undertone, I push the lilac slightly warmer toward mauve; cooler undertones get a crisper, cooler blue.
One thing I noticed: the textured tip can sometimes feel too heavy if overdone. Keep the 3D element just along the smile line — don’t extend it too far up the nail bed or it starts looking clunky rather than sculptural.
How to Create This Nail Look
Step-by-Step
Apply your base coat and a sheer or natural-toned gel base. Using builder gel or thick sculpting gel, trace along the French smile line with a fine brush, building up slightly for dimension. Cure. Apply a gradient blend of light blue and lilac over the textured tip using a blending brush — lighter blue at the base of the tip, deeper lilac toward the edge. Cure and seal with glossy top coat.
Tools: Builder gel, fine nail art brush, LED lamp, blue and lilac gel shades, glossy top coat Skill level: Advanced — the 3D sculpting takes practice. If you’re not comfortable with builder gel, a regular gel French with swirl nail art over the tip creates a similar look without the raised texture.
Occasions to Wear
This is a great transitional look — polished enough for a work environment that allows expressive nails, fun enough for graduation parties or spring dinners, and delicate enough that you could wear it to a daytime wedding without it feeling costume-y.
4. Butter Yellow with Florals
Nail Styling Advice
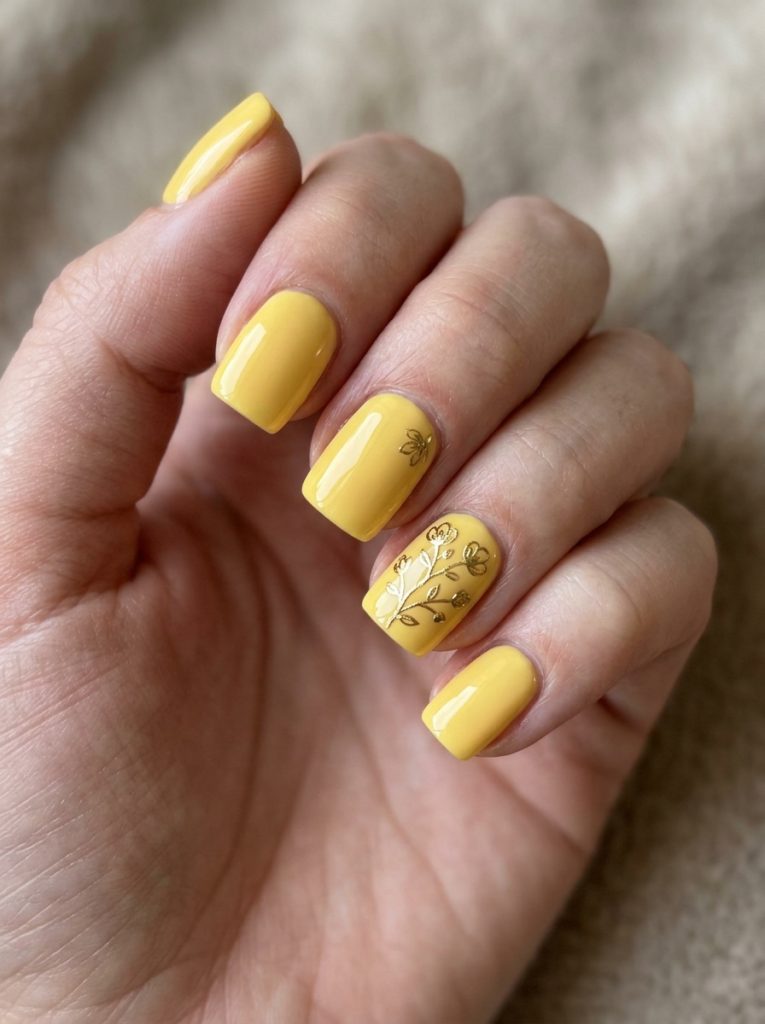
Butter yellow is having its absolute moment right now, and honestly it deserves it. It’s warm, it’s happy, and it sits in this perfect sweet spot between soft and bold that most colors can’t quite pull off.
I’ve done this on square and squoval nails mostly — butter yellow has a brightness that suits a flatter shape. The metallic gold details and small blooming flowers I add to accent nails give it enough depth that it doesn’t read as “just a yellow manicure.” It feels intentional and styled.
For skin tones: this is one of those shades that genuinely looks good on everyone, but the undertones matter. Warmer, golden skin tones should go for a slightly deeper, richer butter yellow. Lighter or cooler skin tones can go as pale and creamy as they like — the contrast is really pretty.
The one mistake I see with yellow nails is applying too few coats. You need at least three for opacity, and sometimes four. Don’t rush it.
How to Create This Nail Look
Step-by-Step
Apply three to four thin coats of butter yellow gel, curing between each. On one or two accent nails, use a fine brush and gold metallic gel to draw small floral outlines — simple five-petal shapes work perfectly and don’t require advanced skill. Add tiny dots at the center of each flower with a dotting tool. Seal all nails with glossy top coat and cure.
Tools: Butter yellow gel polish, gold metallic gel or nail paint, fine art brush, dotting tool, glossy top coat Skill level: Beginner to intermediate — the base is easy, the florals are simple enough for a steady hand
Occasions to Wear
This set was made for outdoor events. Garden parties, picnics, outdoor brunch, Mother’s Day, a casual work week, or a summer-transition vacation look. It also pairs beautifully with white outfits and linen — very much the “effortless and put-together” aesthetic.
5. Mismatched Spring Nails
Nail Styling Advice
I’ll be honest — mismatched nail sets used to make me nervous. Getting them to feel cohesive without looking chaotic is genuinely an art form. But once I cracked the formula, I started loving them.
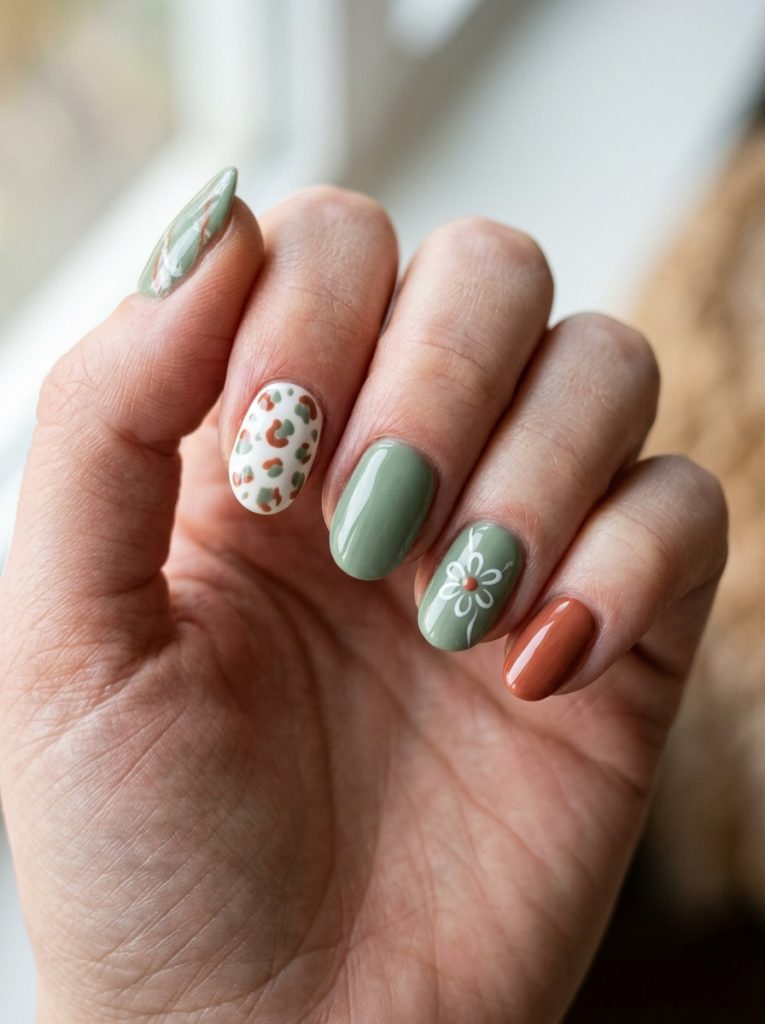
The trick is keeping a color thread running through all the different patterns. If you’re mixing marble, animal print, sun doodles, and florals, they should all be pulling from the same 2-3 color palette. That’s what makes it look “styled” rather than random.
I’ve done this on short-to-medium nails most often — the designs are small-scale enough that they actually show up better on a nail that isn’t super long. Oval and squoval shapes work best. It suits practically every skin tone since the pattern variety means there’s always something working in your favor.
This is also one of the more forgiving designs to do yourself at home, since imperfection reads as intentional on mismatched nails.
How to Create This Nail Look
Step-by-Step
Choose your color palette (example: sage, white, terracotta). Apply a different base to each nail within that palette — one neutral, one colored, one sheer. While each cures, plan your accent designs: one marble nail (thin white brush strokes over a base), one animal print nail (small curved brushstrokes in a darker shade), one solid with a doodle. Keep each design simple — one technique per nail. Seal everything with the same glossy top coat for cohesion.
Tools: Multiple gel shades in a cohesive palette, fine nail art brush, striping brush, glossy top coat Skill level: Intermediate — planning is half the work here
Occasions to Wear
Casual everyday wear, weekend outings, a laid-back birthday, a music festival, or any situation where you want your nails to be a conversation starter without being over-the-top formal.
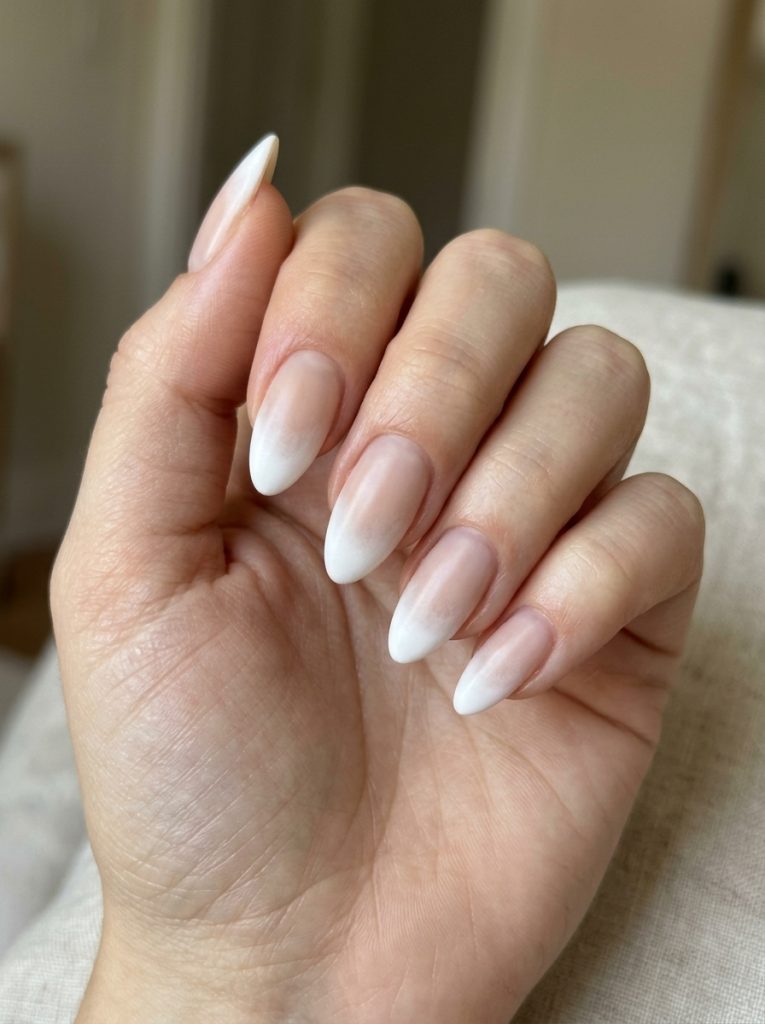
6. Foggy French Tips
Nail Styling Advice
If you’re still doing sharp-line French tips, I say this with full love: it’s time to try something softer. Foggy French tips have this diffused, almost-melted edge where the white blends into the base rather than sitting as a hard line. It’s subtle, but the difference is genuinely striking in person.
I’ve been recommending this to clients who love a French mani but want it to feel more modern and less “done.” It works on literally every nail shape, but I especially love it on almond and oval — the softness of the tip mirrors the softness of the shape.
Neutral and warm skin tones suit a slightly warm, off-white foggy tip. Very fair skin tones can go cooler with the white. The base should be a sheer, barely-there nude — don’t go too opaque or you lose the ethereal quality.
How to Create This Nail Look
Step-by-Step
Apply a sheer nude or barely-blush base gel coat and cure. Using a fluffy or fan brush, lightly dab white or off-white gel along the tip of the nail without painting a defined edge. Before curing, blend the inner edge of the white downward with a clean brush using feathery strokes. Cure. Repeat for a second, slightly more defined pass if needed. Seal with satin or glossy top coat.
Tools: Sheer nude gel base, white gel polish, fluffy nail brush, LED lamp, satin or glossy top coat Skill level: Beginner to intermediate — the blending is key, and it actually gets easier the more you relax your hand
Occasions to Wear
This is your graduation season nail. It’s polished enough for a ceremony, soft enough for photos, and understated enough that it doesn’t compete with a formal dress. It’s also perfect for everyday wear, work, and any event where you want to look put-together without the nail being the main event.
7. Mauve Blush Aura Nails
Nail Styling Advice
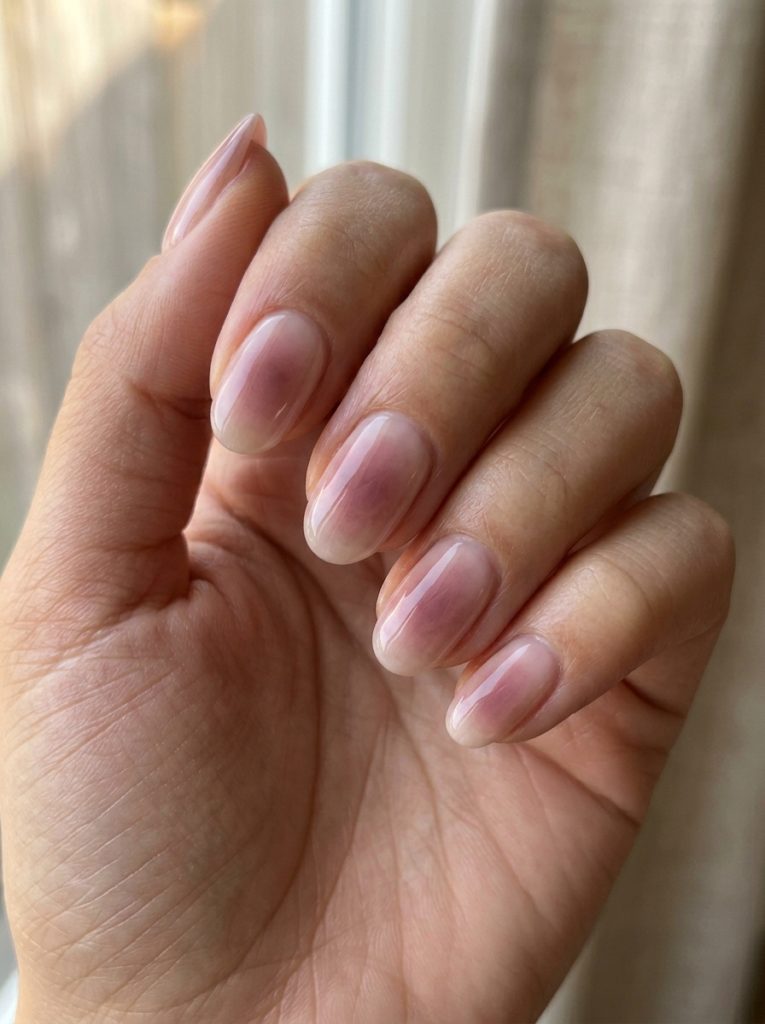
These are the nails I describe as “your fingertips are blushing” — and clients either immediately get it or they request a swatch. Once they see it in person, they always book it.
Mauve aura nails have a soft-focus, almost hazy quality that sits somewhere between a solid color and a cloud. The edges of the nail are the deepest, and toward the center it lightens — almost like the color is being absorbed into the nail rather than painted on top. It’s very editorial and very flattering in photos.
This works on short to medium nails beautifully. Long nails can carry it, but shorter nails actually benefit from the illusion of dimension this design creates. Cooler skin tones should lean into a true mauve-lilac; warmer tones look incredible with a dusty rose version of the same technique.
How to Create This Nail Look
Step-by-Step
Apply a sheer or translucent base coat and cure. Using a fluffy brush or sponge applicator, stipple mauve gel around the outer edges of the nail — leaving the center mostly bare or very faintly tinted. Add more depth along the absolute edges with a slightly deeper mauve. Blend where the two shades meet using a clean brush in circular motions. Cure slowly and check coverage before sealing with a high-gloss top coat.
Tools: Fluffy nail brush or sponge, two mauve gel shades (light and deep), sheer base, glossy top coat Skill level: Intermediate — same technique as aura nails, just in a softer, more muted colorway
Occasions to Wear
Engagement photo shoots (seriously, these photograph beautifully), Mother’s Day, spring brunches, wedding guest appearances, or any event where you want something elegant and a little romantic. Also great for everyday wear if you love a soft nail look.
8. Dark Blue Chrome Nails
Nail Styling Advice
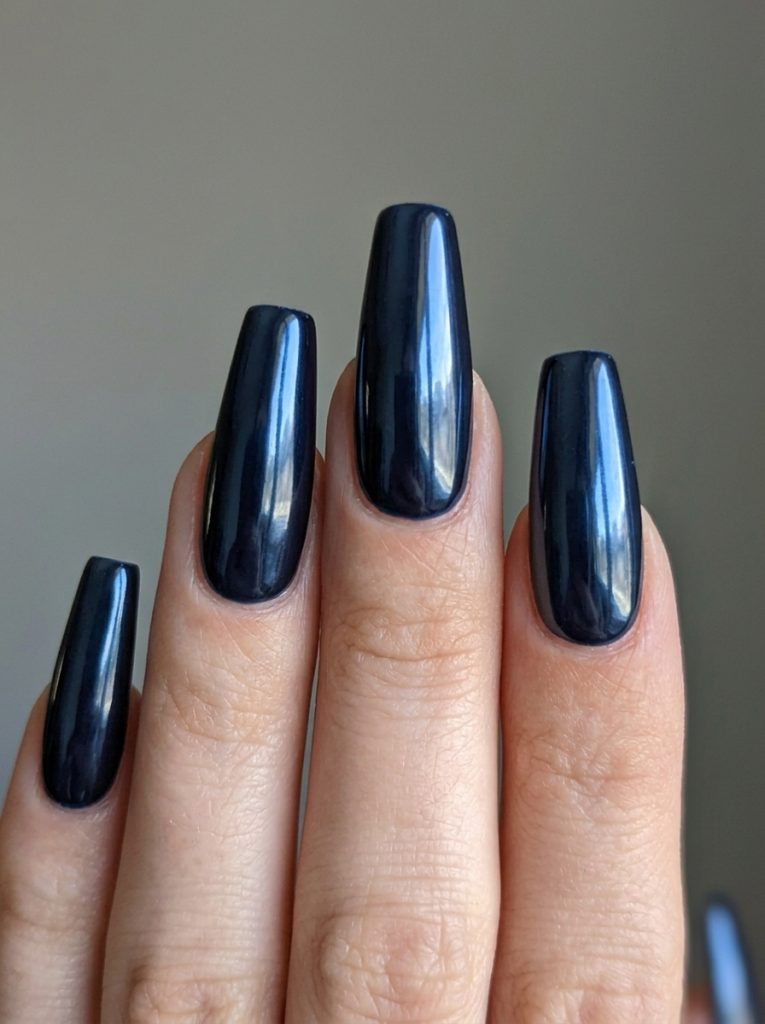
One of my personal favorites this season, no question. While everyone’s reaching for pastels and brights, chrome navy is sitting in the corner looking absolutely cinematic, and I think it deserves way more attention.
I’ve done this on coffin and stiletto shapes — the elongated shape amplifies the chrome reflection in a really dramatic way. It’s not a design for the faint-hearted, but it’s also not complicated to achieve once you understand chrome powder application.
Chrome navy actually reads as more of a fashion statement than a purely “spring” nail, which is exactly why I love it. It pairs with floral dresses in a way that feels editorial. Against deeper skin tones, the navy chrome pops with incredible intensity. On lighter skin tones, it reads more bold and high-contrast.
How to Create This Nail Look
Step-by-Step
Apply a dark navy gel base coat — you need full, even coverage with no streaks, so take your time with two to three thin coats, curing each. Once fully cured, apply a no-wipe top coat but do NOT cure it yet. Working quickly, rub chrome powder onto the tacky surface using a silicone applicator or felt pad in small circular motions until the chrome mirror effect appears. Cure fully, then seal with a no-wipe top coat for longevity.
Tools: Dark navy gel, chrome powder in navy or midnight blue, silicone chrome applicator, no-wipe top coat, LED lamp Skill level: Intermediate — chrome application is a specific technique, but once you practice the motion, it becomes pretty repeatable
Occasions to Wear
Memorial Day, summer parties, evening events, date nights, or any occasion where you want something striking and unexpected. This nail design is what I reach for when a client says “I want people to notice my nails immediately.”
9. Sculpted 3D Flower Nails
Nail Styling Advice
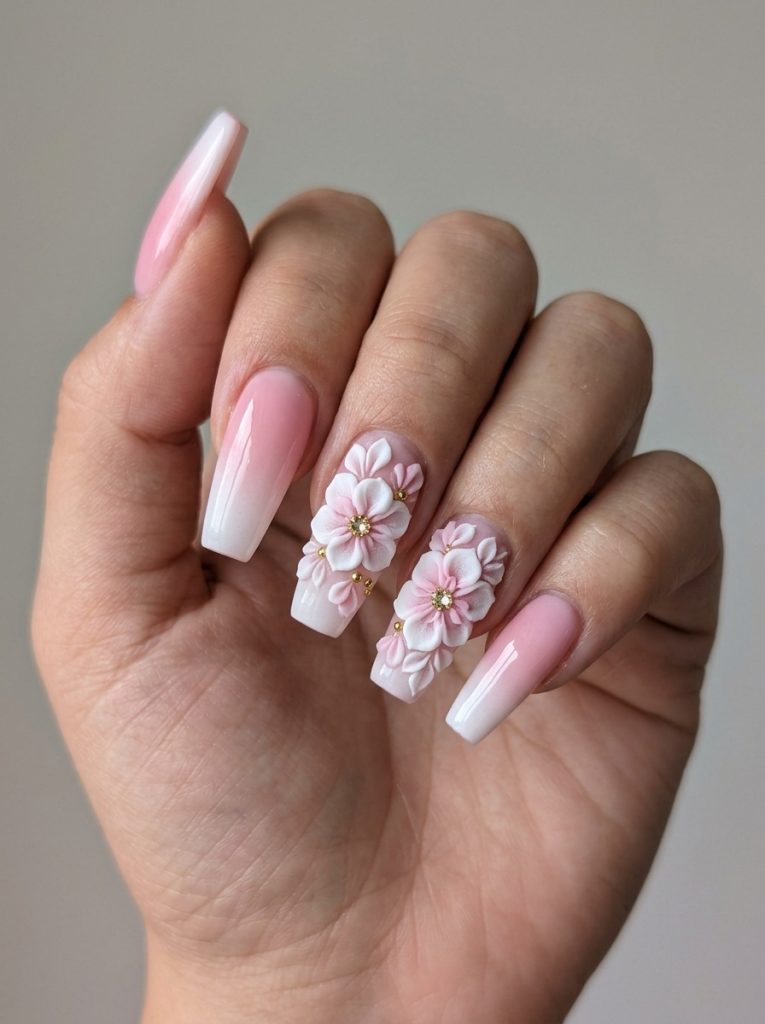
This is the one that takes the longest and gets the most compliments. Every single time. I’ve done sculpted flower sets that have clients taking their hands out to show strangers, and I don’t say that to brag — I say it because 3D nails have that effect.
The combination of pink and white with raised acrylic or builder gel flowers is very 2026 maximalist spring. On a medium-to-long coffin shape, it looks like something out of a fashion editorial. The ombré base underneath adds depth so the flowers have something interesting to sit on.
This is admittedly an advanced design. If you’re doing it at home, I’d suggest using press-on nail charms or flat flower embellishments rather than sculpting from scratch — the effect is similar and much more achievable for most people.
One thing I’ve learned: if you’re adding animal print to any accent nails alongside the florals, keep the print small-scale and in a matching color family. It should whisper, not shout.
How to Create This Nail Look
Step-by-Step
Apply a pink-to-white ombré base using two gel shades blended on a sponge, cure fully. On accent nails, use acrylic powder and a kolinsky brush or builder gel to sculpt small five-petal flower shapes directly on the nail — build from the center outward, keeping petals thin and even. Cure or let acrylic set. Paint flowers in white or soft pink. Add a tiny rhinestone or gold dot at the center of each flower. Seal with glossy top coat.
Tools: Pink and white gel, sponge for ombré, acrylic powder or builder gel, kolinsky brush, rhinestones or gold dotting gel, glossy top coat Skill level: Advanced — sculpting in 3D takes practice. Consider nail charms as an alternative.
Occasions to Wear
Spring weddings (as guest or even bridal party), birthdays, graduation, Mother’s Day, or any special occasion where you want your nails to feel like an accessory.
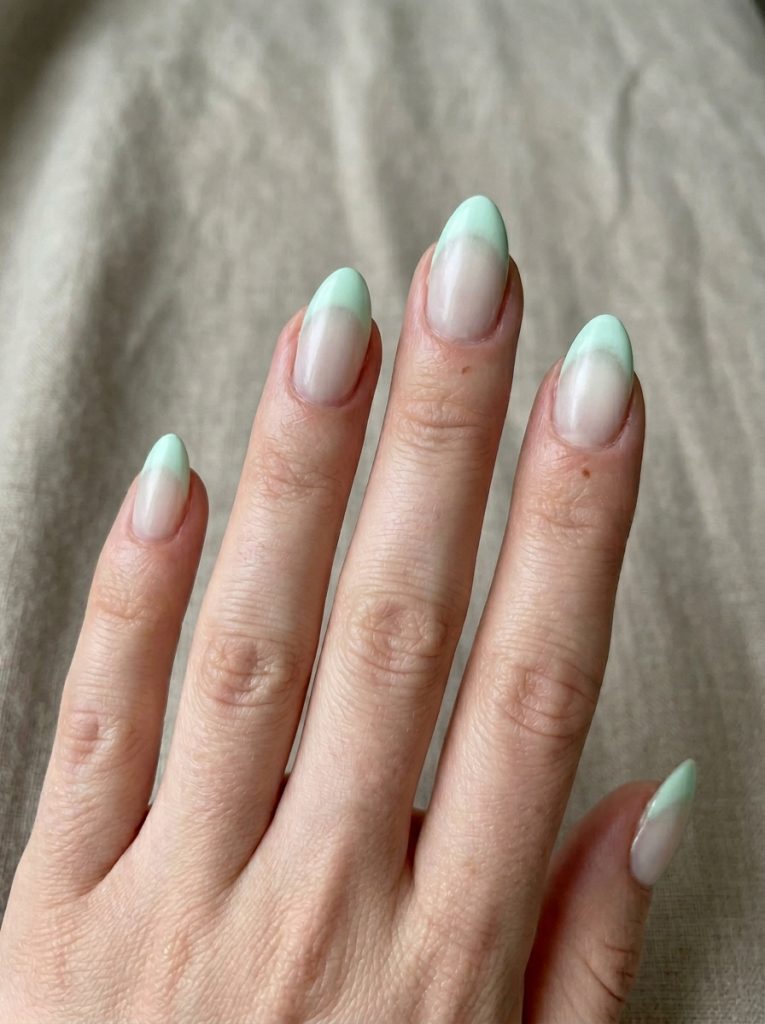
10. Mint Green French Nails
Nail Styling Advice
Mint is having a real moment, and this particular iteration — mint French tips with a melty, non-sharp edge — is one of my current obsessions. It’s fresh in the most literal sense. Like the first day you can finally wear sandals again.
I love this on medium-length almond or oval nails. The softness of the mint color feels right at home on a rounded shape. Square tips can carry it too, especially if you want the green to feel slightly more graphic and bold.
The “melty edge” technique is essentially the foggy French method applied to a colored tip. The mint bleeds slightly into the natural base rather than sitting as a hard line. That’s what makes it look modern rather than retro.
Mint can sometimes read a bit cold on very fair skin tones — if that’s you, add a tiny drop of warm green to your mint to push it slightly toward sage. For medium and deep skin tones, pure mint is stunning.
How to Create This Nail Look
Step-by-Step
Apply a sheer milky or barely-nude base and cure. Using a fine brush, paint the French tip in mint green gel — then immediately take a clean brush and feather the inner edge of the tip downward in light strokes before curing. The goal is a soft, not-perfectly-defined edge. Cure. Add a second layer for color depth if needed, feathering again before curing. Seal with glossy or satin top coat.
Tools: Sheer nude base, mint green gel, fine nail art brush, blending brush, satin or glossy top coat Skill level: Beginner to intermediate
Occasions to Wear
A perfect everyday nail for May. Great for outdoor events, casual work environments, brunches, weekend errands — basically anywhere that benefits from you looking effortlessly put-together.
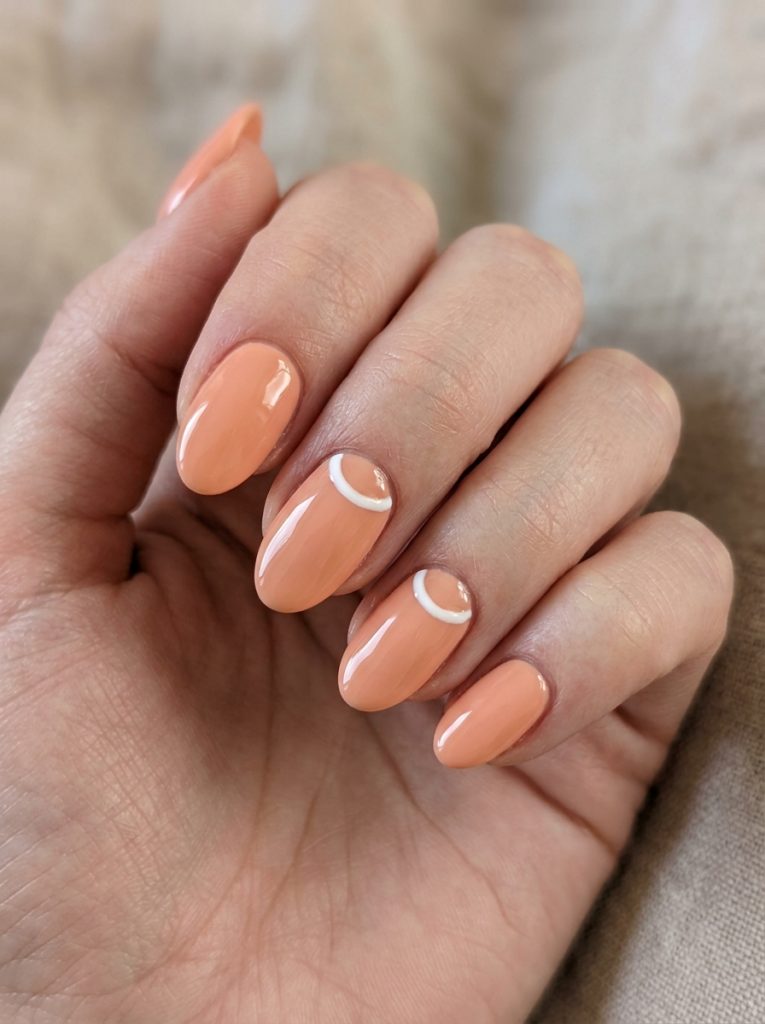
11. Peach Nails with Flipped French
Nail Styling Advice
Peach is the underrated MVP of spring nails. It lives in the warm pastel family but doesn’t compete with pink — it’s its own thing entirely. And the flipped French tip variation (where the French line curves the opposite direction, sitting closer to the cuticle) is such a subtle twist that genuinely elevates a simple base.
I tried this nail set with a client who was burned out on pink but still wanted something warm and spring-appropriate. She loved it immediately. The flipped French on a couple of accent nails in white, set against the soft peach base, gave just enough visual interest without making the set feel busy.
Works beautifully on oval and almond shapes. Slightly warmer skin tones get the most out of peach — it’s incredibly harmonious against golden undertones. Cooler skin tones should go for a peach that leans slightly pink to avoid clashing.
How to Create This Nail Look
Step-by-Step
Apply two to three coats of soft peach gel, curing between layers. On one or two accent nails, use white gel and a fine brush to paint a reverse French curve near the cuticle area — a gentle C-shape curving slightly away from the cuticle edge. Keep the line fine and clean. Cure and seal with glossy top coat.
Tools: Soft peach gel, white gel, fine nail art brush, glossy top coat Skill level: Beginner — easier than it looks once you map out where the curve goes
Occasions to Wear
Mother’s Day is the obvious one here. Also great for spring graduation parties, afternoon events, work nail looks, and really any occasion from April through June where you want something warm and a little sweet.
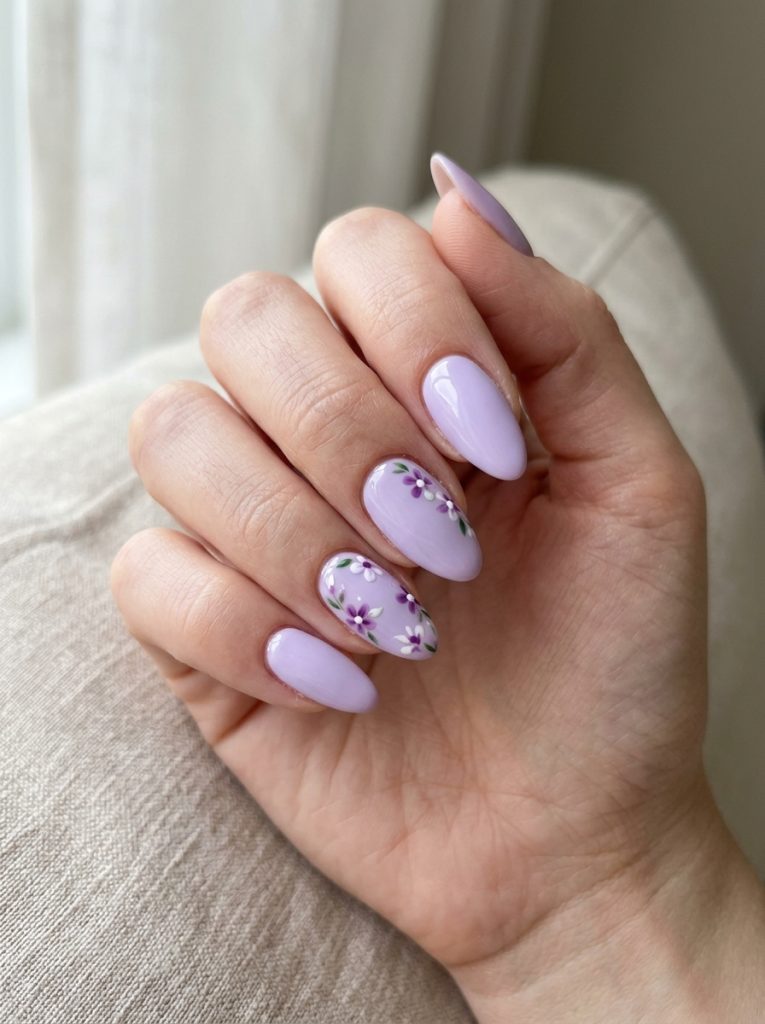
12. Soft Lavender Floral Nails
Nail Styling Advice
Lavender is technically a “late spring” color, and May is basically its last big moment before summer neons take over. I always tell clients: if you’ve been meaning to try lavender nails, May is the window. Don’t let it close.
The version I love most pairs a soft, pastel lavender base with dainty hand-painted flower art — tiny blooms in a slightly deeper purple and white, maybe with a thin stem or leaf detail. It’s classy without being boring, which is harder to achieve than it sounds.
This is also genuinely one of the best choices for Mother’s Day. I’ve done so many of these in late April and early May for clients going to brunches and family events — it photographs beautifully and feels appropriate for any age.
Medium-length almond or oval shapes suit this perfectly. Round nails also work well. On deeper skin tones, push the lavender slightly more saturated so it doesn’t get lost — a more vibrant lilac reads better than a very pale, washed-out lavender.
How to Create This Nail Look
Step-by-Step
Apply two to three coats of soft lavender gel and cure. On accent nails (typically the ring finger and thumb), use a fine brush and slightly deeper purple gel to paint tiny five-petal flowers — don’t overthink the shapes, wobbly petals look more organic and natural. Add white highlight dots on some petals for dimension. Finish with a tiny green leaf using a fine brush dipped in sage green gel. Seal everything with glossy top coat.
Tools: Soft lavender gel, deeper purple gel, white gel, sage green gel, fine nail art brush, glossy top coat Skill level: Beginner to intermediate
Occasions to Wear
Mother’s Day, obviously. Spring brunch, outdoor events, casual weekends, spring weddings as a guest — lavender is one of those rare colors that genuinely suits all occasions without feeling out of place.
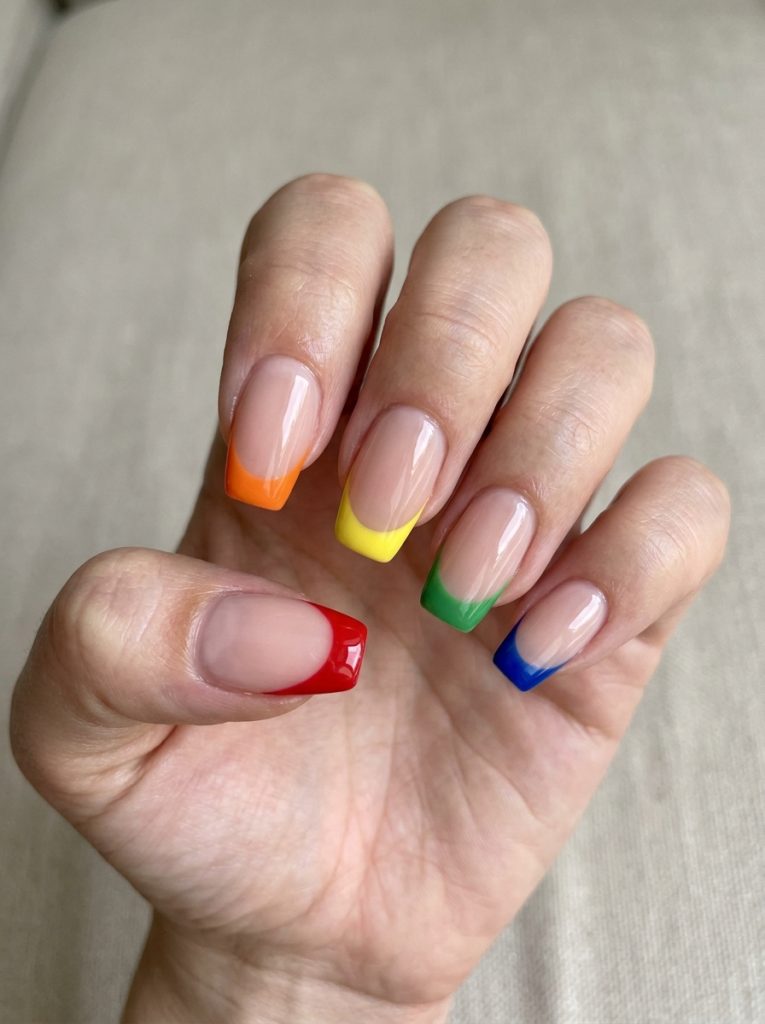
13. Bright Skittle French Tips
Nail Styling Advice
I’ll be upfront — this one is fully chaotic and I love it unironically. The skittle method means each nail gets a different color on the French tip. You keep the natural or sheer base consistent, but the tips go rogue: one red, one orange, one yellow, one green, one blue. Or you pick a more curated palette. Either way, it’s maximalist spring energy and I am completely on board.
The thing that keeps it from looking messy is the consistent base and the consistent application method. All the tips should have the same curve, same thickness, same finish. When those elements are uniform, you can throw five different colors on the tips and it still looks intentional.
Works on any length and pretty much any shape — square and coffin shapes give the most surface area on the tip, which lets the colors really pop. This design is also surprisingly forgiving if you’re doing it at home.
How to Create This Nail Look
Step-by-Step
Apply a sheer or natural-tone base gel and cure. Choose five different bright gel shades — one per nail. Using a thin nail art brush or a striping brush, paint the French tip on each nail in a different color, keeping the curve consistent across all nails. Cure each tip. Seal with glossy top coat.
Tools: Sheer base, five bright gel shades, striping or fine nail art brush, glossy top coat Skill level: Beginner — this is actually one of the more achievable statement nail looks
Occasions to Wear
Music festivals, birthday celebrations, summer kickoff events, casual weekends, or any day you want your nails to match your most chaotic, joyful energy. Also incredible paired with a white or neutral outfit.
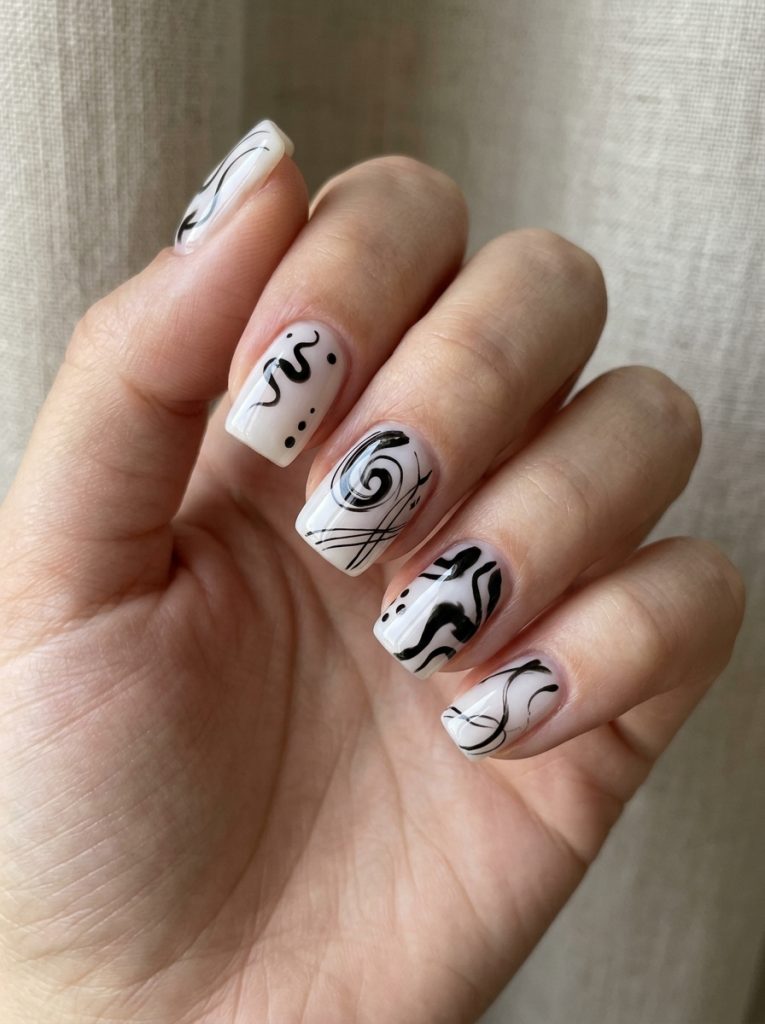
14. Abstract Black and White Nails
Nail Styling Advice
For anyone who genuinely doesn’t want color — and I mean that sincerely, not as a compromise — this is the most interesting non-color option of the season. Abstract black swirls over a sheer white or milky base. Graphic, clean, and surprisingly editorial for something that only uses two shades.
I’ve done this on clients who come in saying “I just want something simple” and leave with something that looks like nail art from a fashion week backstage. The abstract nature of the swirls means there’s no perfect template — every set looks slightly different, which actually makes it feel more personal and artsy.
Square and coffin shapes hit different with this design. The geometric, graphic quality of the black line work feels at home on a flatter, more angular nail. Any skin tone can carry this — it’s essentially a neutral with the personality of a statement nail.
How to Create This Nail Look
Step-by-Step
Apply two coats of sheer milky white gel and cure. Using a striping brush dipped in black gel, draw loose swirling lines across each nail — don’t plan too much, just let the brush move naturally. Some nails can have more coverage, others just a single swirl for balance. The variation is intentional. Cure and seal with glossy top coat.
Tools: Milky white gel, black gel, striping brush, glossy top coat Skill level: Beginner to intermediate — the less you try to control the swirl, the better it looks
Occasions to Wear
Everyday wear, work (where appropriate), casual events, editorial or creative environments, weekend outings — this design is extremely versatile because it pairs well with nearly any outfit. It’s also a great option for people who want something interesting in their nails without committing to color.
15. Swirly Green Nails
Nail Styling Advice
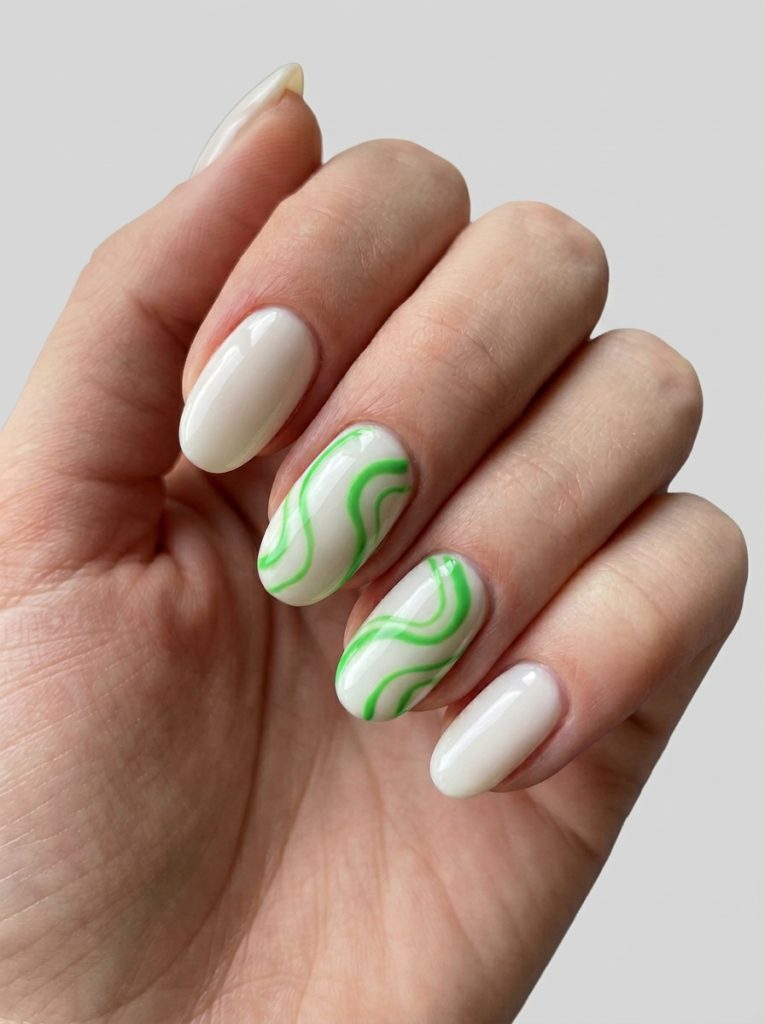
There’s something about bright green nails in May that just makes sense on a biological level. Everything outside is green, the energy is green, and your nails should absolutely be green too. But not just solid green — that’s too easy. The version I keep coming back to is a milky base with bright green swirl accents on select nails, creating this soft-meets-bold contrast that’s genuinely hard to pull off with any other color combination.
I did this on a client with medium-length oval nails ahead of a garden party, and she messaged me three days later saying strangers were complimenting them. The key is keeping the milky base very clean and opaque — it needs to be the quiet counterpoint to how energetic the green swirls are. If both elements are competing for attention, the whole thing reads as chaotic rather than considered.
This works best on oval and almond shapes. For deeper skin tones, push the green toward a more electric, saturated shade. Lighter skin tones can go for a slightly more muted or sage-toned green and still get the full effect.
How to Create This Nail Look
Step-by-Step
Apply two to three coats of opaque milky white gel, curing between each. On your accent nails — typically the ring finger and maybe the thumb — use a striping brush dipped in bright green gel to draw loose, flowing swirl shapes. Don’t trace a perfect circle; let the line move and curve freely. Add a few smaller swirl details on one or two other nails for cohesion. Cure and seal with high-gloss top coat.
Tools: Milky white gel, bright green gel, striping brush, glossy top coat, LED lamp Skill level: Beginner to intermediate — the swirls are forgiving because imperfect lines look intentionally artistic
Occasions to Wear
Garden parties, spring picnics, outdoor weddings as a guest, casual Fridays, or any May weekend situation where you want something fresh and fun. Also pairs beautifully with a white linen set or a floral dress — the green echoes nature without trying too hard.
16. Hot Pink with Freehand Line Work
Nail Styling Advice
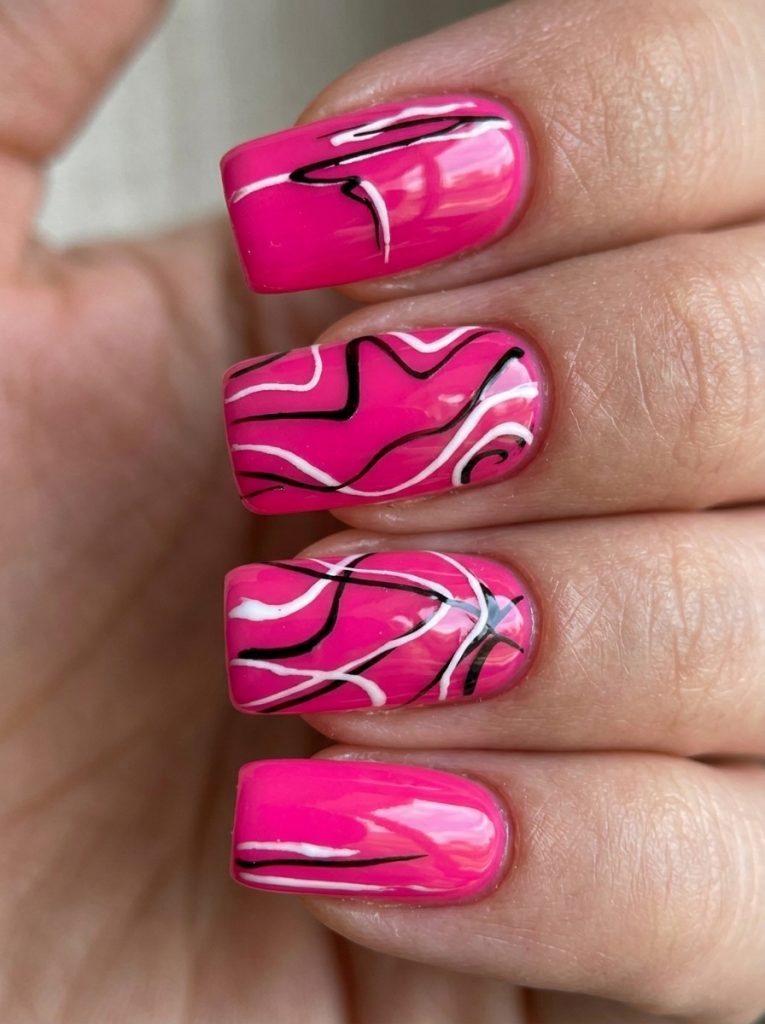
I’ll be real — I was a little skeptical about hot pink nails in May. I always associate them more with July energy. But the freehand line work version completely changed my mind. There’s something about those random, imperfect lines drawn over a punchy hot pink base that makes the whole set feel editorial rather than basic.
One thing I noticed immediately when I started doing this: the line work needs to be confident. Hesitant, wobbly lines look like mistakes. Fast, fluid lines look intentional. It’s the same motion either way — but the speed and pressure change everything about how it reads. I tell clients attempting this at home: practice the stroke on paper first, then nail it (pun intended) on the actual nail.
This look is shape-flexible. Square nails give it a more graphic, structured feel. Almond makes it feel softer and more wearable. Hot pink is universally flattering — it’s one of those rare shades that genuinely suits every skin tone, though deeper skin tones get an especially stunning contrast.
How to Create This Nail Look
Step-by-Step
Apply two to three even coats of hot pink gel and cure. Using a thin striping brush dipped in white or black gel, draw random lines across the nails — horizontal, diagonal, curved, varying thickness. There’s no pattern to follow; the randomness is the point. Vary how many lines you put on each nail so they don’t all look identical. Cure and seal with glossy top coat.
Tools: Hot pink gel, white or black gel for lines, striping brush, glossy top coat Skill level: Beginner — this is a great home nail look because the “imperfect” quality is built into the design
Occasions to Wear
Everyday wear, casual weekends, birthday nights out, summer kickoff parties, music events, or any occasion where the fits are getting louder and your nails need to keep up.
17. Cat Eye Pink with Rhinestones
Nail Styling Advice
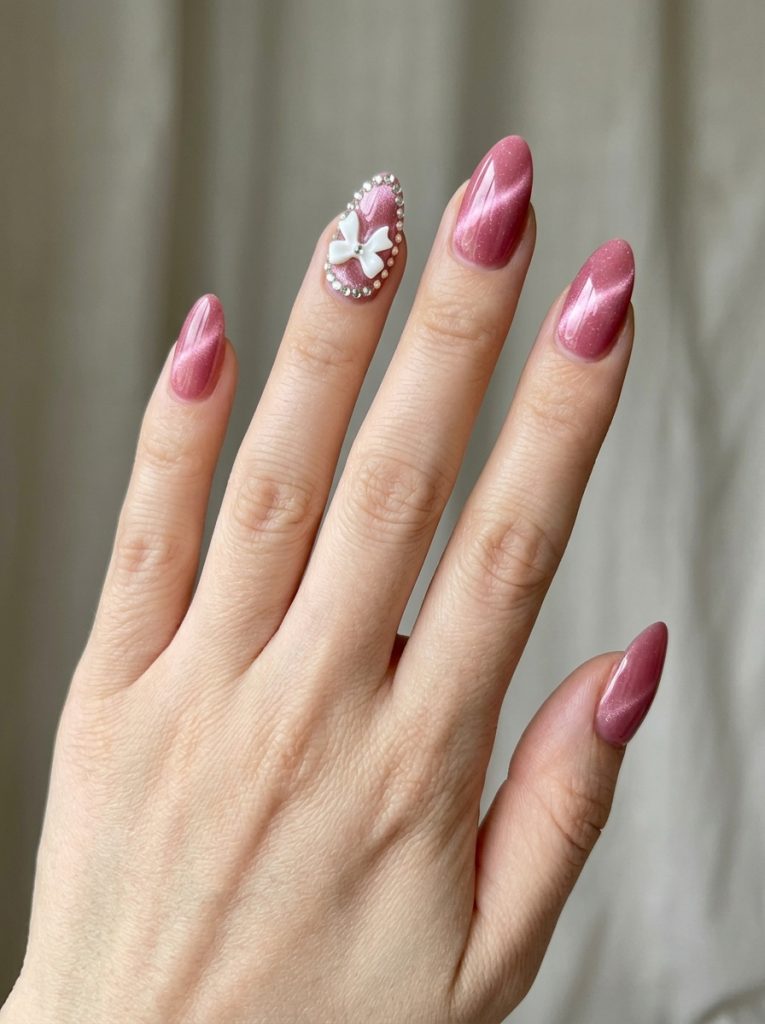
Cat eye gel is one of those techniques that looks incredibly complex but is genuinely straightforward once you understand the magnet. The pink version — especially a rosy, slightly warm pink cat eye — feels tailor-made for May. It has that spring shimmer quality but with serious depth, like there’s movement happening inside the nail.
Loading it up with bows and rhinestones pushes it into full soft-glam territory, which is exactly where May nail aesthetics are living right now. I’ve done this on clients heading to engagement parties, spring date nights, and bridal showers — and it photographs like a dream every single time.
Almond and stiletto shapes are my top recommendations here. The elongated shape lets the cat eye shift in light more dramatically, which is kind of the whole point. Rhinestones should be placed sparingly — one accent nail fully loaded, others with just one or two stones so it doesn’t feel overwhelming.
How to Create This Nail Look
Step-by-Step
Apply pink cat eye gel and immediately hold a cat eye magnet close to the nail surface for 10-15 seconds to draw the magnetic particles into a line — this creates the characteristic shifting shimmer. Cure. Repeat on all nails. On one or two accent nails, press small rhinestones into a thin layer of uncured gel and cure to set. Add tiny bow nail art stickers or hand-painted bows using white gel and a fine brush on accent nails. Seal with glossy top coat, being careful not to dislodge rhinestones.
Tools: Pink cat eye gel, cat eye magnet, rhinestones, nail art tweezers, bow stickers or white gel, fine brush, glossy top coat Skill level: Intermediate — the magnet technique is specific but quick to learn
Occasions to Wear
Bridal showers, engagement parties, Valentine’s-adjacent spring events, date nights, birthday dinners — anything soft and romantic. This set says “I put thought into this” without saying “I tried too hard.”
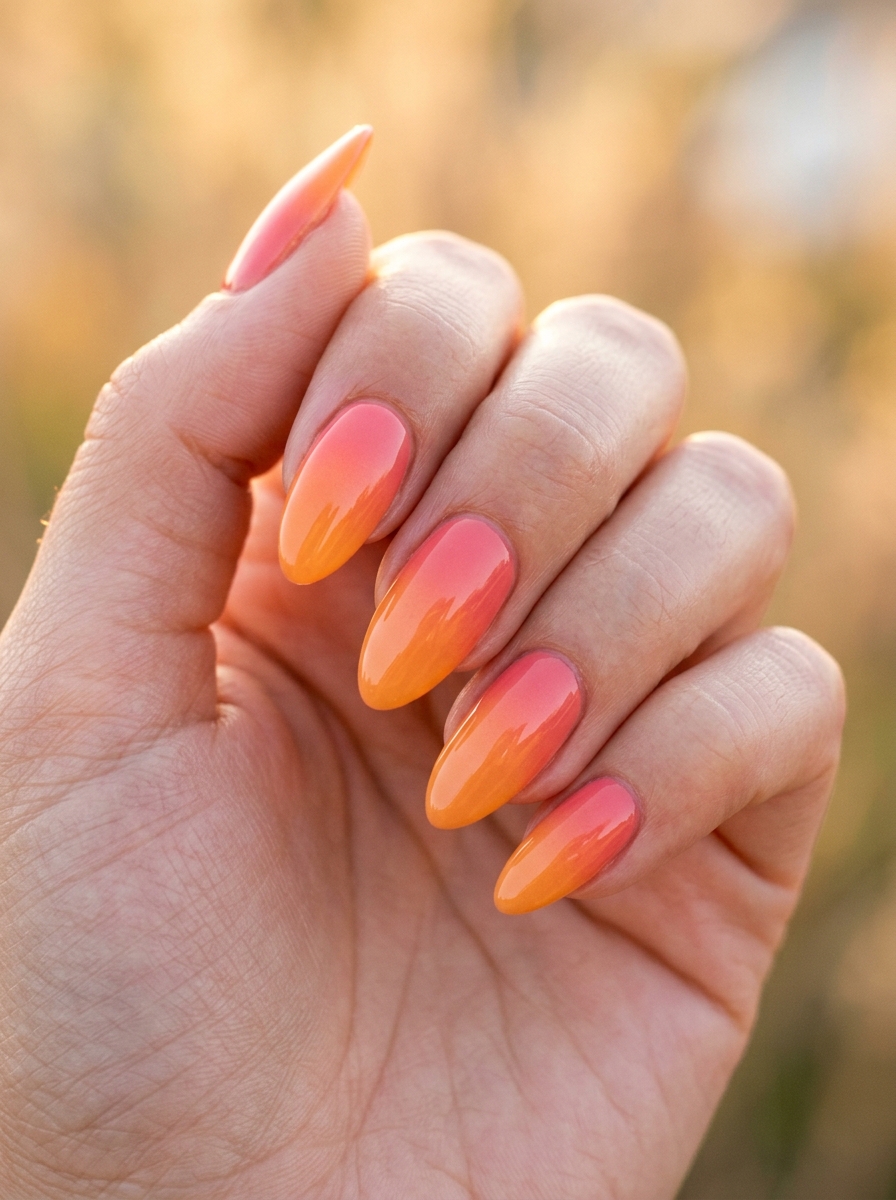
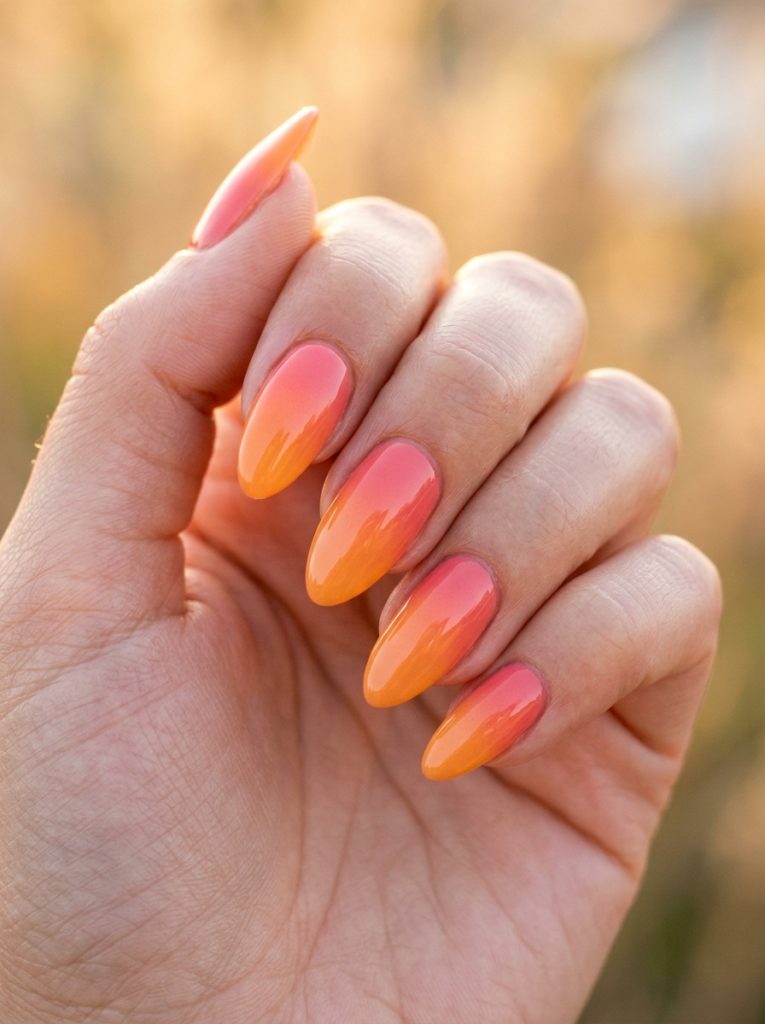
18. Sunset Ombré Nails
Nail Styling Advice
Pink bleeding into orange is one of the most genuinely beautiful color combinations in nature — and it translates onto nails in a way that makes people stop and stare. I’ve done sunset ombré sets more times than I can count, and every single client walks out looking at their hands differently. There’s something about wearing a literal sunset on your fingertips that just feels special.
The gradient should move from a warm coral-pink at the cuticle end to a deeper, more saturated orange toward the tip. The transition zone is where most people go wrong — trying to blend too fast or using shades that are too similar. You want visible gradient movement, not just one color that slightly shifts.
This works beautifully on all lengths but particularly shines on medium-to-long almond nails. The elongated shape gives the gradient more vertical space to breathe and transition. For warmer skin tones, add a golden shimmer to the orange end of the gradient — it picks up beautifully on golden undertones.
How to Create This Nail Look
Step-by-Step
Apply a sheer or warm nude base coat and cure. On a makeup sponge, paint a stripe of coral-pink gel and a stripe of warm orange gel side by side with a slight overlap. Dab the sponge onto the nail, positioning the pink toward the cuticle and orange toward the tip. Repeat several times for saturation, curing every two layers. Clean up edges with a brush dipped in acetone before final cure. Seal with glossy or slightly satin top coat.
Tools: Coral-pink gel, warm orange gel, makeup sponge, fine cleanup brush, acetone, glossy top coat Skill level: Intermediate — sponge ombré takes a few attempts to get the gradient clean, but it’s very learnable
Occasions to Wear
Evening events, outdoor dinners, summer-preview weekends, beach trips starting in May, casual everyday wear, or any occasion where you want your nails to match golden hour energy.
19. Emerald Green Drip Nails
Nail Styling Advice
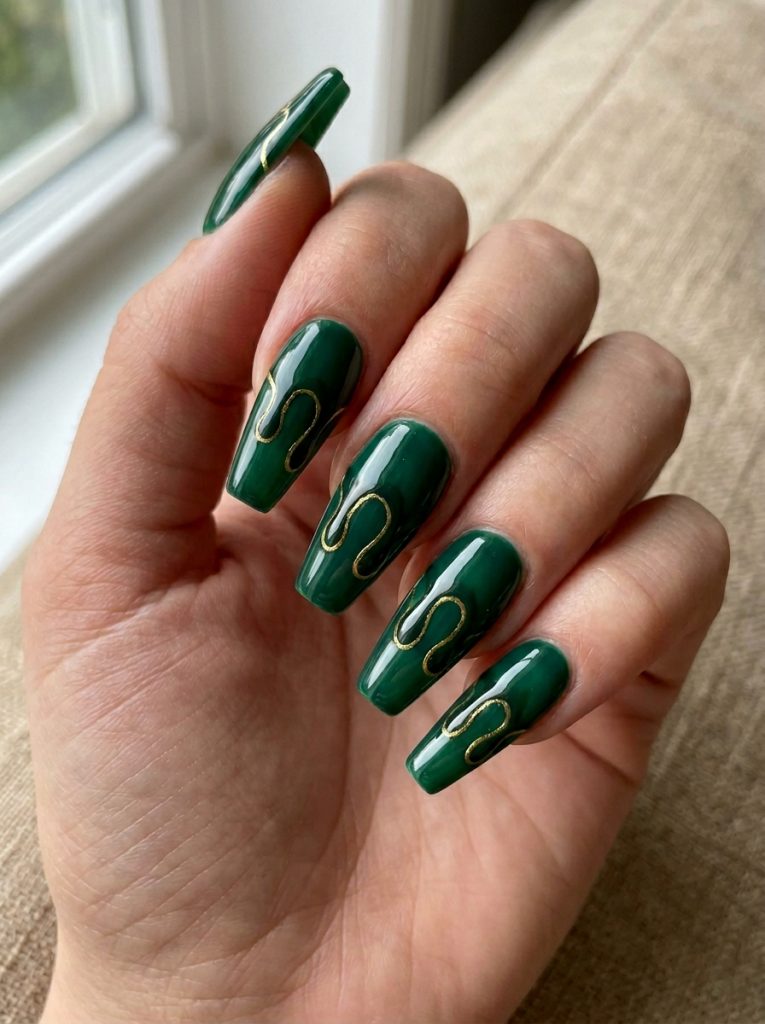
Emerald is the May birthstone, and I genuinely look forward to this design every year because it gives me an excuse to use one of the most luxurious nail colors in existence. But solid emerald is just the starting point — the drip art version, with gold outlining and a wet-paint effect along the edges, takes it somewhere that feels genuinely high-fashion.
I’ve done this mostly on coffin and square nails, and both shapes elevate the design differently. Coffin makes it feel more dramatic and editorial; square makes it feel more graphic and bold. The gold outline detail is optional but it adds a jewelry-like quality that I think is worth the extra few minutes.
One mistake to avoid: going too thin with the green. You need full opacity for emerald to read as the rich, deep shade it should be. Three coats minimum.
For skin tones: emerald is one of those universally flattering shades that somehow works on absolutely everyone. Deeper skin tones get a stunning jewel-toned contrast; lighter skin tones get something that feels very elevated and dramatic.
How to Create This Nail Look
Step-by-Step
Apply three coats of deep emerald green gel, curing between each. While the final coat is still slightly soft, use a fine brush and a deeper green or black gel to create drip-like shapes along the free edge — thin at the top, slightly wider at the bottom, like paint dripping off the tip. Cure. Using a thin striping brush and gold gel, trace a thin outline along the inner edge of the drip shapes. Cure and seal with glossy top coat.
Tools: Emerald green gel, black or deep green gel, gold gel, fine nail art brush, striping brush, glossy top coat Skill level: Intermediate — the drip shapes are simple once you commit to the stroke
Occasions to Wear
May birthday celebrations (especially for Taurus or Gemini birthdays), evening events, cocktail parties, graduation dinners, or any occasion where you want to wear something bold that still feels sophisticated rather than just loud.
20. Celestial French Nails
Nail Styling Advice
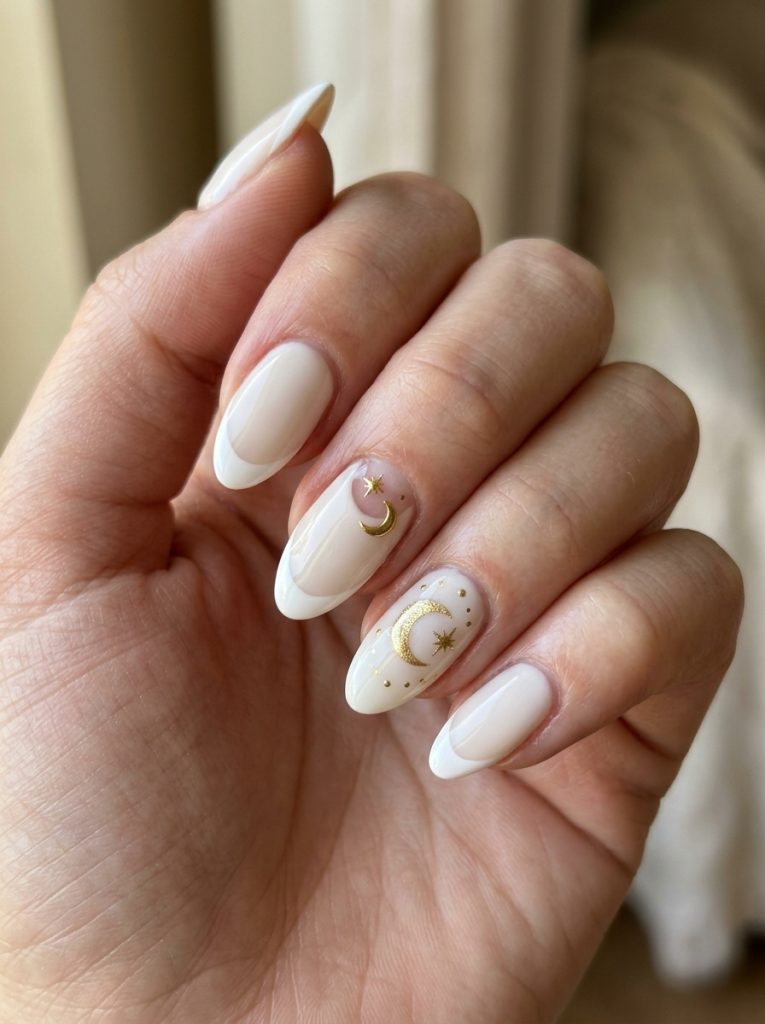
Celestial nails are non-negotiable in 2026 — that’s just a fact at this point. And the French tip version, done in a warm off-white or vanilla shade with gold star and moon accents, is one of the most wearable interpretations of the trend I’ve found. It doesn’t feel costume-y. It feels like a French mani that went to an art museum and came back inspired.
The cut-out detail — where the natural nail shows through a shaped gap near the base — adds a modern edge that keeps this from feeling too sweet or too simple. It’s a small detail but it genuinely changes the whole feeling of the design.
I’ve done this on clients with medium-length almond and oval nails, and both shapes suit it perfectly. The rounded tip echoes the celestial, moon-adjacent aesthetic in a way that square shapes don’t quite achieve. For anyone who loves a more understated nail but still wants something special, this is the one I’d recommend every time.
How to Create This Nail Look
Step-by-Step
Apply a sheer or nude natural-tone base and cure. Paint off-white or vanilla French tips using a fine brush, creating a clean smile line. Cure. Using a thin detail brush and gold gel, draw tiny star shapes — five small lines meeting at a center point — on two or three accent nails. Add a small crescent moon on one nail. Optionally, leave a curved cut-out near the cuticle area on the accent nails where the base shows through. Seal with glossy top coat.
Tools: Sheer nude base, off-white or vanilla gel, gold gel, fine detail brush, glossy top coat Skill level: Beginner to intermediate — the stars are simple line drawings, and the crescent is just a curved stroke
Occasions to Wear
Everyday wear, graduation season, spring evenings, date nights, or any event where you want something elegant and a little dreamy. This nail design has a timeless quality that works from May all the way through summer.
21. Fruity Nails with Blue French Tips
Nail Styling Advice
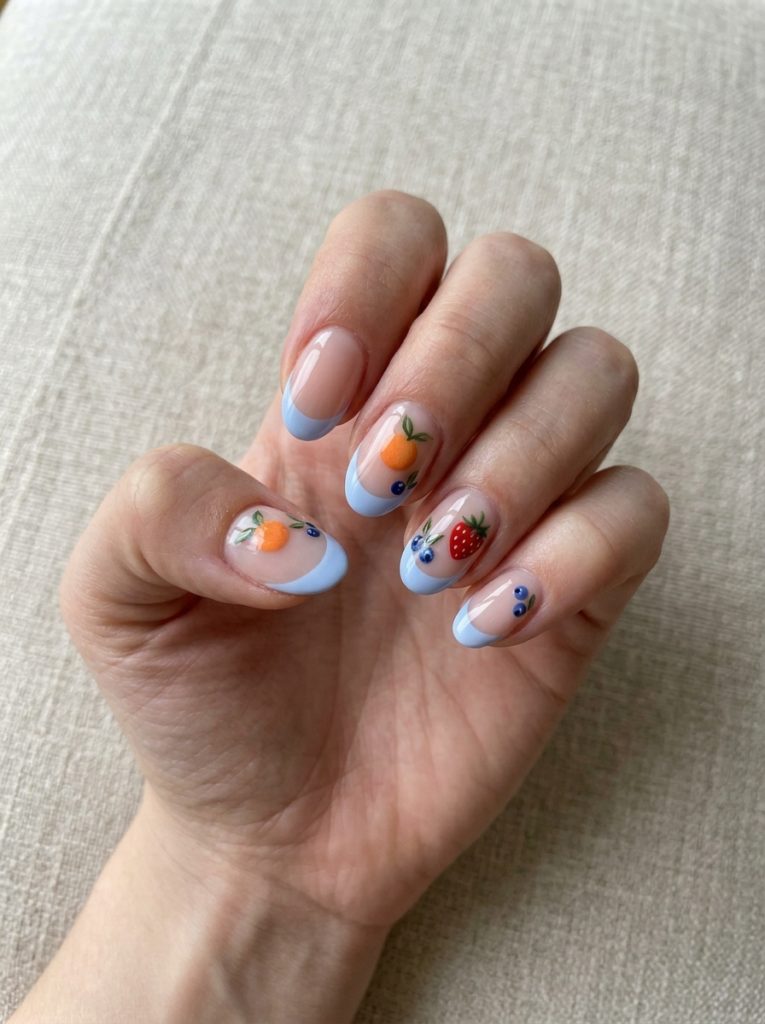
Fruit nails have been cycling in and out of trend for a couple of years now, and every time they come back they come back slightly more refined than before. The version I’m loving right now pairs a sheer base with soft blue French tips — which gives the whole set a cool, fresh backdrop — and then adds tiny hand-painted or charm-based fruit details on accent nails.
Strawberries, oranges, small blueberries — whatever the nail tech (or your own hand) can fit. The fruit art doesn’t need to be hyper-realistic. Slightly cartoonish and simple actually looks cuter and more intentional for this aesthetic.
I tried this nail set on myself before pitching it to clients and genuinely got compliments from three separate people within the first day of wearing it. There’s something about the combination of cool blue tips and warm fruit colors that creates a really perfect visual balance.
Any length works, but I prefer short to medium here — the fruit details can get lost on very long nails if they’re not scaled up. Squoval or oval shapes suit the playful nature of this design.
How to Create This Nail Look
Step-by-Step
Apply a sheer or barely-there natural base and cure. Paint blue French tips using a fine brush — a soft, slightly muted blue rather than electric blue works better here as a backdrop for the fruit colors. Cure. On one or two accent nails, use fine nail art brushes and red, orange, and yellow gel to paint tiny fruit shapes: a small strawberry (red teardrop with tiny yellow seed dots and a green leaf), a round orange with a thin orange-peel texture line, small round blueberries in clusters. Cure and seal with glossy top coat.
Tools: Sheer base, soft blue gel, red, orange, yellow, and green gel, fine nail art brush, dotting tool, glossy top coat Skill level: Intermediate — the fruit art is fiddly but not as complicated as it looks
Occasions to Wear
Casual everyday wear, spring picnics, outdoor events, kids’ birthday parties if you’re attending one, beach days starting in late May, or anywhere you want your nails to bring a little joy into someone’s day.
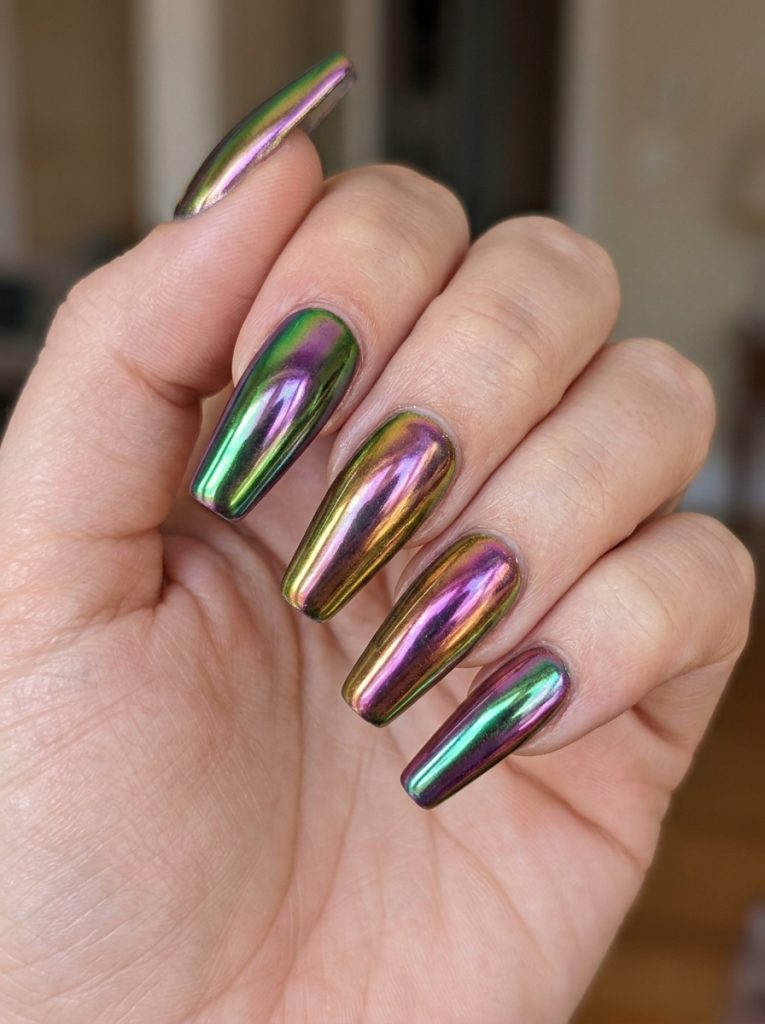
22. Rainbow Chrome Coffin Nails
Nail Styling Advice
Rainbow chrome is one of those designs where the photos genuinely don’t do it justice — you have to see it shift in real light to understand why people lose their minds over it. Every angle gives a different color. One moment it’s green, shift your hand and it’s purple, tilt again and it’s gold. It’s basically a mood ring on your fingertips and I mean that as the highest possible compliment.
The coffin shape is my absolute first choice for this design. The flat surface of the tip maximizes the chrome reflection area, so the color shift is more dramatic and visible. Long coffin nails make this look runway-ready; medium coffin keeps it wearable for everyday.
This is one of the few designs where I’d say the technique matters more than the color, because the chrome powder does all the work. Your base coat needs to be perfectly smooth with zero streaks or texture — any imperfection in the base will show through the chrome.
How to Create This Nail Look
Step-by-Step
Apply a white or holographic silver gel base — this maximizes the rainbow effect of the chrome powder. Three even coats, curing between each. Apply a no-wipe top coat and do NOT cure it. Immediately rub rainbow chrome powder onto the tacky surface using a felt or silicone applicator in circular motions until the full chrome effect appears across the nail. Cure. Seal with a no-wipe top coat and cure again.
Tools: White or silver gel base, rainbow chrome powder, felt or silicone applicator, no-wipe top coat, LED lamp Skill level: Intermediate — the chrome technique is consistent once you learn the motion; the main challenge is getting a streak-free base
Occasions to Wear
Festival season, birthday nights out, graduation parties, summer preview events, or any occasion where you want your nails to literally change color as you move your hands. These are conversation-starter nails in the best possible way.
23. Moody Navy Floral Nails
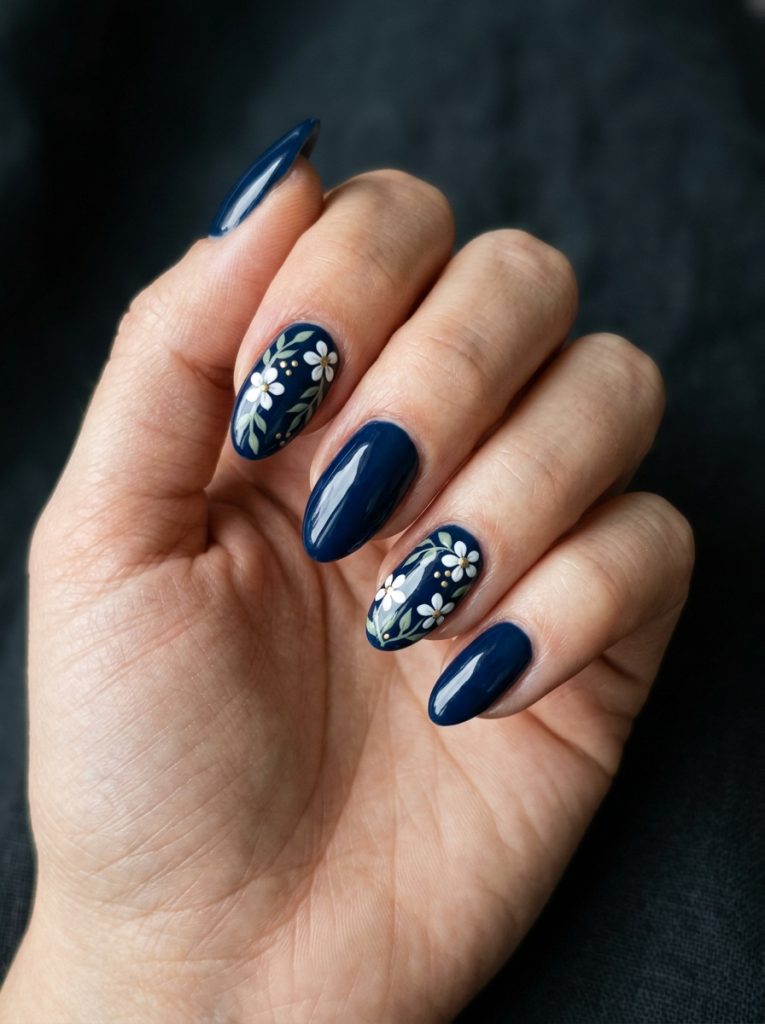
Nail Styling Advice
For anyone who is genuinely allergic to pastels — I see you, I respect you, and this is your May nail. Moody navy with hand-painted florals sounds counterintuitive for spring, but the result is this lush, almost botanical dark-garden aesthetic that feels completely seasonal without being predictably soft.
The florals need to be painted in lighter, more delicate shades against the dark base — white, pale pink, sage green — so they read clearly without getting lost in the navy. The contrast between a deep, inky base and small, fine-line florals creates something that feels elevated and considered.
I’ve done this most often on medium-to-long almond nails, and the elongated shape gives the florals room to spread across the nail bed in a way that feels intentional rather than cramped. On shorter nails, keep the floral detail to one or two accent nails so it doesn’t feel cluttered.
For skin tones: navy on deeper skin tones is absolutely spectacular — the contrast is rich and the florals really pop. Lighter skin tones get a more dramatic, high-contrast result that photographs beautifully.
How to Create This Nail Look
Step-by-Step
Apply two to three coats of deep navy gel, curing between each for full opacity. Using a fine nail art brush and white gel, paint small floral shapes on accent nails — simple five-petal flowers with a tiny yellow or gold dot at the center. Add thin sage green leaf strokes around the flowers for organic detail. On non-accent nails, add one or two small scattered petals for cohesion. Seal with glossy top coat.
Tools: Deep navy gel, white gel, gold or yellow gel, sage green gel, fine nail art brush, dotting tool, glossy top coat Skill level: Intermediate — the dark base makes cleanup easier since mistakes are harder to see during painting
Occasions to Wear
This is a genuinely versatile design — it works for evening events, spring dinners, garden parties for the “anti-pastel” crowd, work environments, and even as a more dramatic Mother’s Day option for clients who lean darker in their aesthetic.
24. Matcha Green French Nails
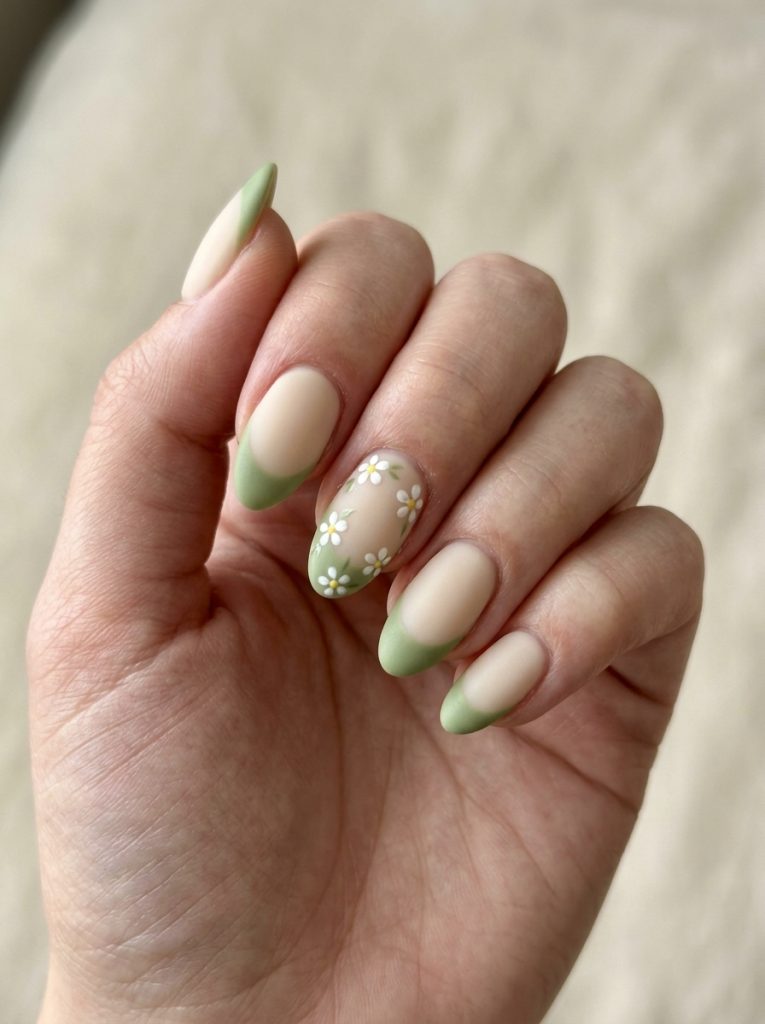
Nail Styling Advice
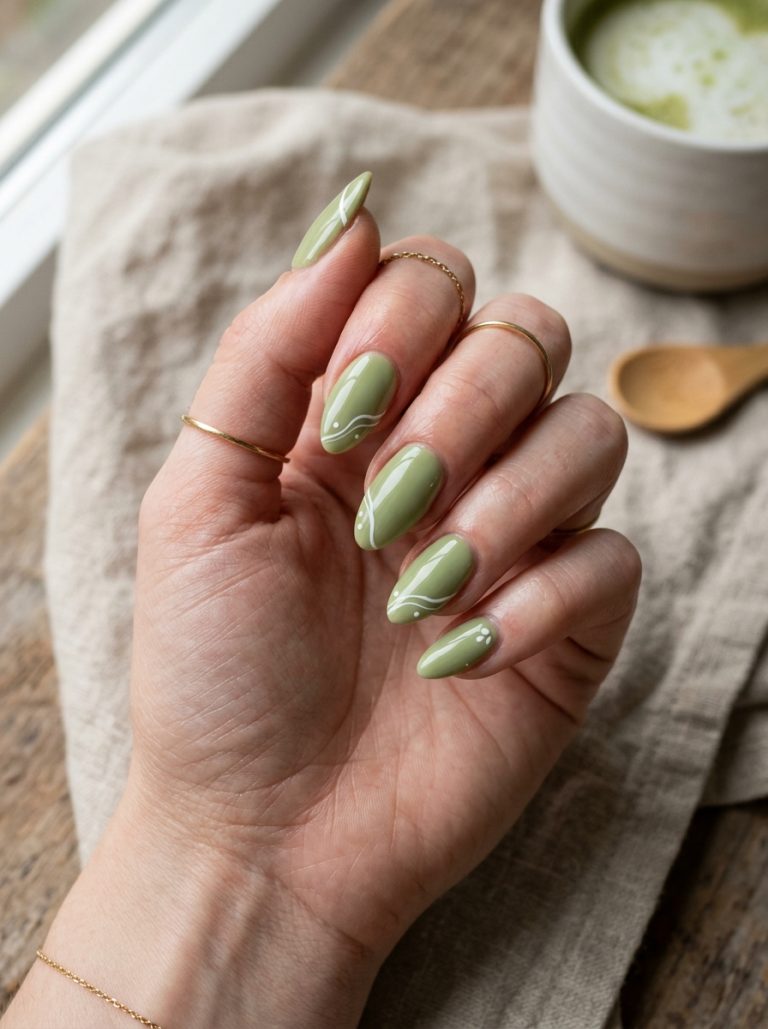
Matcha green had its breakout moment a couple of seasons ago and it has absolutely no intention of leaving. The French tip version — pointed matcha tips over a white or cream base — is one of the cleanest, most satisfying nail looks I’ve done this spring. It feels both trendy and timeless, which is genuinely rare.
The pointed tip style (where the French line comes to a slight V or arch at the center rather than a full curved smile line) gives it a slightly edgier, more fashion-forward feel without committing to full stiletto nails. I’ve done this on medium oval and almond shapes and it works perfectly on both.
One thing I love about matcha on nails: it photographs incredibly well across all lighting conditions. Natural light makes it look fresh and earthy. Artificial light gives it a slightly more yellow-green warmth that’s equally flattering.
Tiny flower accents in white or cream on one accent nail are the finishing touch that ties the whole look together — it softens the edge of the pointed tips and brings in that spring botanical reference.
How to Create This Nail Look
Step-by-Step
Apply a white or cream gel base and cure. Using a fine nail art brush and matcha green gel, paint the French tips — arch them slightly to a soft point at the center rather than a full curved smile line. Cure. On one accent nail, add two or three tiny five-petal flowers in white gel using a fine brush and a dotting tool for the centers. Seal with satin or glossy top coat.
Tools: White or cream gel base, matcha green gel, fine nail art brush, dotting tool, satin or glossy top coat Skill level: Beginner — the pointed French tip is actually easier to execute than a perfect curved smile line
Occasions to Wear
Everyday wear, casual work environments, café dates, spring walks, any low-key May occasion. This is also a great nail for people who want to try a colored French without going too bold — matcha reads as a “sophisticated” departure from standard white or pink.
25. Red Power Nails with Gold Accents
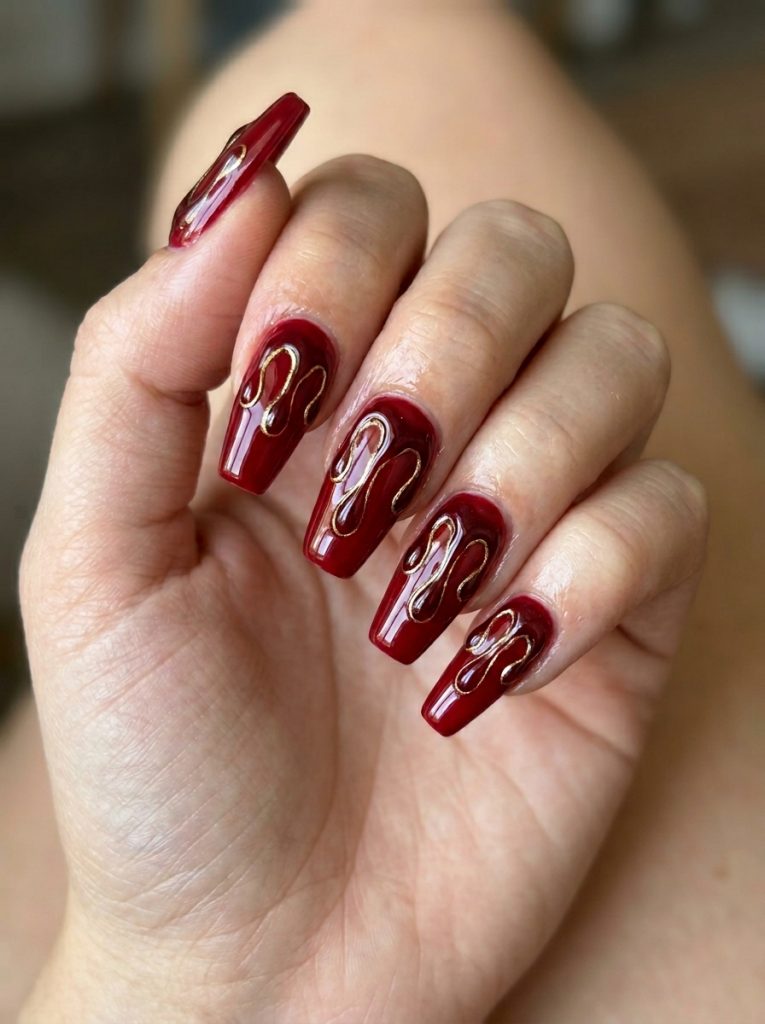
Nail Styling Advice
Red nails never fully go out of style, but the way we wear them in May 2026 is a little different from classic red. The drip-effect French tip version — where sculpted red tips have outline accents in gold — feels genuinely cinematic. I’ve described it to clients as “your nails, but they graduated with honors and started a fashion brand.”
This is where it gets tricky: the drip effect needs to be deliberate. It should look like intentional art, not like your red polish slipped. The key is keeping the drips in varying heights — some longer, some barely there — so it reads as a design choice rather than an accident.
Coffin and square are the shapes I recommend here. The flat surface of the tip gives the drip shapes a clean backdrop to read against. Any skin tone suits red — it’s one of the most universally flattering nail colors in existence. The gold outlines add a richness that pushes it toward true statement territory.
How to Create This Nail Look
Step-by-Step
Apply two to three coats of deep true red gel for full opacity, curing between each. On all or selected nails, use a fine brush and slightly darker red or burgundy gel to paint drip shapes down from the tip — thin elongated teardrop shapes of varying lengths. Cure. Trace the inner edge of each drip shape with a thin gold gel stripe using a striping brush. Cure and seal with high-gloss top coat.
Tools: Deep red gel, burgundy or dark red gel, gold gel, fine nail art brush, striping brush, high-gloss top coat Skill level: Intermediate — the drip outlines require a steady hand, but the shapes are simple once you commit
Occasions to Wear
Power meetings, graduation ceremonies (bold guest look), evening events, birthday dinners, date nights, Memorial Day gatherings — basically any occasion where you want to walk in and immediately be taken seriously while also being the most stylish person in the room.
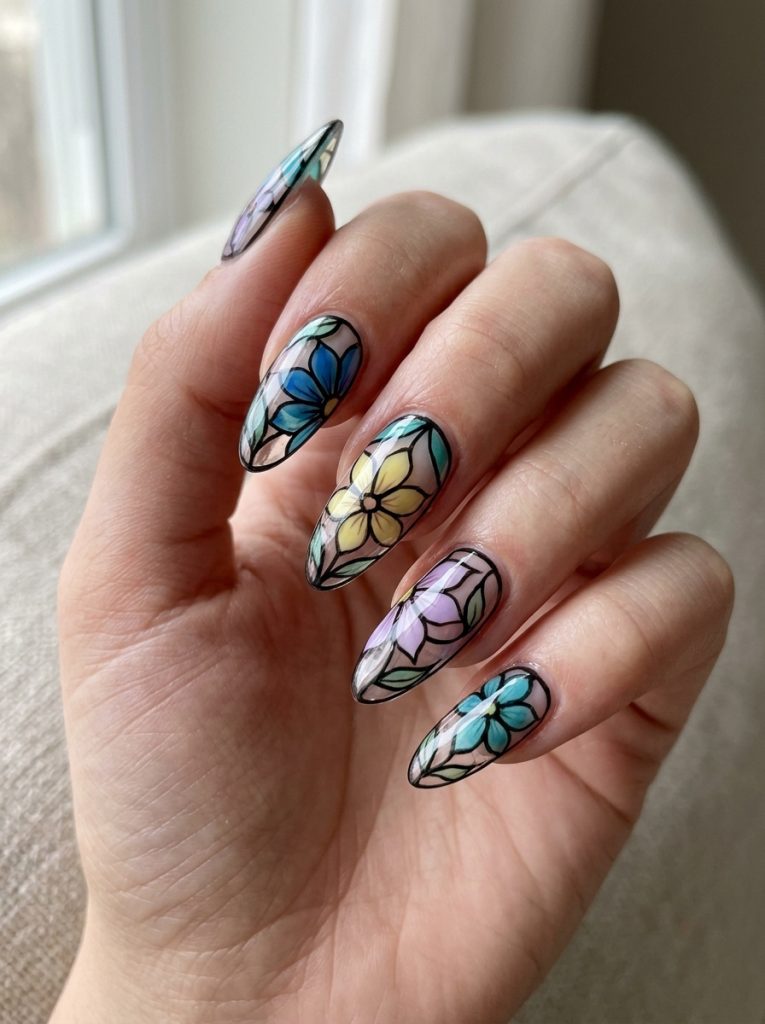
26. Stained Glass Floral Nails
Nail Styling Advice
If there’s one design from this entire list that surprises people most when they see it in person, it’s this one. Stained glass nails look like something you’d see in a museum window, not on someone’s fingertips — and that’s exactly why they work so beautifully.
The technique involves painting colored “panes” on a clear or translucent base, then outlining each pane with a thin black line — mimicking the lead came in actual stained glass. For a floral version, each pane forms part of a larger flower shape: blue and teal petals separated by thin black outlines, a warm yellow center, with the clear base creating that backlit glass effect.
I’ve done this on long almond and stiletto nails, which really sell the “window” illusion. The translucent base is essential — if you use an opaque base, you lose the light-catching quality that makes the whole design work. It’s one of the more time-intensive designs I do, but the result genuinely looks like wearable art.
How to Create This Nail Look
Step-by-Step
Apply a clear gel base — no color — and cure. Using a fine brush and translucent colored gel (blue, teal, soft yellow, light purple), paint sections of petal shapes on the nail, leaving thin gaps between each section. Cure. Take a thin striping brush and black gel to trace over every gap between the colored sections, creating the “lead line” effect. Add a warm yellow center section. Cure and seal with glossy top coat to maximize the light-refracting effect.
Tools: Clear gel base, translucent colored gels in multiple shades, black gel, fine nail art brush, striping brush, high-gloss top coat Skill level: Advanced — requires patience and planning, but the segmented structure actually guides you through the design
Occasions to Wear
Any special occasion where your nails will be noticed and admired up close: spring weddings, bridal showers, engagement parties, birthday celebrations, or a graduation where you want to arrive in full statement mode.
27. Neutral Jelly Nails
Nail Styling Advice
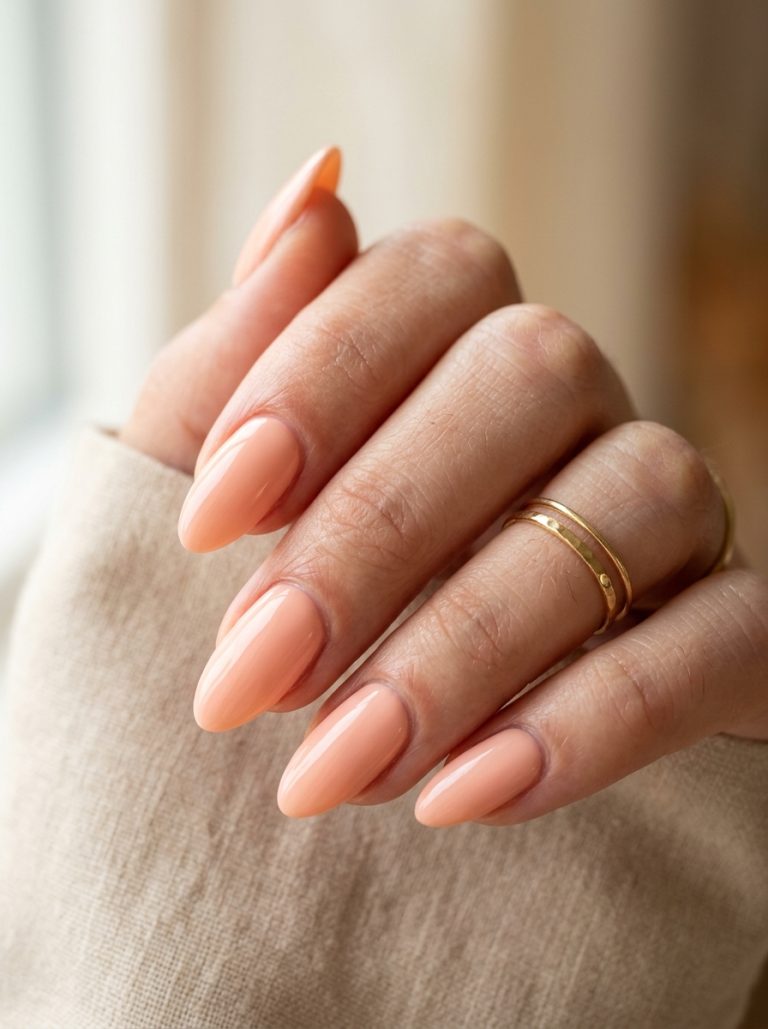
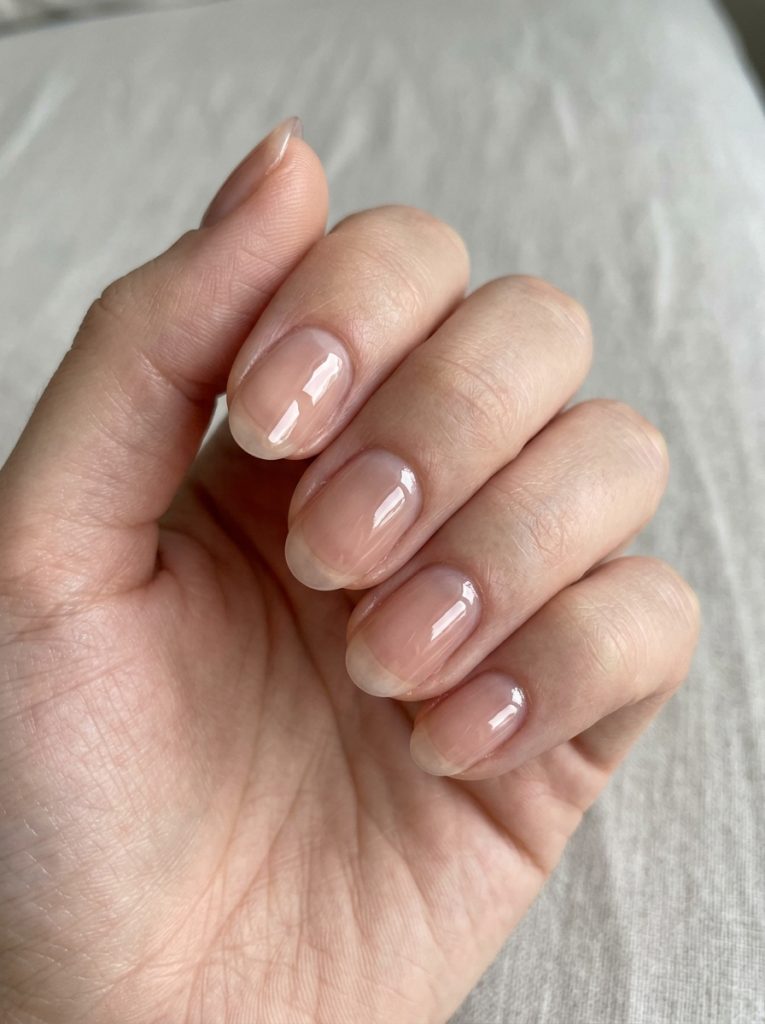
Not everyone wants nail art. Not everyone wants color. And not everyone wants to explain their nails to people all month. For that client — and I have many of them — jelly nails are the answer. A sheer, glossy, slightly translucent neutral that lets your natural nail show through in a way that looks intentional and polished rather than bare.
The key word is “extra glossy.” Jelly nails live and die by their finish. A mediocre top coat will make them look unfinished. The right top coat makes them look like your nails are made of the world’s most beautiful glass.
I’ve been doing this on short to medium length nails mostly — jelly nails suit shorter lengths in a way that longer nails sometimes don’t, because the transparency reads more elegantly when the nail bed isn’t too extended. Square and oval shapes both work perfectly. For skin tones: cooler-toned clients should opt for a slightly pink-tinted jelly; warmer skin tones suit a beige or greige translucent shade.
How to Create This Nail Look
Step-by-Step
Choose a sheer jelly gel in nude, blush, or greige — it should be buildable but never fully opaque. Apply three thin coats, curing between each; the slight transparency is intentional. The natural nail should still be faintly visible through the gel. Finish with an ultra-glossy top coat — this is non-negotiable for jelly nails. Apply two layers of top coat if needed for that deep, wet-glass shine.
Tools: Sheer jelly gel in nude or blush, high-gloss top coat (two layers) Skill level: Beginner — this is one of the most achievable home gel looks if you have a LED lamp
Occasions to Wear
Literally every occasion. Work, casual weekend, events, travel, graduation, Mother’s Day — jelly nails are the one design I’d recommend to someone who wants to look put-together without any maintenance anxiety. They also grow out beautifully, which is a practical consideration that I think about more than most people realize.
28. Lilac Dream with Wildflowers
Nail Styling Advice
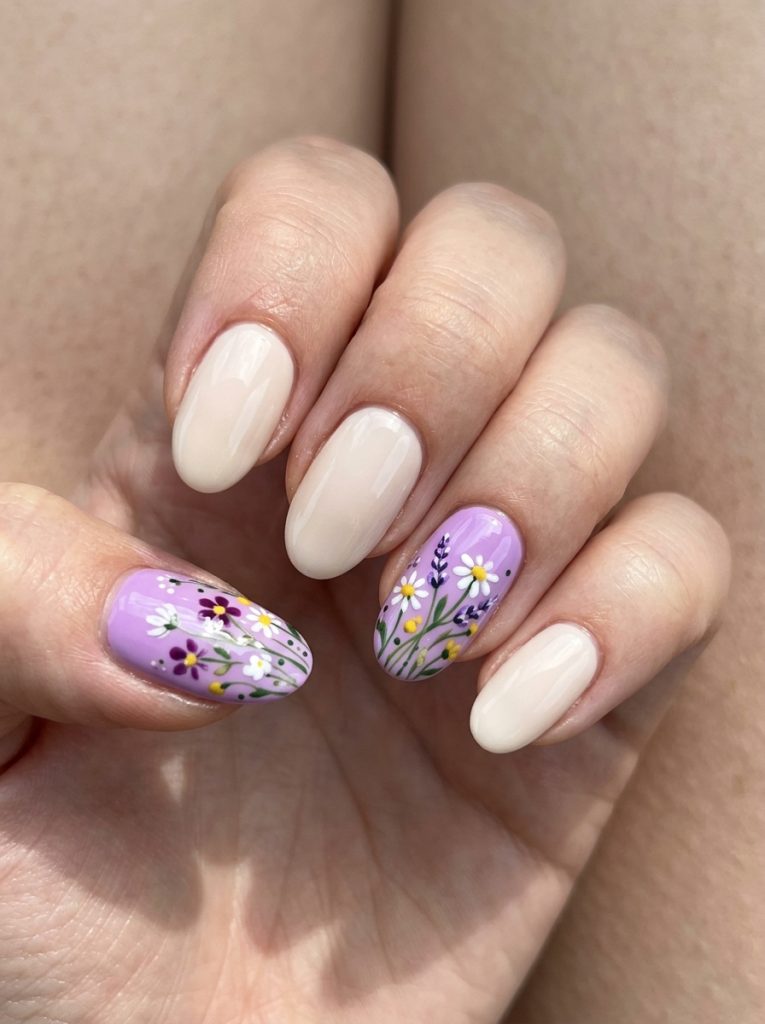
Lilac is the color I keep reaching for when a client doesn’t know what they want but says something like “pretty but not pink.” It’s feminine without being expected, soft without being boring, and wildflower nail art is its perfect companion.
The wildflower version I love most uses a neutral or cream base on most nails with bright lilac accent nails, and then scatters hand-painted wildflowers — the kind that look slightly loose and organic rather than perfectly symmetrical — across the lilac sections. It’s a design that looks like you found it pressed inside a book.
This works beautifully on short and medium nails. Longer nails can carry it but I’d scale the flowers up slightly so they don’t look like specs. Oval and round shapes suit the organic, botanical nature of the design; square shapes give it a slightly more graphic, structured interpretation.
Cooler undertones absolutely glow with true lilac. Warmer undertones should push toward a warmer lavender that doesn’t clash with their natural warmth.
How to Create This Nail Look
Step-by-Step
Apply a warm cream or natural gel on three nails and cure. Apply bright lilac gel on the accent nails (ring finger and thumb typically) in two to three coats, curing between each. On the lilac nails, use a fine brush to paint small organic wildflower shapes in white, deep purple, and tiny yellow — varying the flower sizes and types for that “picked from a field” quality. Add thin green stem strokes between flowers. Cure and seal with glossy top coat.
Tools: Cream gel, lilac gel, white gel, deep purple gel, yellow gel, green gel, fine nail art brush, glossy top coat Skill level: Intermediate — the wildflowers are intentionally imperfect, which makes them surprisingly achievable
Occasions to Wear
Mother’s Day (this one is a top contender), spring weddings as a guest, daytime events, countryside or outdoor settings, picnics, garden parties, or any May occasion that calls for something that feels both pretty and effortless.
Nail Care Tips Worth Knowing
Before you commit to any of these looks, a couple of things I always tell my clients: prep is everything. If your natural nail is dry or peeling, no amount of beautiful gel on top is going to keep it looking fresh past the first week. Hydrate with cuticle oil daily — not just when you remember, actually daily.
For anyone doing press-ons at home: file the surface of your natural nail lightly before applying. It creates grip. And always size properly — a slightly too-small press-on looks worse than you’d think, and a slightly too-large one lifts faster.
If you want your gel manicure to last through the full May into June stretch, avoid soaking your hands in hot water for extended periods in the first 24 hours after your appointment. It sounds minor but it makes a real difference in adhesion.
A Closing Note from a Nail Artist
May is genuinely the month I look forward to most behind the nail desk. The designs are more fun, clients come in with more references, and there’s a real energy around spring nails that I don’t experience at any other time of year.
If I had to pick just one set from everything here, I’d go back to the milky florals. Every single time. It’s soft without being forgettable, and it suits practically everyone who sits down in front of me. But the dark chrome navy is creeping up on it — that one has been surprising people this season in the best possible way.
Whatever you pick: go one step bolder than your instinct. May nails are meant to be noticed.