24+ June Nails That Will Make You Ditch Every Other Summer Mani
The June Nail Designs You’ll Actually Want to Wear This Summer
Okay, real talk — June is the month for nails. I don’t know what it is, maybe it’s the longer days or the fact that everyone suddenly has somewhere to be, but this is when people start actually caring about what’s on their fingertips. I’ve had more “can you do something fun for summer?” clients walk through the door in June than any other month. And I get it. You want something fresh, but you don’t want to show up to a barbecue with January nails.
This year is genuinely exciting. We’ve got milky sheer finishes sitting right next to dopamine brights, chrome French tips going viral every other week, fruit-core details everywhere, and jelly textures that I personally cannot stop recommending. I’ve been testing these looks on clients and on myself for weeks now. Some of them surprised me. A few of them I’m already obsessed with. Whether you’re going for something low-key or want a full maximalist moment, I’ve rounded up 24+ June nail ideas that are actually worth your time.
1. Iced French Nails
Nail Styling Advice
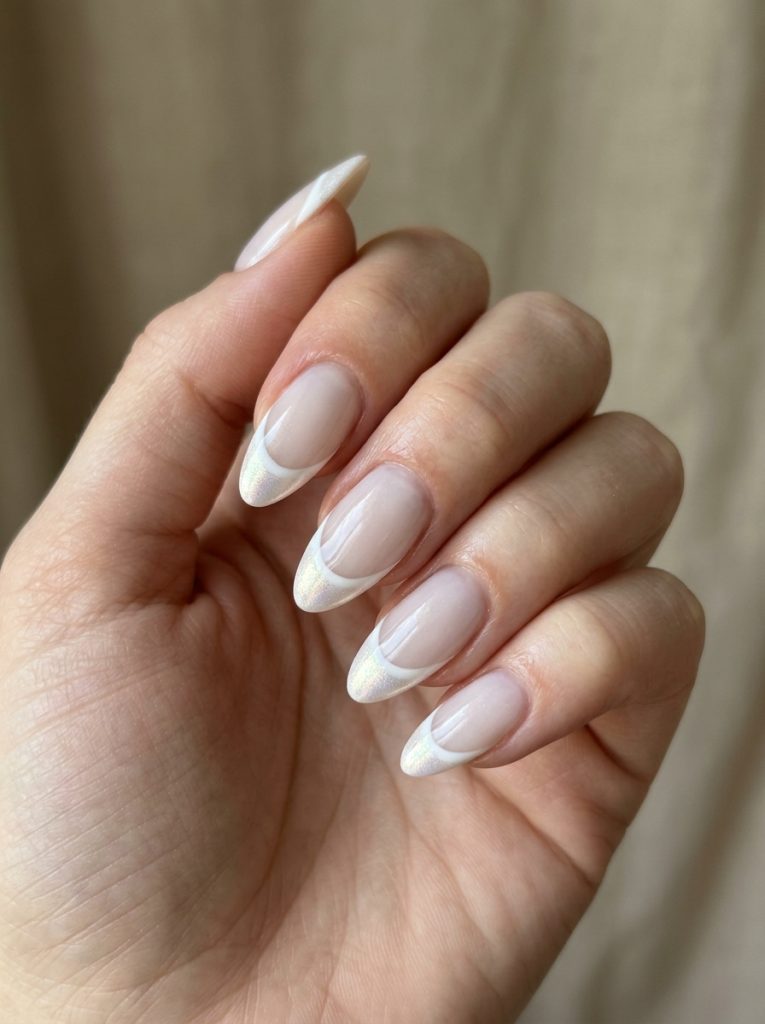
This is one of those designs I keep coming back to for clients who want something “elevated but not extra.” The iced French is basically a traditional French tip that got a glow-up — you’re working with a sheer milky base, clean white arcs, and then a dusting of reflective or pearl chrome over the tips. I’ve done this on almond, square, and micro-length nails and it works on all three. The chrome is what makes it feel 2025 instead of 2005. One thing I noticed: the lighter your base, the more that chrome pop shows up. If you go too opaque on the base, the iced effect loses its depth.
Skin tone-wise, this is genuinely flattering on everyone. The sheer base adapts. On deeper skin tones, I tend to push the white arcs a little bolder so they don’t disappear against the natural nail color.
How to Create This Nail Look
Step 1 — Prep: File and buff to your desired shape. Push back cuticles and apply a base coat.
Step 2 — Base: Apply one to two coats of a sheer milky white or translucent pink gel polish. Cure under LED lamp.
Step 3 — Tips: Using a thin nail art brush, paint clean white French arcs near the free edge. Cure fully.
Step 4 — Chrome: While the top coat is still tacky (before curing), rub pearl or reflective chrome powder over the tips using a sponge applicator or eyeshadow brush. Seal with a no-wipe gel top coat and cure.
Skill level: Intermediate. The chrome step is easy once you’ve done it once — it’s the clean arc that takes practice.
Occasions to Wear
This is my go-to recommendation for June weddings. It photographs beautifully, looks polished without being bridal-white traditional, and pairs with literally everything from a sundress to office wear. Also great for graduation parties and first-day-of-summer events.
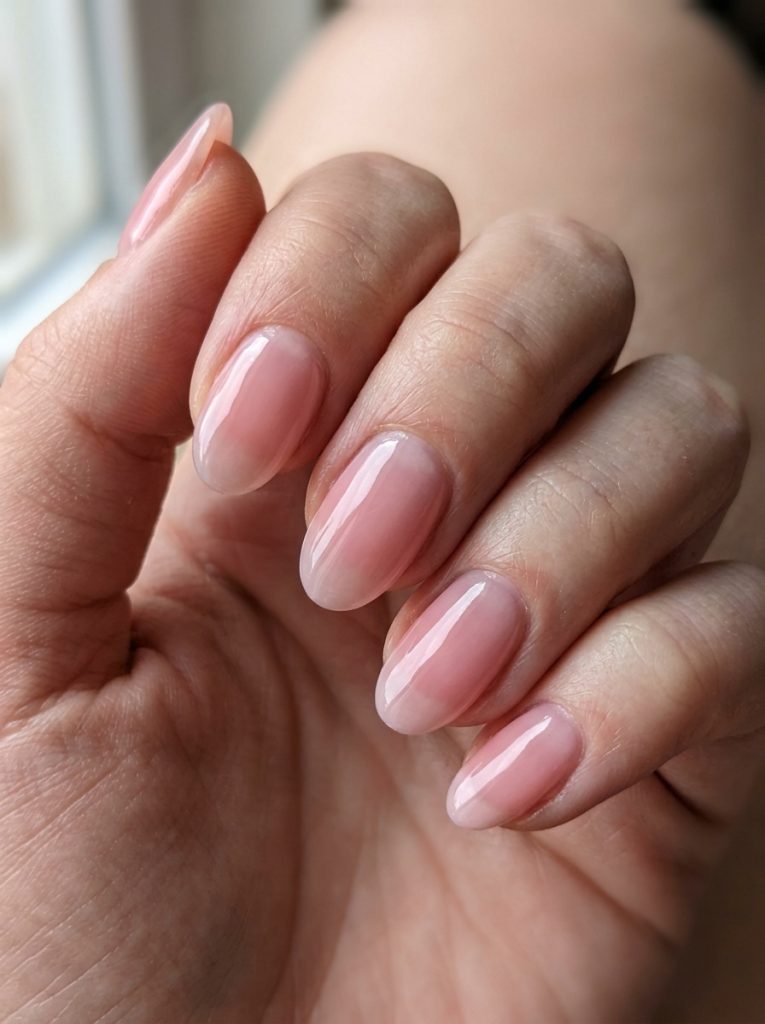
2. Strawberry Milk Nails
Nail Styling Advice
I’ve done this design on probably fifteen clients this month alone. The strawberry milk mani is deceptively simple — it’s one to two coats of a sheer soft pink that reads almost translucent, like your nails but rosier. The “milky” quality is the whole point. You don’t want full coverage. You want that soft, glassy, diffused look that makes your nails look like they’re lit from within.
What I love about this is how it scales. Wear it solo for the cleanest “my nails but better” look. Use it as a base for June French tips. Or take it further and blend it into a milky-white-to-pink frombre — which is the ice cream nail trend that’s everywhere right now and is genuinely adorable. On shorter nails especially, this finish makes the nails look longer and healthier. I won’t say it’s the most exciting design on this list, but it’s probably the most universally wearable.
How to Create This Nail Look
Step 1 — Prep: Clean and buff the nail surface to remove shine for better adhesion.
Step 2 — Base: Apply one thin coat of a sheer baby pink jelly gel. If you want it milkier, add a second coat. Don’t overdo it — the translucency is the whole aesthetic. Cure.
Step 3 — Finish: Cap with a high-shine glossy top coat. Cure fully.
Optional frombre upgrade: Apply sheer white at the base of the nail and blend toward pink at the tip while both are uncured, using a dry brush to feather the transition.
Skill level: Beginner-friendly. This is one of the easiest sets on this list.
Occasions to Wear
Genuinely works everywhere — brunch, the office, beach days, casual dates. I especially recommend it when someone needs a low-maintenance set that still looks intentional. It’s also the perfect “recovery” mani after a bold color if your nails need a visual break.
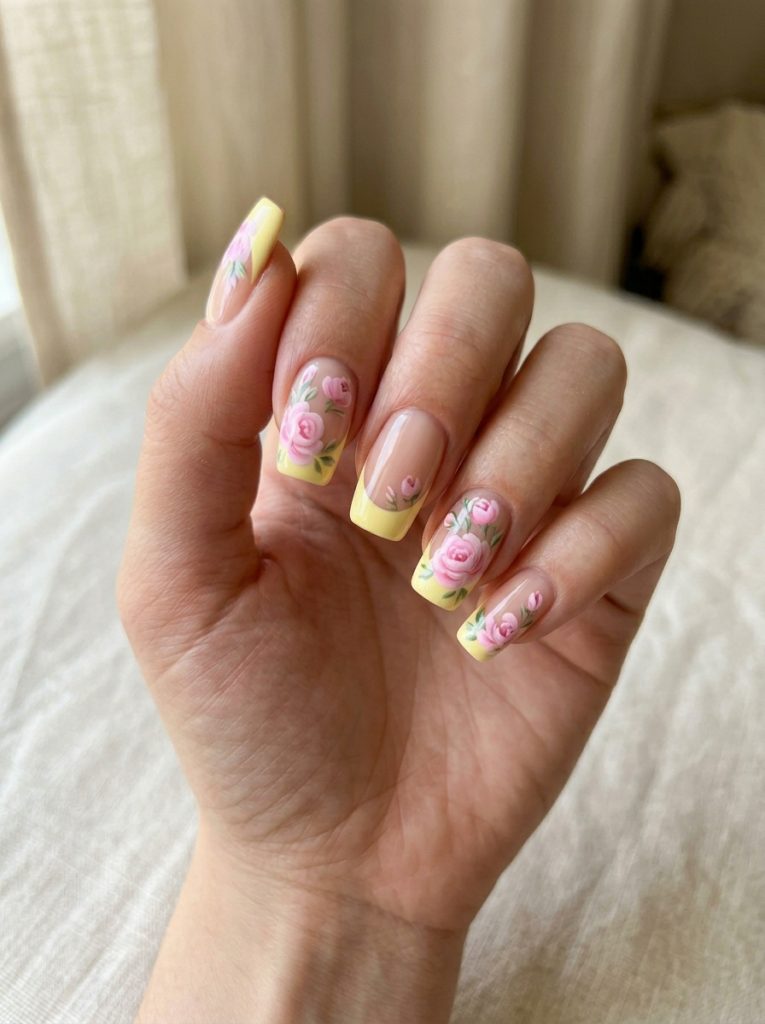
3. Butter Yellow French Tips With Florals
Nail Styling Advice
Butter yellow is the color of summer 2025 — I’ve seen it everywhere from runway looks to the H&M rack, and nail boards are completely saturated with it. The trendiest take right now is a pastel yellow French tip with oversized pink florals painted over the arc. It’s soft-girl coded in the best way.
This is where it gets tricky though — getting the yellow right matters. Too bright and it looks neon, too dull and it reads greenish. You want the warm, creamy butter tone. I had one client bring in a reference photo and we went through four swatches before landing on the right shade. Worth it. The pink florals on top (chunky and slightly imperfect, not tiny and precise) are what take this from “nice yellow nails” to “stop, where did you get those done?”
Best on medium-length almond or squoval shapes. On short nails the florals can feel crowded, so scale them down to one accent nail if needed.
How to Create This Nail Look
Step 1 — Base: Two coats of a creamy butter yellow gel. Cure between coats.
Step 2 — Tips: Using a thin nail art brush, apply white French arcs first, then layer pastel yellow on top while slightly wet to blend. Or skip the white and go directly with a slightly more opaque yellow on the tips.
Step 3 — Florals: Using a dotting tool or fine brush, paint oversized five-petal blooms in coral pink or hot pink over the tip area. Add a yellow or white center dot. Cure.
Step 4 — Top coat: Glossy finish, cured.
Skill level: Intermediate. The florals take a steady hand but they don’t need to be perfect — slightly loose petals actually look better.
Occasions to Wear
Perfect for outdoor events, garden parties, June birthday brunches. It pairs beautifully with white or floral sundresses and elevated summer fits. I tried this set on a client headed to a graduation garden party and it was genuinely perfect for the occasion.
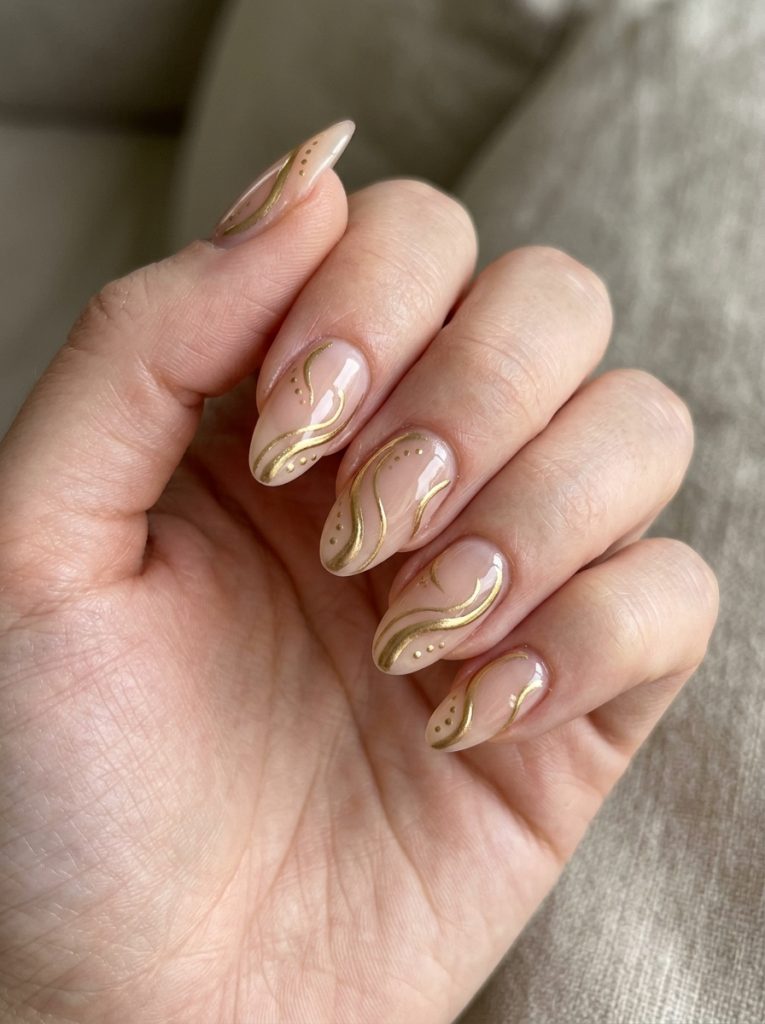
4. Gold Chrome Accent Nails
Nail Styling Advice
Full metallic sets feel a little heavy for June — but gold chrome accents? That’s a different conversation. This is where I float gold swoops, side arcs, or tiny micro-dots over a sheer neutral base, leaving negative space as part of the design. It’s the kind of mani that reads expensive without being loud about it.
I’ve been pairing this with peachy nudes for a warm, gilded look and with milky whites for a more luxurious, quiet-money aesthetic. The key is restraint. One or two clean gold elements per nail is the sweet spot — the moment you overload it, the elegance disappears.
Chrome powder gives a more mirror-like finish. Chrome nail polish gives a softer, more wearable result. I personally prefer powder for this design because the precision is better.
How to Create This Nail Look
Step 1 — Base: Two thin coats of a sheer nude or milky gel. Cure fully.
Step 2 — Gold detail: Using a fine nail art brush dipped in gold chrome powder (mixed with gel) or gold nail art gel, paint thin arcs, swoops, or floating curves near the sides or tips of each nail.
Step 3 — Dots (optional): Use a small dotting tool to add micro-dots near the cuticle or base of the arch.
Step 4 — Seal: Glossy top coat, cured.
Skill level: Intermediate. The lines need to be clean — take your time with the brush.
Occasions to Wear
This is my recommendation for anyone who says “I want something for work but still cute.” It’s professional enough for the office, elevated enough for after-work events or dinners. Also genuinely stunning for evening summer weddings.
5. Jelly Nails
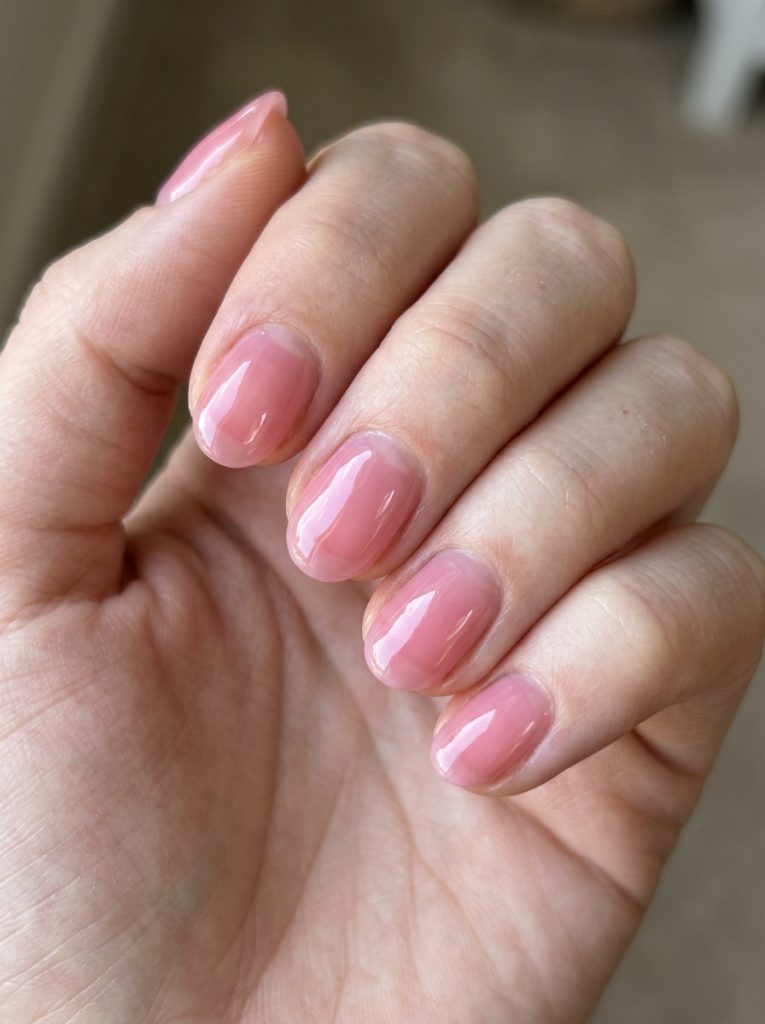
Nail Styling Advice
Jelly nails have been in my rotation since last year, but the 2025 version is elevated. The semi-sheer gel formula lets the free edge show through slightly, which gives that gummy-bear, candy-glass look. Light pink for a lip-gloss sheen. Hot pink for a candy-gloss moment. Both are having their day on Instagram and TikTok right now.
I find jelly formulas slightly annoying to work with because they’re thin — you often need three coats to get the right depth of color without losing the translucency. This is where patience matters. Build slowly. Rushing jelly gel = streaky, uneven result. But when it’s done right? It’s one of the most satisfying finishes to look at.
Works beautifully on short to medium oval or round shapes. Long nails in jelly can start to look a little overwhelming.
How to Create This Nail Look
Step 1 — Prep: Buff nails lightly and apply a clear base coat.
Step 2 — Jelly layers: Apply three thin coats of a jelly/sheer gel formula in your chosen color. Cure between each coat. The key is thin layers — thick coats bubble.
Step 3 — Finish: A super glossy top coat is non-negotiable here. It amplifies the glassy, candy-like quality. Cure.
Skill level: Beginner to intermediate. The technique is simple; the patience required is the challenge.
Occasions to Wear
Everyday wear, casual events, beach days, pool parties. I tried a hot pink jelly set before a summer festival last year and got more compliments on that than almost any other mani I’ve worn. It photographs incredibly in natural sunlight.
6. Hot Pink Gradient With Hibiscus Art
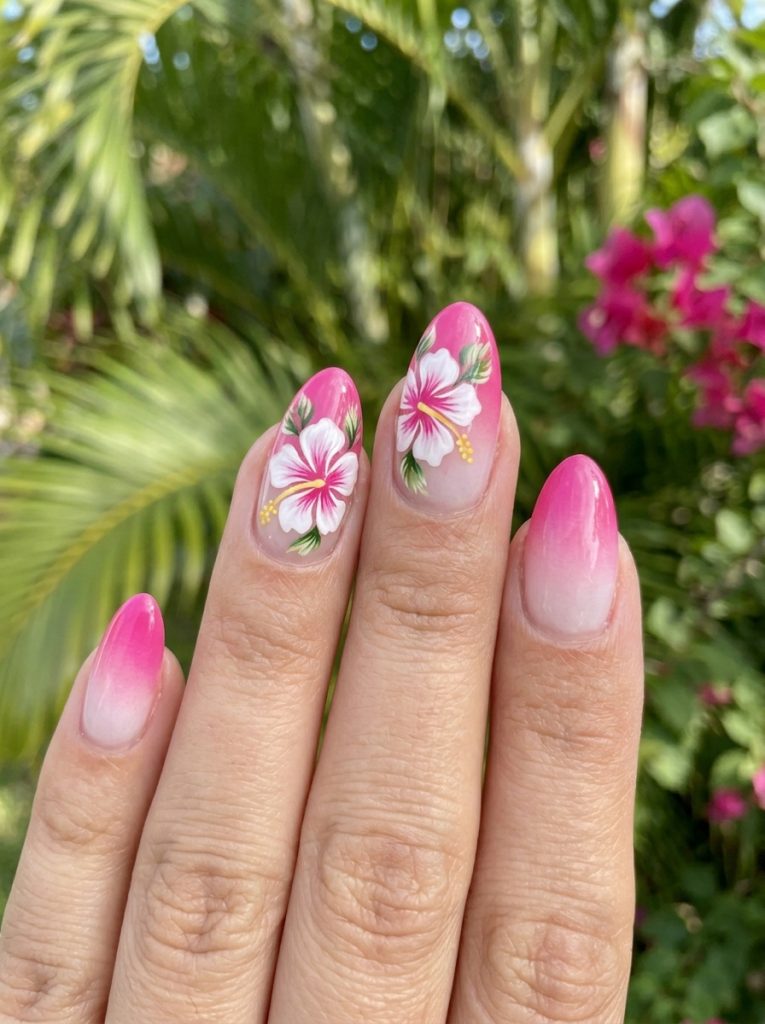
Nail Styling Advice
This one is for the people who want full tropical energy. A milky white base bleeds into electric hot pink at the tips, then white hibiscus flowers stamp across the accent nails. The gradient does the heavy lifting color-wise, and the florals keep it from feeling like a plain ombre.
I’ve noticed the white buffer between the milky base and the hot pink is what makes the design pop — without it, the colors can muddy at the blend point. One client was skeptical about the hibiscus (she’s usually a minimalist) and ended up texting me three days later saying she’d gotten stopped by strangers twice.
Best on medium to long almond or coffin. The hibiscus needs a little canvas to work with.
How to Create This Nail Look
Step 1 — Base: Sheer milky white on all nails, cured.
Step 2 — Gradient: Apply hot pink gel near the free edge and use a sponge or fan brush to blend upward into the milky base while uncured. The transition zone should feel soft. Cure.
Step 3 — Florals: On one or two accent nails, paint white hibiscus blooms using a fine brush. Add a hot pink center detail. Cure.
Step 4 — Top coat: Glossy, cured.
Skill level: Intermediate. The gradient blend takes a little trial and error.
Occasions to Wear
Vacation, beach resort, pool party, summer concert. If you’re going anywhere remotely tropical or sunny this June, this is your set.
7. Blue Chrome Nails
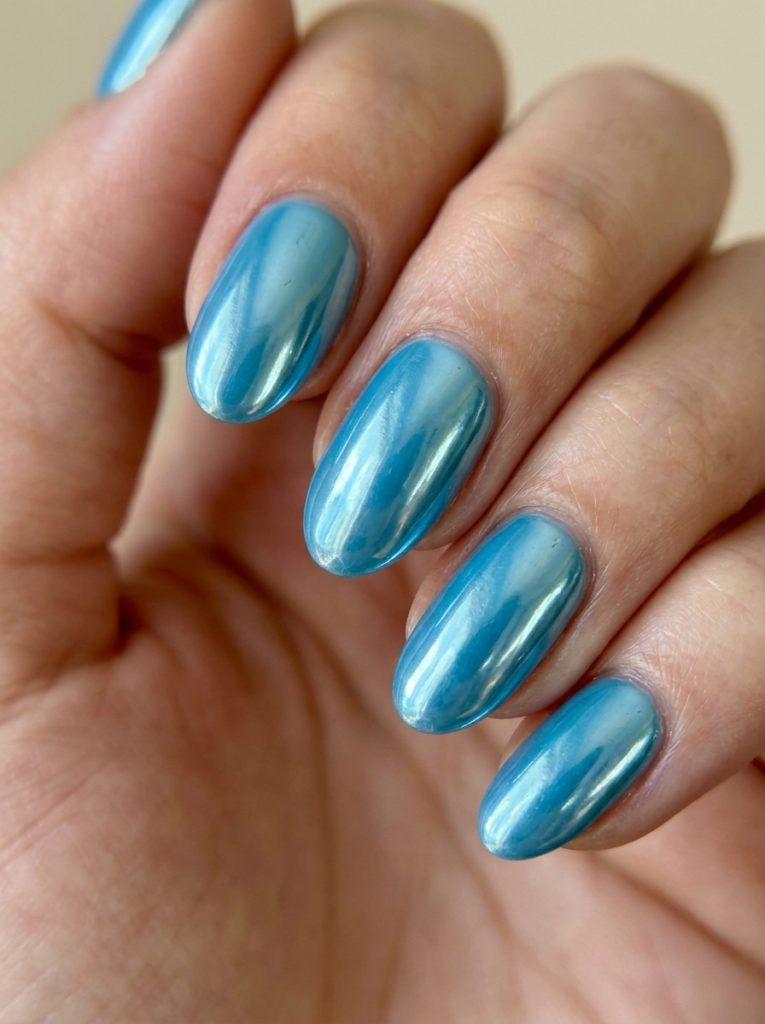
Nail Styling Advice
Blue already brings summer-sky and pool-float energy — give it a chrome finish and you’re in a whole different league. I’ve done mirror chrome for a full statement look and pearl chrome for a softer, mermaid-core effect. Both are on trend boards right now, and honestly both are incredible depending on the vibe you want.
Mirror chrome on blue is bold. I mean genuinely eye-catching. Pearl chrome on blue is more wearable for everyday situations. If someone tells me they want blue nails for June but they’re not sure how dramatic to go, I almost always suggest pearl chrome — it satisfies the trend without being intimidating.
Pairs amazingly with silver rings and literally every denim outfit you own. That’s not an exaggeration, I tested this combination repeatedly.
How to Create This Nail Look
Step 1 — Base: Two coats of a mid-tone blue gel (not too navy, not too pastel — a pool or sky blue works best). Cure.
Step 2 — Chrome: While a no-wipe top coat is still tacky, rub blue or silver chrome powder over all nails using a sponge applicator. Buff gently in circular motions for even coverage.
Step 3 — Seal: Apply a gel top coat and cure to lock the chrome in.
Skill level: Intermediate. Chrome powder application has a learning curve but it’s deeply satisfying once you nail it.
Occasions to Wear
Beach days, summer nights out, Pride Month events, any occasion where you want a head-turning but cohesive look. I wore a variation of this to a rooftop event and it was a full conversation starter.
8. Rainbow French Tips
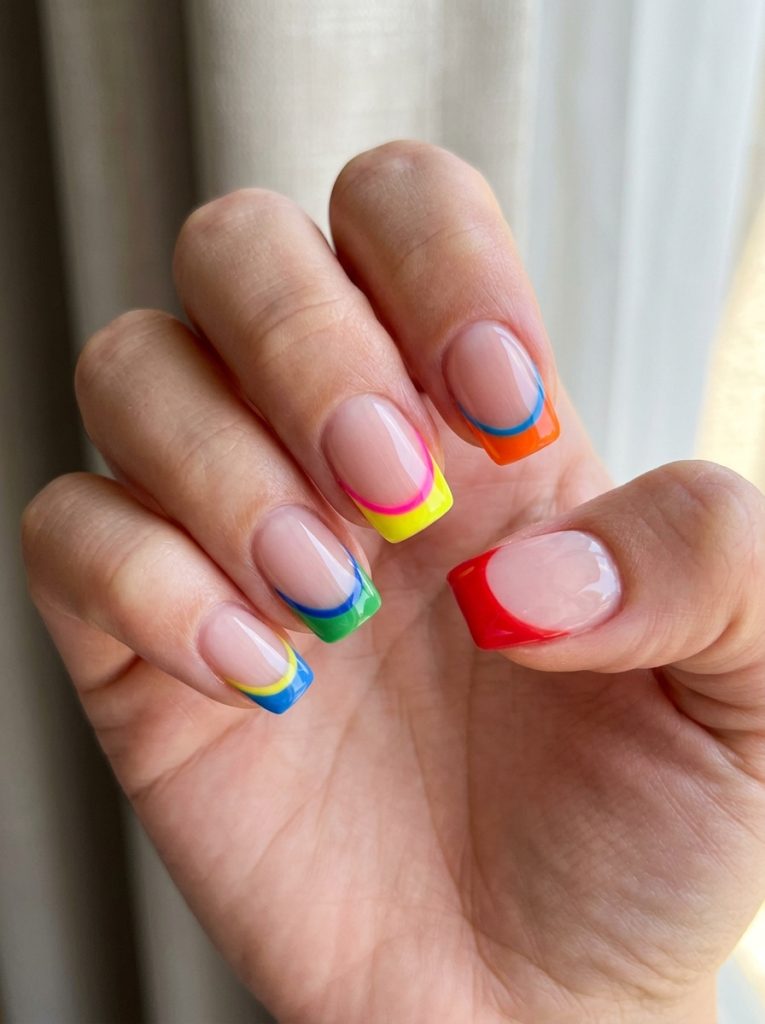
Nail Styling Advice
Pride Month falls in June, which means rainbow nails have a built-in excuse to be as extra as they want. The modern version of this isn’t a skittle set — it’s rainbow French tips, where each nail gets a different bold color arc, sometimes outlined with a deliberately clashing hue for extra drama.
I personally love this design because there’s creative freedom in it. No two sets look exactly the same. I’ve done red, orange, yellow, green, blue, and purple across six nails, and I’ve also done a tighter four-color version for shorter nail sets. The outlined tip variation — where you paint the arc in one color and outline it in a contrasting one — takes it from fun to genuinely artistic.
Works on any length. Short nails make the color pops feel punchy. Long nails give you more arc surface to play with.
How to Create This Nail Look
Step 1 — Base: One coat of sheer or nude gel across all nails. Cure.
Step 2 — Tips: Using a thin nail art brush, paint each nail’s French tip in a different rainbow color. Keep the arcs at a consistent depth.
Step 3 — Outline (optional but great): Once the tips are cured, use a contrasting color and a very fine liner brush to trace the outer edge of each arc. Cure.
Step 4 — Top coat: Glossy, cured.
Skill level: Intermediate. The arc consistency is what makes this look clean versus chaotic.
Occasions to Wear
Pride Month events, festivals, summer concerts, birthday parties. This is also a set that photographs brilliantly — if you have any June events you know you’ll be photographed at, this is a strong contender.
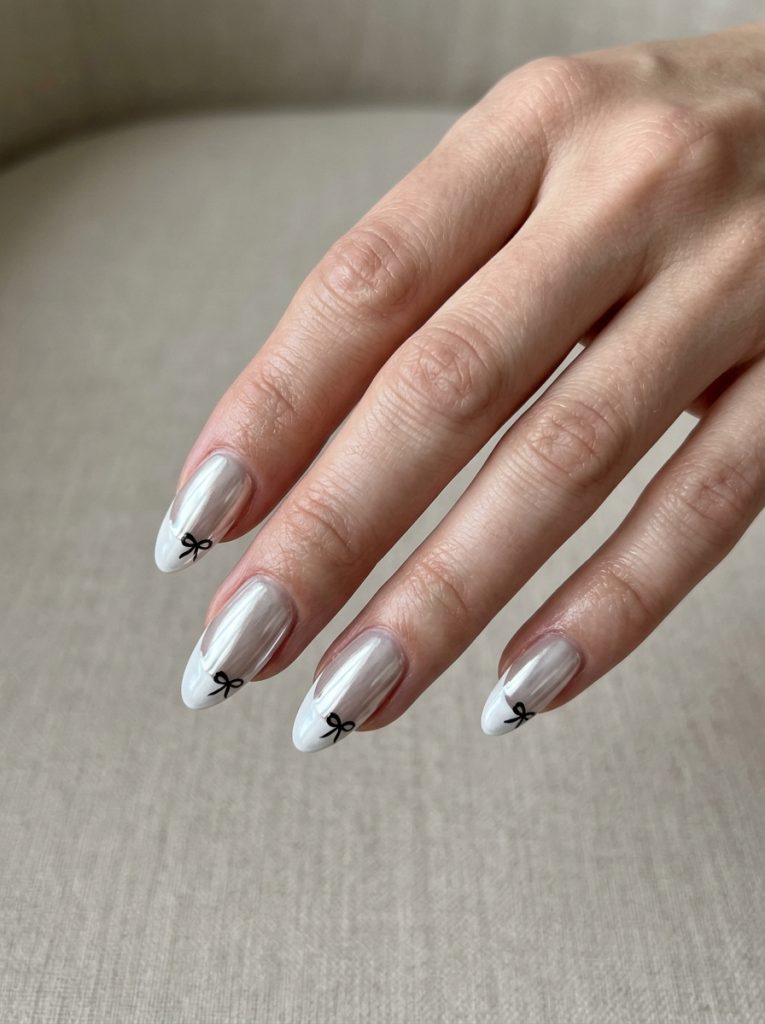
9. Coquette French Nails
Nail Styling Advice
White chrome French tips plus tiny black bows at the corners of the arc — that’s the coquette mani formula, and it is not going away any time soon. I’ve been doing variations of this since late 2024 and clients still request it constantly.
The chrome powder on white tips gives a mirror finish that feels elevated, and the bows keep it from being too polished or grown-up. It’s the combination that makes it work — classy and playful at once. I tried this with rose gold chrome instead of white once and it was stunning, so that’s worth exploring if you want a slightly warmer version.
Best on medium to long almond or coffin shapes. Short nails can pull it off but the bow placement gets a little tight.
How to Create This Nail Look
Step 1 — Base: Sheer nude or clear gel base. Cure.
Step 2 — Tips: Paint clean white French arcs. Cure fully.
Step 3 — Chrome: Apply chrome powder over the white tips only (not the base) using a sponge applicator while top coat is tacky. Seal with no-wipe top coat.
Step 4 — Bows: Using a fine nail art brush and black gel, paint a micro bow at the corner of each tip arc. Cure.
Step 5 — Final top coat: Glossy, fully cured.
Skill level: Intermediate to advanced. The bows require a steady hand and patience.
Occasions to Wear
Dates, graduation ceremonies, June weddings as a guest, afternoon events. This is the design I recommend when someone says they want to look “put together but still fun.”
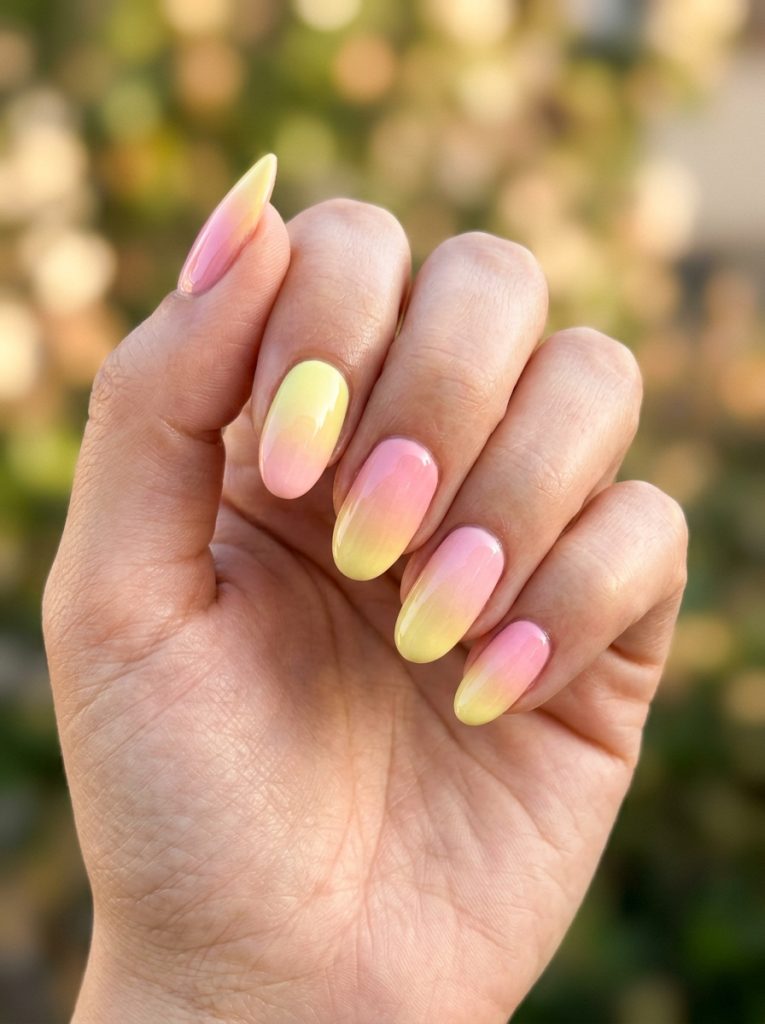
10. Sorbet Gradient Nails
Nail Styling Advice
Lemon yellow bleeding into sweet-pea pink, alternating direction across the nails for scroll-stopping results. This is the design that looks like melted sherbet and tastes (visually) like summer. I wasn’t expecting to love this one as much as I do, but after doing my first set I immediately wanted it on my own nails.
The alternating direction of the gradient — some nails going light-to-dark base to tip, others going dark-to-light — is what makes it interesting. Without that variation it reads as a standard ombre. With it, the whole hand becomes a composition.
Medium oval or squoval shapes work best. The gradient needs enough surface area to read properly.
How to Create This Nail Look
Step 1 — Base: Clear gel base on all nails.
Step 2 — Gradient: On alternating nails, apply lemon yellow at the base and blend into soft pink at the tip. On the other nails, reverse the direction. Use a dry sponge brush to feather the blend zone while gels are uncured.
Step 3 — Cure and clean: Cure, then clean up any flooding with a brush dipped in acetone before final cure.
Step 4 — Top coat: Glossy finish, cured.
Skill level: Intermediate. The alternating directions require planning before you start.
Occasions to Wear
Outdoor summer parties, picnics, beach-adjacent events. Also incredible for June birthday celebrations — it’s festive without being themed.
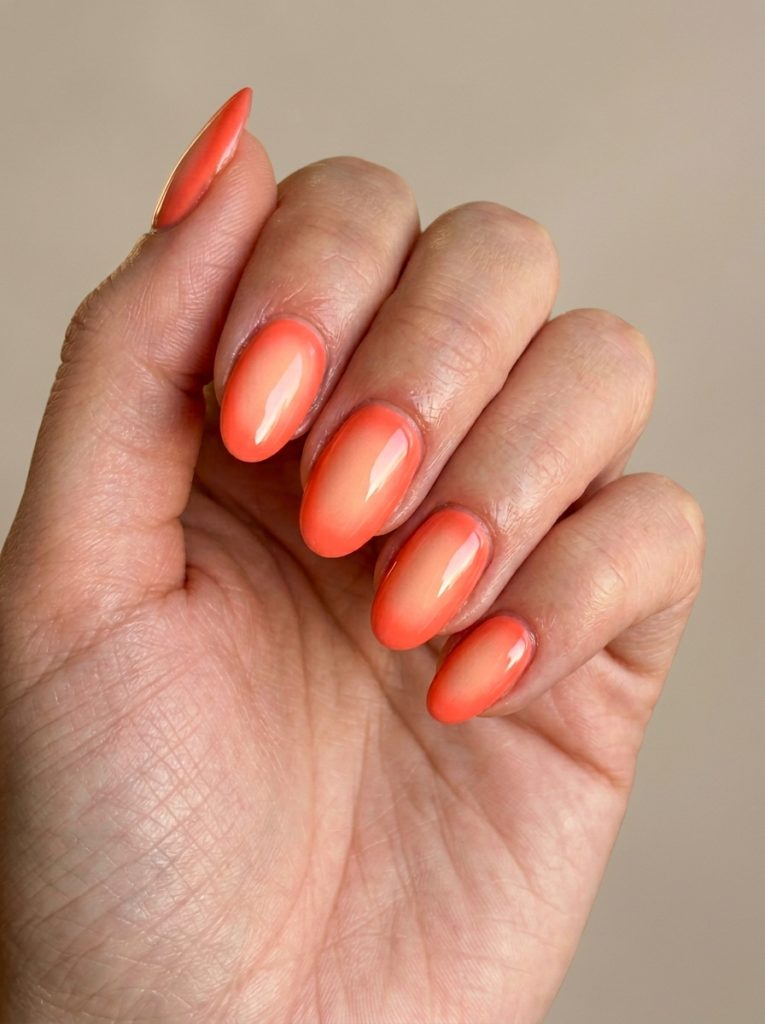
11. Aura Effect Nails
Nail Styling Advice
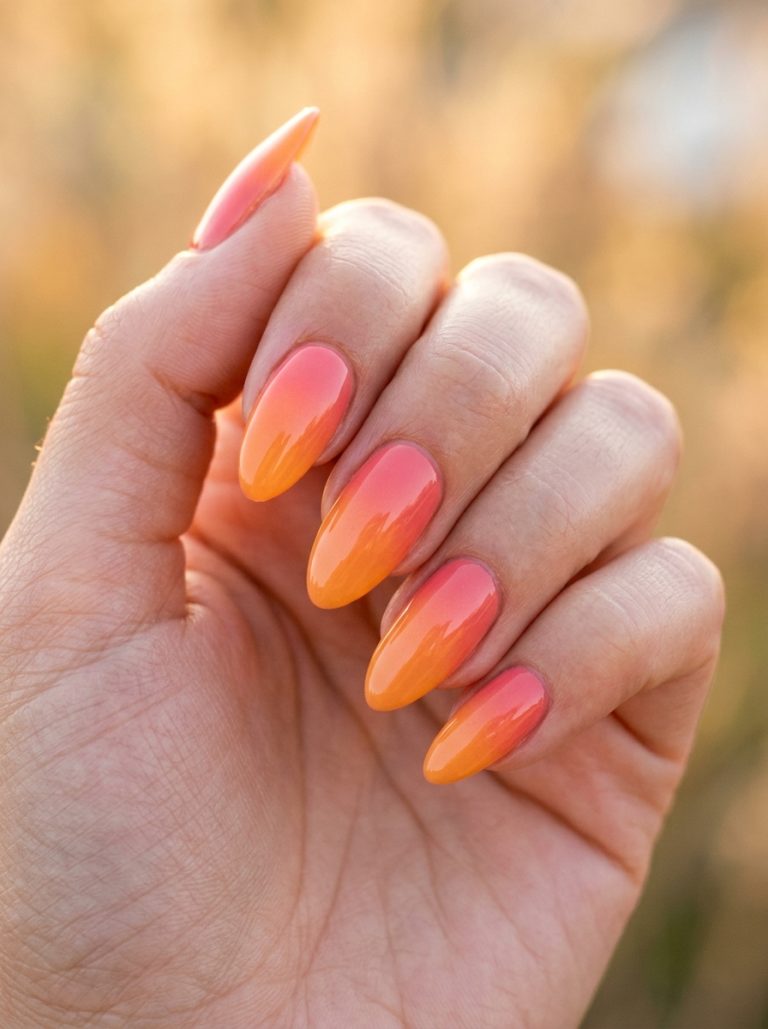
Aura nails are holding their ground in 2025 and I’m fully on board with it. For June, I push the color toward warm summer tones — peach, coral, and golden-pink. The technique involves an airbrushed gradient that glows outward from the center, like the nail has its own light source.
The trick is layering. I start with a vivid peach or coral base, then airbrush (or sponge) a lighter, almost white-tinted version of the same hue in the center of the nail. The contrast between the rich edges and the glowing center is what creates that ethereal, aura-like depth.
This works on any shape, but oval and round nails make the glow feel most natural. The circular shape mirrors the round aura effect.
How to Create This Nail Look
Step 1 — Base: Two coats of a vivid peach or coral gel. Cure.
Step 2 — Aura center: Mix your base color with white gel to create a lighter tint. Using a thin sponge or dry brush, dab this lighter mix into the center of each nail. Blend the edges outward. Cure.
Step 3 — Top coat: High-gloss top coat to make the gradient depth really sing. Cure.
Skill level: Intermediate. The blending technique takes a few practice runs to get natural-looking.
Occasions to Wear
Everyday wear, casual summer events, evening outings. This is a versatile design that reads differently depending on the color — peach feels daytime-soft, coral reads bolder and more evening-appropriate.
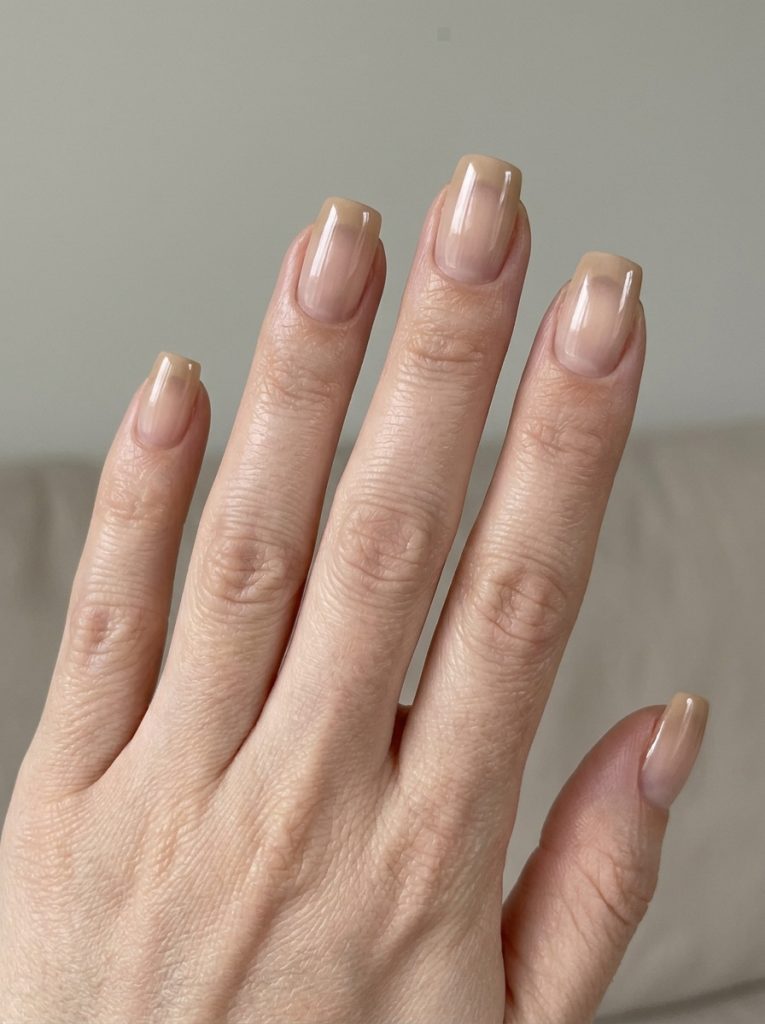
12. Neutral French (Quiet Luxury Version)
Nail Styling Advice
Everyone’s doing the stark white French tip. And there’s nothing wrong with that. But the 2025 quiet luxury version swaps the white for latte-beige, vanilla cream, or a barely-there greige, and blurs the smile line slightly for a foggy, diffused look that feels genuinely elevated.
I’ve started recommending this to clients who want to look polished without trying too hard. It pairs with every outfit, passes any dress code, and photographs well. The foggy-French variation (where the tip blurs rather than forms a hard arc) is my current personal favorite — it’s more modern and less “standard salon result.”
Works beautifully on all skin tones. On lighter skin tones I lean toward the vanilla cream. On deeper tones, a slightly more peachy-nude tip makes the contrast land better.
How to Create This Nail Look
Step 1 — Base: Sheer or semi-sheer nude base that’s close to the client’s natural nail color. Cure.
Step 2 — Tips: For classic version: paint clean latte-beige arcs. For foggy version: apply the tip color while slightly wet and dab the edge with a dry brush to blur it intentionally. Cure.
Step 3 — Top coat: Glossy for classic; slightly diffused satin finish for foggy. Cure.
Skill level: Beginner to intermediate.
Occasions to Wear
Work, office, professional events, low-key dates, any occasion where you want to look put together without making a statement. This is the design I fall back on when I need my nails to work with multiple outfits over two weeks.
13. Milk Manicure
Nail Styling Advice
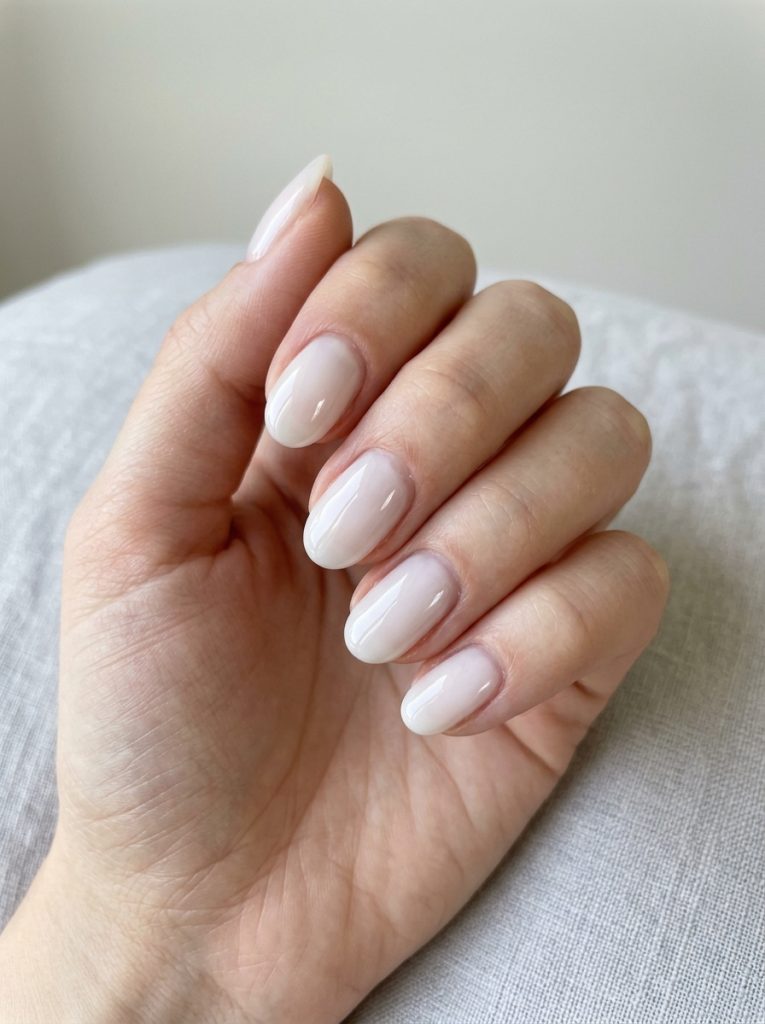
The milk manicure is deceptively simple and endlessly flattering. A translucent wash of white, pale pink, or cream that looks like polished glass — that’s the whole thing. It owns trend charts because it manages to feel both minimal and luxurious at the same time, which is a rare combination.
I’ve noticed minimalists love this for the barely-there color, and jewelry-wearers love it because it makes rings and bracelets the star. Both are right. It’s a blank canvas that somehow still looks intentional and finished.
The critical part is the top coat. A cheap or dull top coat will kill this look entirely. You need something genuinely high-shine and glassy. That reflective surface is 70% of what makes milk nails look like milk nails.
How to Create This Nail Look
Step 1 — Base: One thin coat of a translucent white or pale pink jelly gel. Cure.
Step 2 — Second coat (optional): If you want a milkier appearance, add a second thin coat. The goal is translucency with depth, not opacity. Cure.
Step 3 — Top coat: The glossiest top coat you own. Apply generously. Cure. This is non-negotiable.
Skill level: Beginner. The simplicity is the skill — it’s all about flawless prep and the right product choice.
Occasions to Wear
Literally anywhere. Work, beach, events, dates, errands. This is my most-recommended design for people who can only do one set per month and need it to work everywhere.
14. Polka Dot Nails
Nail Styling Advice
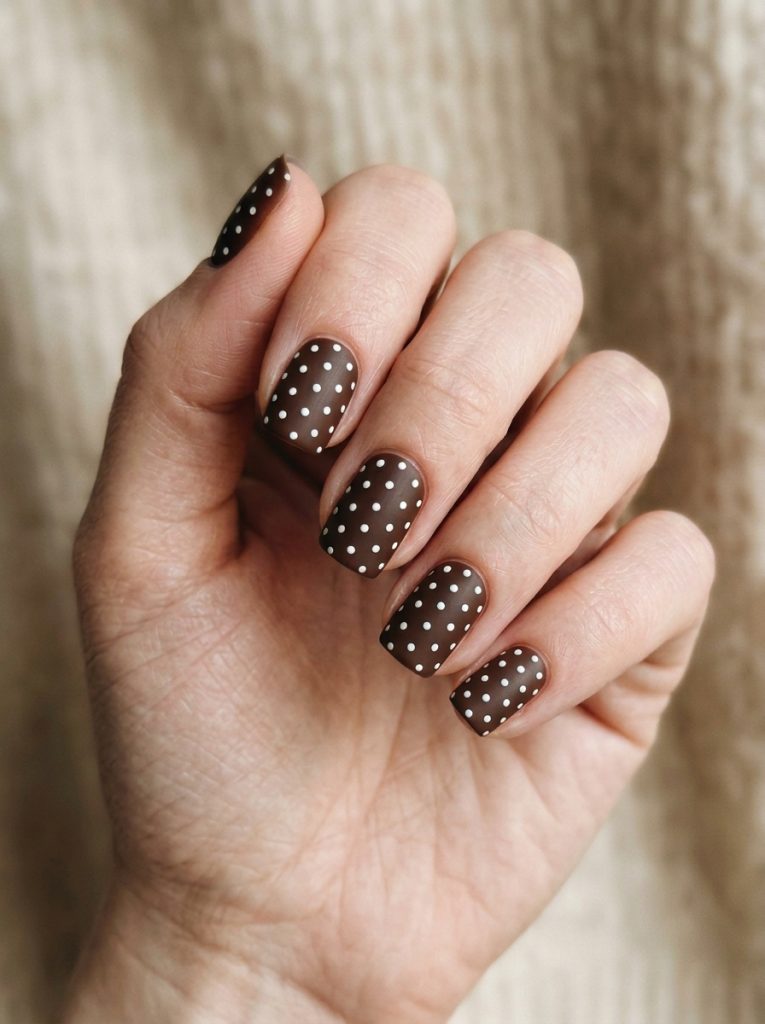
Resort fashion brought retro prints back hard this season, and polka dot nails are riding that wave. My favorite version right now: chocolate brown base with white micro-dots for a sleek retro-core look. But if you want dopamine energy, butter yellow and baby blue is equally on-trend and much more maximalist.
The dots don’t need a professional dotting tool — I genuinely use the unfolded end of a bobby pin for this and it works perfectly. The key is keeping your dot sizes consistent and your spacing deliberate. Random uneven dots can look messy. Evenly spaced dots look intentional.
Works well on shorter nails. The pattern actually reads better on a smaller canvas — it feels more graphic and less busy.
How to Create This Nail Look
Step 1 — Base: Two coats of your chosen base color (brown, yellow, or whatever you’re going with). Cure.
Step 2 — Dots: Dip a bobby pin tip or small dotting tool into a contrasting gel color. Press firmly but briefly onto the nail surface, spacing dots evenly. Cure after completing all nails.
Step 3 — Top coat: Glossy, cured.
Skill level: Beginner. One of the most approachable nail art techniques.
Occasions to Wear
Casual events, weekend outings, summer trips, any occasion where you want a retro-playful look. Works brilliantly with linen sets, sundresses, and vintage-inspired summer outfits.
15. Red Nails With White Floral Accents
Nail Styling Advice
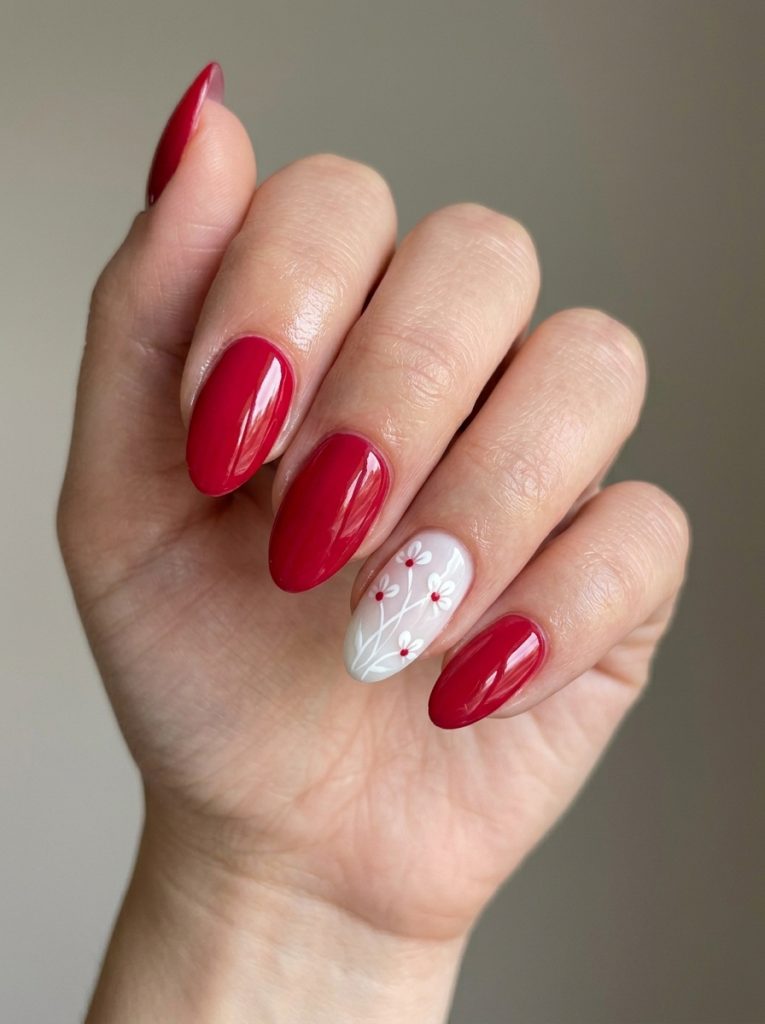
Cherry red gel on most of the hand, then one or two milky accent nails loaded with white floral art. This combo makes so much sense because it bridges the power of red with the softness of bloomcore. You get the confidence of a red manicure but it doesn’t feel aggressive or heavy for June.
I did this on a client who usually avoids red nails (“too bold for me”) and she was completely converted. The milky accent nails soften the whole hand enough that the red reads vibrant rather than intense. The white florals also photograph really beautifully against the red — high contrast, high impact.
Best on medium to long length. The florals need some space and the red reads better when there’s enough nail to show off the color.
How to Create This Nail Look
Step 1 — Base: Cherry red gel on three to four nails. Cure.
Step 2 — Accent nails: Milky white gel on one to two nails. Cure.
Step 3 — Florals: On the milky accent nails, paint white floral designs using a fine brush (five-petal blooms with a red center dot for cohesion). Cure.
Step 4 — Top coat: Glossy on all nails. Cure.
Skill level: Intermediate. The floral detail requires a fine brush and patience.
Occasions to Wear
Date nights, evening events, any occasion where you want to look bold but not one-dimensional. Also works for early July if you want to extend the set — the red is perennial.
16. Cat-Eye Magnetic Nails
Nail Styling Advice
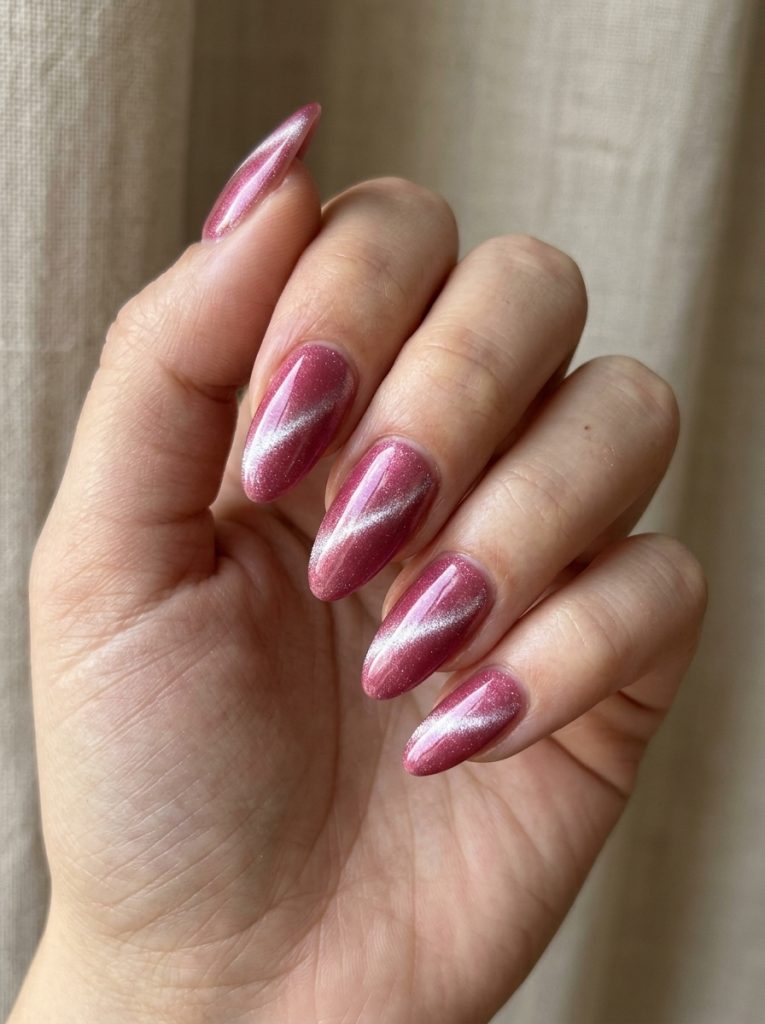
Magnetic polish plus a quick swipe of a magnet wand equals the cat-eye shimmer line that’s been all over Pinterest for months. The line of light shifts depending on the angle, which is what makes people stop and stare. It’s one of those designs that looks much more complicated than it actually is.
I combine this with a rose-pink base and French tip framing sometimes, which hits two summer trends at once — cat-eye and pink nails — in a single set. The challenge is working quickly. Magnetic gel has a short window between application and magnet placement before it starts setting. I tell every DIY client: do one nail at a time, don’t rush between nails.
Looks stunning on medium to long almond or oval shapes. The cat-eye line needs length to create that elongating, seductive effect.
How to Create This Nail Look
Step 1 — Base: Sheer pink or nude base coat. Cure.
Step 2 — Magnetic gel: Apply one coat of magnetic gel polish to one nail.
Step 3 — Magnet: Immediately hold the magnet wand close to (but not touching) the wet gel surface for 5–10 seconds. The metal particles align to create the shimmer line. Cure quickly.
Step 4 — Repeat: Do each nail individually. Do not batch-apply before using the magnet.
Step 5 — Top coat: Glossy top coat to enhance the shimmer. Cure.
Skill level: Intermediate. Timing is everything with magnetic gel.
Occasions to Wear
Evening events, dinner dates, summer weddings, any occasion where you want nails that photograph in a completely captivating way. The shifting light effect under event lighting is genuinely stunning.
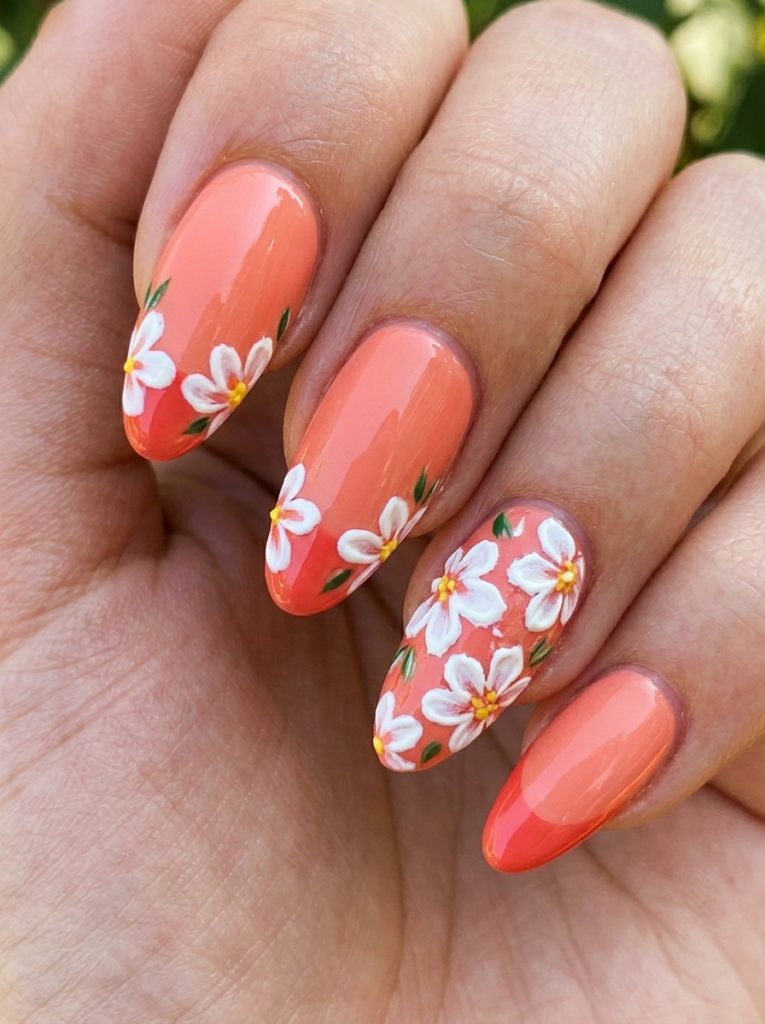
17. Floral French Tip Nails (Coral Edition)
Nail Styling Advice
This is the French tip redesigned for summer. Instead of a plain arc, you swap in a saturated coral tip and stamp chunky white blooms right over it. The coral pulls the design out of spring-pastel territory and plants it firmly in hot-weather bloom-core. I love that it’s bold without being aggressive — the florals soften what could otherwise be an intense color.
One thing I noticed: the larger and slightly imperfect the flowers, the better this looks. Tiny precise florals feel too delicate for coral. You want chunky, almost stamped-looking blooms that feel confident. Slightly overlapping petals are fine — even good.
Works best on medium to long almond or coffin. The coral tip needs to be visible behind the florals, so you need enough arc width to show both elements.
How to Create This Nail Look
Step 1 — Base: Sheer neutral or clear gel. Cure.
Step 2 — Coral tips: Paint wide coral French arcs with a nail art brush. Cure.
Step 3 — Florals: Using a medium nail art brush, paint chunky five-petal white flowers directly over the coral tips. Add a coral center dot to tie back to the tip color. Cure.
Step 4 — Top coat: Glossy finish. Cure.
Skill level: Intermediate. The floral painting is forgiving — embrace the organic look.
Occasions to Wear
Festival season, outdoor parties, beach vacations, June bridal showers. Pairs beautifully with white linen, flouncy sundresses, and floral outfits.
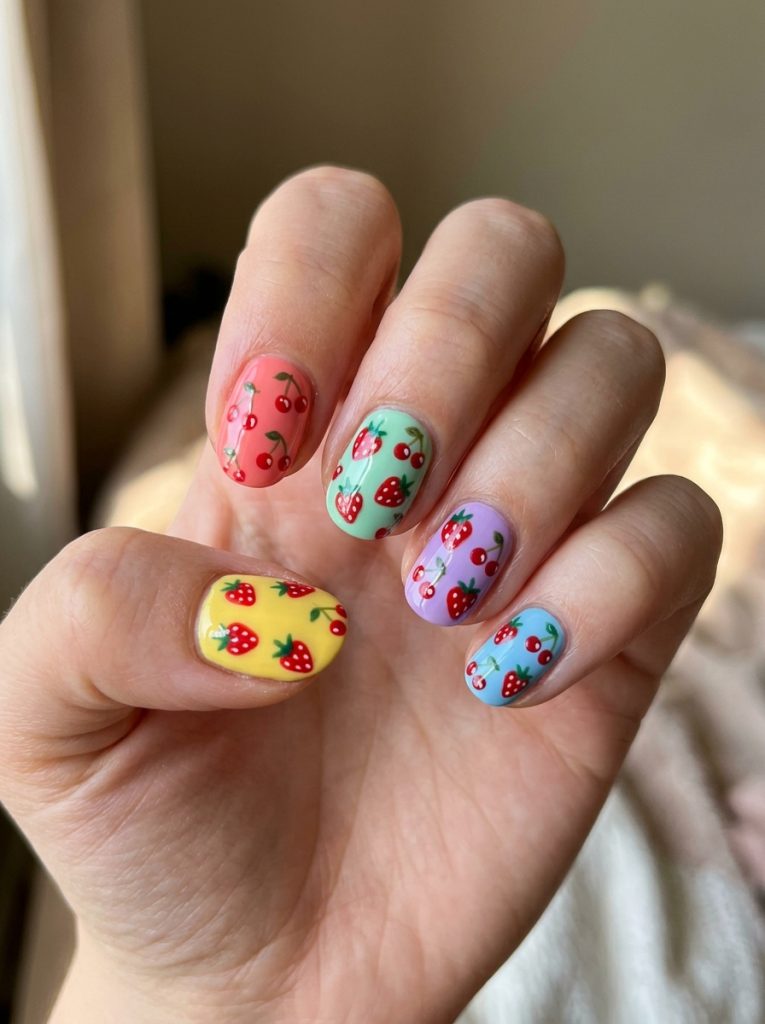
18. Fruity Mani (Strawberries, Kiwis & Cherries)
Nail Styling Advice
Summer does not officially start until fruit nails hit the feed, and this year the fruit-core trend went bigger than I expected. I’m talking full strawberry designs, abstract kiwi slices, 3D jelly cherries — the works. Mismatched green, red, and yellow bases with fruit details layered on top.
I was a little skeptical at first that this would be too “theme park” for anyone over twenty-two. I was completely wrong. I’ve done fruit sets on clients from their early twenties to their mid-forties and everyone loves them. The key is balancing: don’t put fruit on every single nail. Mix in a solid or a stripe as a breather nail. It makes the fruit details feel intentional rather than chaotic.
The 3D jelly cherry version (transparent gel cherries with tiny stem details) is my current favorite — it’s the most technically impressive and gets the most reaction.
How to Create This Nail Look
Step 1 — Base colors: Mix and match complementary colors — soft green, white, red, yellow — on different nails. Cure.
Step 2 — Fruit designs: Using fine nail art brushes, paint your chosen fruit motifs. Strawberries: red body with tiny white seed dots, green cap. Kiwi: green circle with white flesh and black seed details. Cherries: two red rounds with a green stem.
Step 3 — 3D option: For jelly cherries, build small rounded gel bumps, cure, and paint cherry color over them for dimension.
Step 4 — Top coat: Glossy on all nails. Cure.
Skill level: Intermediate to advanced. The 3D elements require gel sculpting experience.
Occasions to Wear
Summer picnics, beach days, casual June events, anywhere fun and playful is appropriate. This is a full conversation-starter set — wear it when you feel like being social.
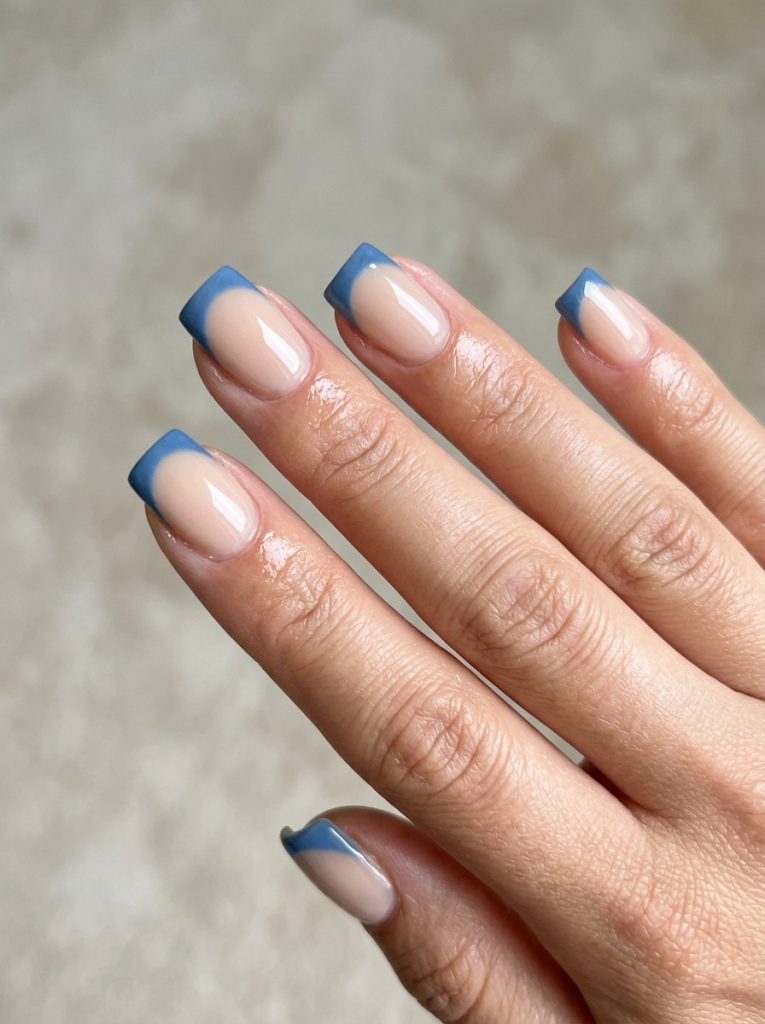
19. Denim Blue French Tips
Nail Styling Advice
Denim blue is the color solving a specific June problem: you want color, but you’re not a neon person. This mid-tone blue sits perfectly between pastel and saturated — not too light, not too bold. As French tips, it has a subtle nod to summer cut-offs while still feeling polished enough for almost any setting.
I’ve done this paired with a sheer neutral base and the contrast is clean and satisfying. It also works as a full nail color with slightly abstract or drip-style tip details. The Google Trends spike on denim blue nails is real — this is genuinely one of the more searchable designs right now.
Works on any length and shape. Square or squoval tips make the arc look especially clean and graphic.
How to Create This Nail Look
Step 1 — Base: Two coats of a sheer nude or white gel. Cure.
Step 2 — Tips: Paint denim blue French arcs using a nail art brush. For a more abstract version, slightly extend and angle the arc asymmetrically. Cure.
Step 3 — Top coat: Glossy or slightly satin finish depending on how polished you want the final result.
Skill level: Beginner to intermediate. Clean arcs are the only technical challenge.
Occasions to Wear
Work, everyday wear, casual dates. It’s the nail design equivalent of a well-fitted pair of jeans — it works with essentially everything and you never regret choosing it.
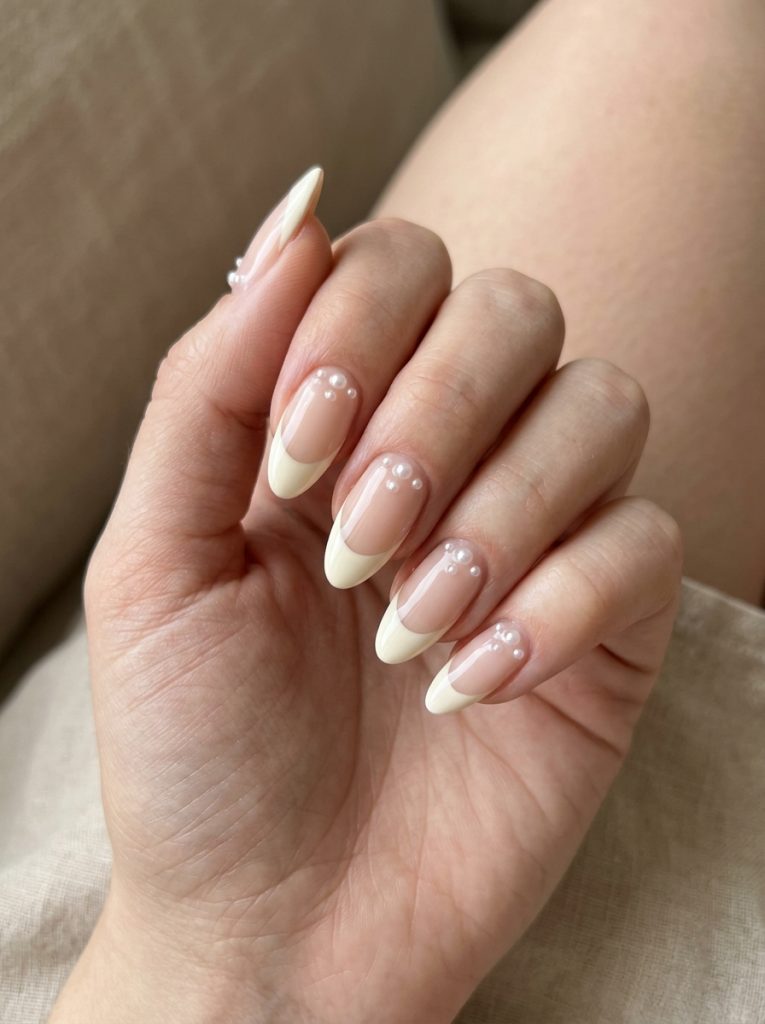
20. Pearl Manicure
Nail Styling Advice
Pinterest Predicts 2025 called pearl-core as a top nail trend, and months later it’s still holding strong. The version I keep doing is a neutral French tip with flat-back pearl stickers scattered across each nail — some clustered near the cuticle, some trailing toward the tip. It’s a birthday girlie dream and a trend chaser’s win at the same time.
What I like about this is the flexibility. You can keep the base neutral beige for a quiet luxury look, or swap in pastel arcs for a more playful result. The pearls elevate both. The mistake I see with DIY pearl nails is using rounded pearls instead of flat-back ones — rounded pearls catch on fabric and pop off within days. Flat-back pearls sealed properly under top coat last the full wear.
Works on any length, best on medium to long for maximum pearl real estate.
How to Create This Nail Look
Step 1 — Base: Two coats of a vanilla or pale nude gel. Cure.
Step 2 — French tips: Paint soft beige or blush French arcs. Cure.
Step 3 — Pearls: While top coat is still tacky, place flat-back pearl stickers using tweezers. Press firmly. Cure over them with another coat of gel to seal.
Step 4 — Final seal: Another thin top coat layer over the pearls to ensure adhesion. Cure.
Skill level: Beginner to intermediate. Tweezers and patience are your best tools here.
Occasions to Wear
Birthday celebrations, bridal events, summer weddings, dinner parties. Also a strong contender for anyone who wears a lot of gold or pearl jewelry — the nails become part of the accessory conversation.
21. Mermaid-Core Nails
Nail Styling Advice
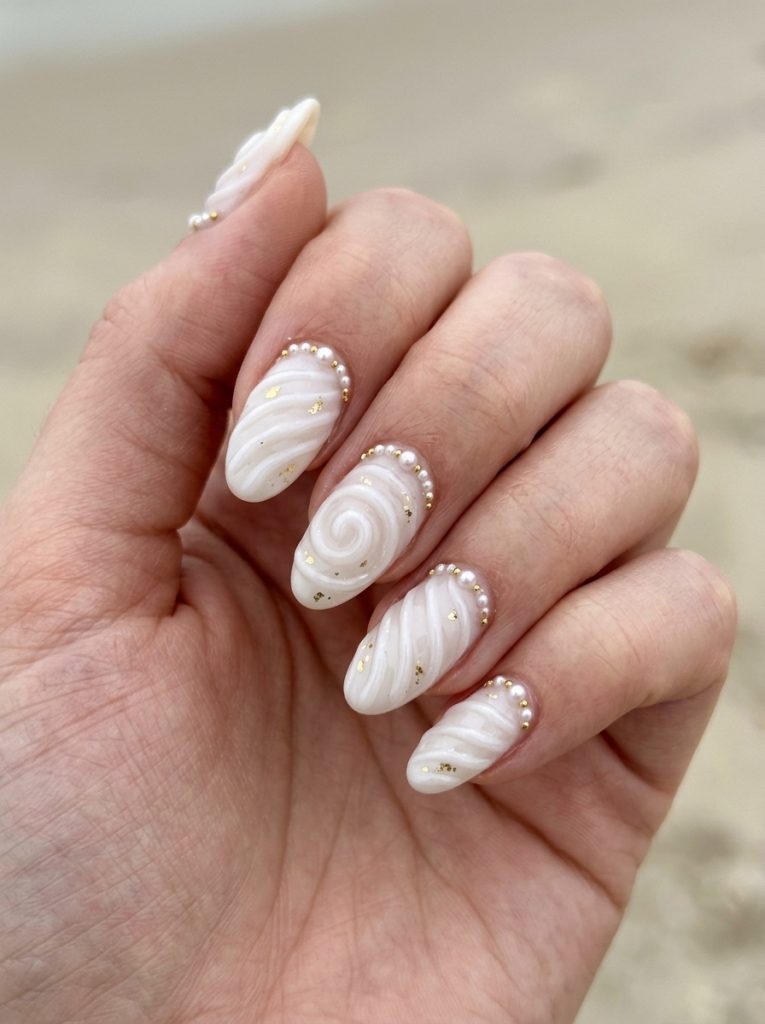
The 2025 version of mermaid nails sheds the chunky glitter and replaces it with texture and sophistication. Milky base, raised gel swirls that mimic shell ridges, micro pearls along the cuticle line, and a gold bead or two for detail. It’s beach-coded but elevated — the kind of mani that makes people say “wait, those aren’t press-ons?”
I find this one genuinely meditative to create. The gel swirl technique requires building up small ridges with a thick gel formula and letting them hold their shape before curing. It takes longer than a regular set but the textural result is worth the extra chair time.
Medium to long oval or coffin shapes work best. The swirl details need surface area to read properly.
How to Create This Nail Look
Step 1 — Base: Two coats of milky white gel. Cure.
Step 2 — Swirls: Using a thick builder gel and a medium nail art brush, trace organic wavy lines across the nail surface to create shell-ridge texture. Don’t flatten them — let them hold their dome shape before curing.
Step 3 — Pearl details: Place micro pearl beads along the cuticle edge while top coat is tacky. Press and cure.
Step 4 — Gold accents: Add a tiny gold bead or two near the nail’s center or cuticle. Seal with top coat and cure.
Skill level: Advanced. The 3D gel swirling technique requires experience with builder gel.
Occasions to Wear
Beach vacations, resort trips, summer evening events. This is a “statement set” — wear it when you want your nails to be the focal point.
22. Glazed Peach Chrome Nails
Nail Styling Advice
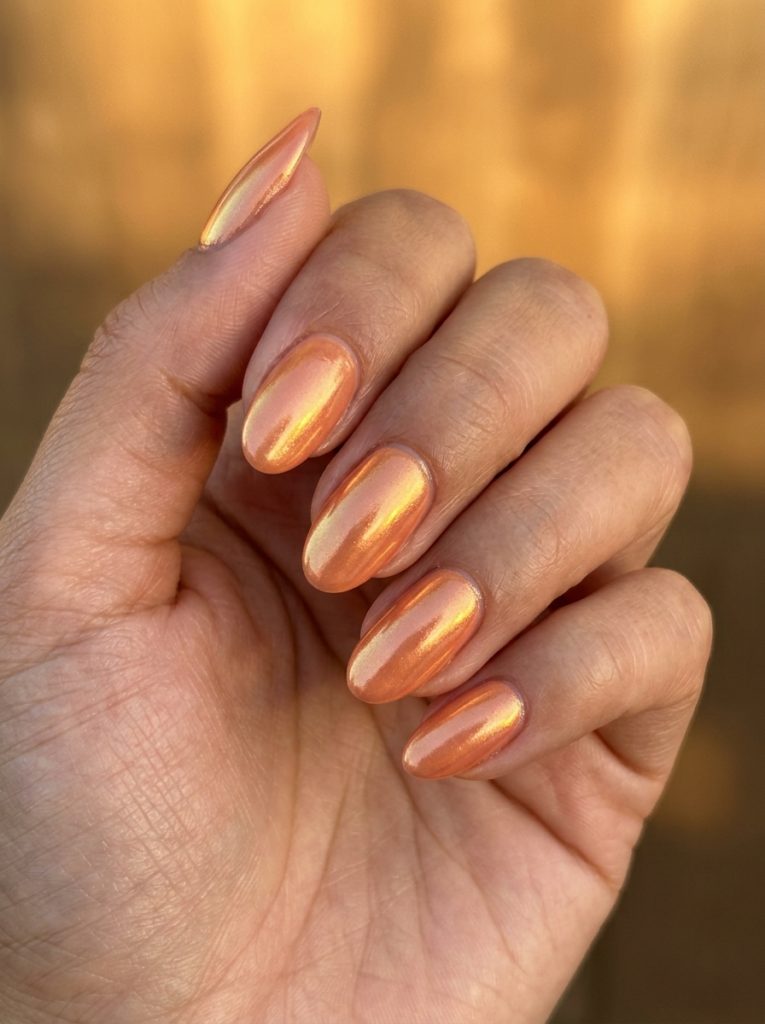
Peach base plus reflective chrome powder equals golden-hour on your hands. That’s genuinely what this looks like — warm, luminous, sunset-toned. Peach chrome has been climbing warm-weather trend lists steadily and the reason is simple: the sunset undertone flatters every skin tone and every fresh tan.
I’ve done this design with a straight mirror chrome for a statement look and a subtler pearl chrome for a more everyday result. Both are stunning. The mirror version is more dramatic and photographs stunningly. The pearl version is something you can wear to the office without looking like you raided a costume shop.
Works on any length. Shorter nails in glazed peach chrome look chic and modern. Longer nails look like a luxury editorial.
How to Create This Nail Look
Step 1 — Base: Two coats of a warm peach or peachy-orange gel. Cure.
Step 2 — Chrome: While a no-wipe top coat is still tacky, buff reflective chrome powder (gold or orange-tinted) across the nail surface using a sponge applicator.
Step 3 — Seal: Gel top coat applied and cured fully.
Skill level: Intermediate. Standard chrome powder application.
Occasions to Wear
Summer evenings out, beach parties, outdoor weddings, any warm-weather event where you want nails that glow in the golden-hour lighting. I wore a version of this to a rooftop sunset event and it was literally perfect for the light.
23. Mismatched Dopamine Nails
Nail Styling Advice
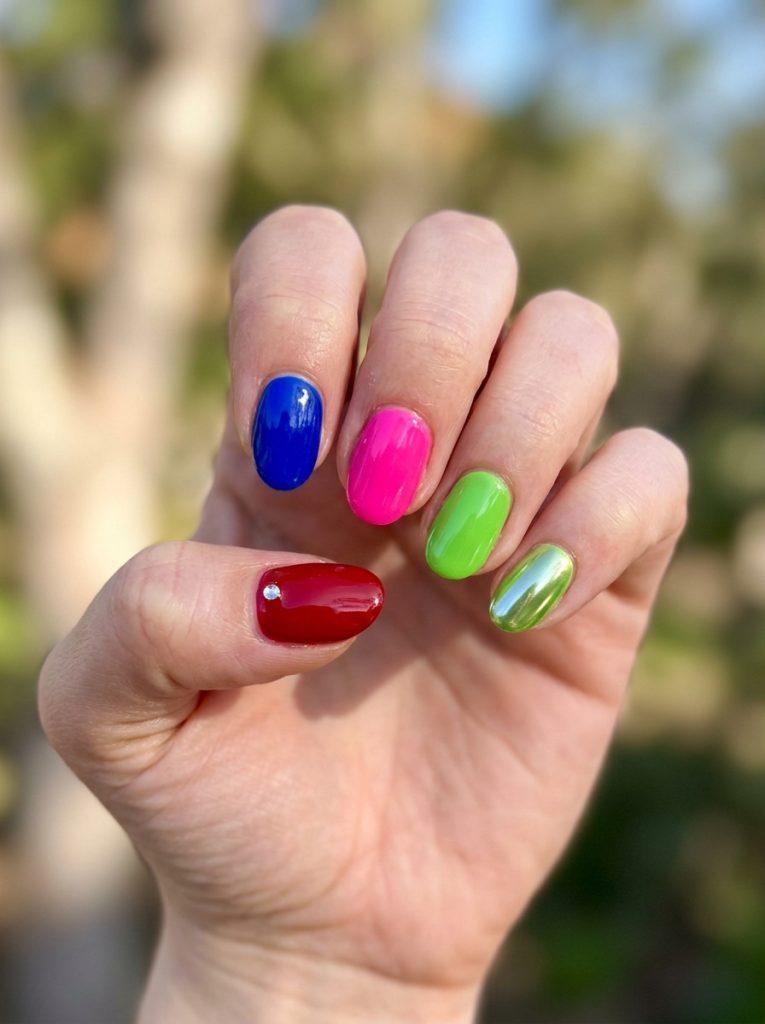
This one requires zero coordination and maximum confidence. Pick four to five bold summer colors — red, cobalt blue, lime green, hot pink, purple — rotate them across the nails with zero repetition, then add a stray rhinestone or chrome accent wherever the mood strikes. Zero matching required. Color blocking is the point.
I used to think mismatched nails were a bit “nail school experiment” energy, but the current dopamine mani trend has genuinely converted me. When the colors are bold enough and the execution is clean (meaning the actual application is tidy even if the color selection is chaotic), it looks deliberately editorial rather than accidental.
Works on any length. Short nails make the color pops feel graphic and intentional. Long nails make it more dramatic.
How to Create This Nail Look
Step 1 — Colors: Choose four to five distinct, bold colors. Apply one to each nail in no particular order. Two coats each, cured.
Step 2 — Accents: Add chrome powder on one or two nails, or press on a single rhinestone near the cuticle of a nail or two. Keep the embellishments sparse — the colors are the main event.
Step 3 — Top coat: Glossy on all nails. Cure.
Skill level: Beginner. This is genuinely one of the easiest designs to execute.
Occasions to Wear
Festivals, concerts, beach days, casual summer events, Pride Month. Any occasion where the vibe is celebratory and playful.
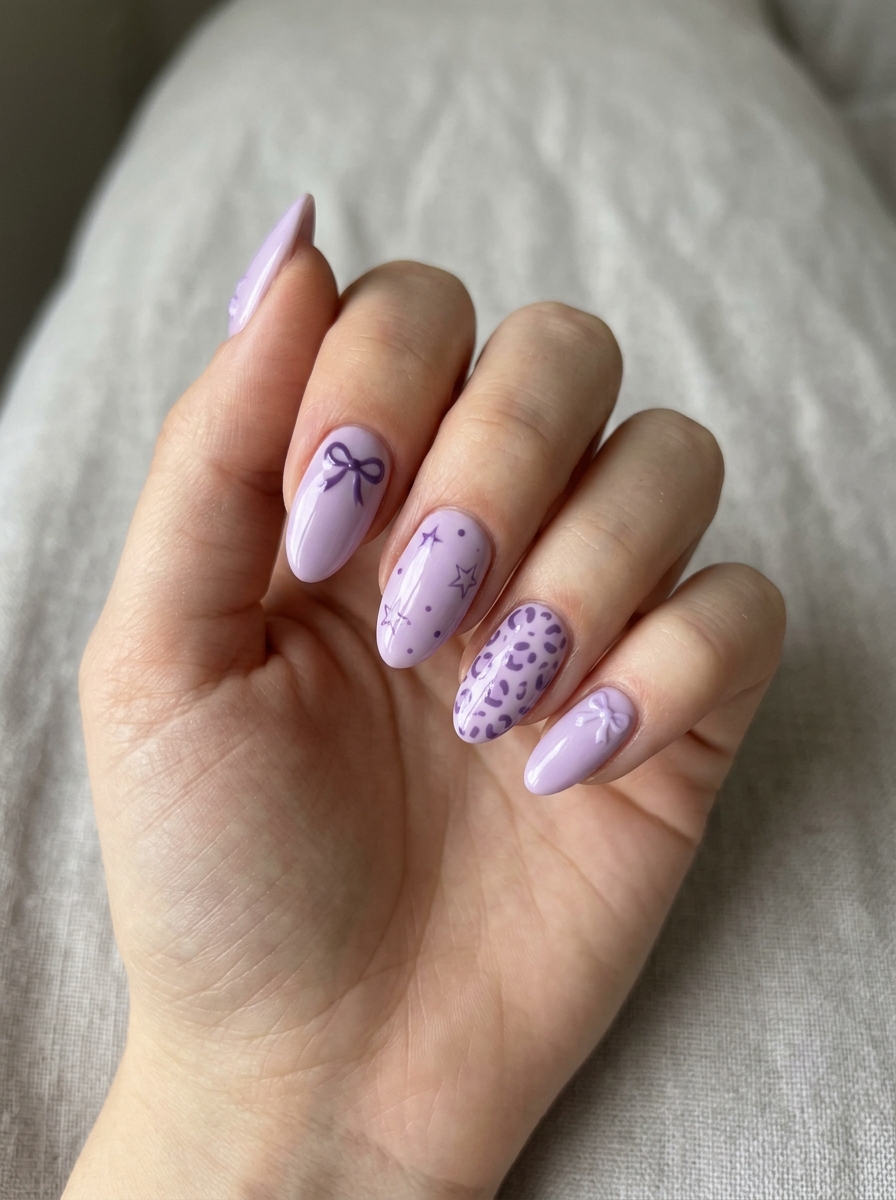
24. Lavender With Maximalist Details
Nail Styling Advice
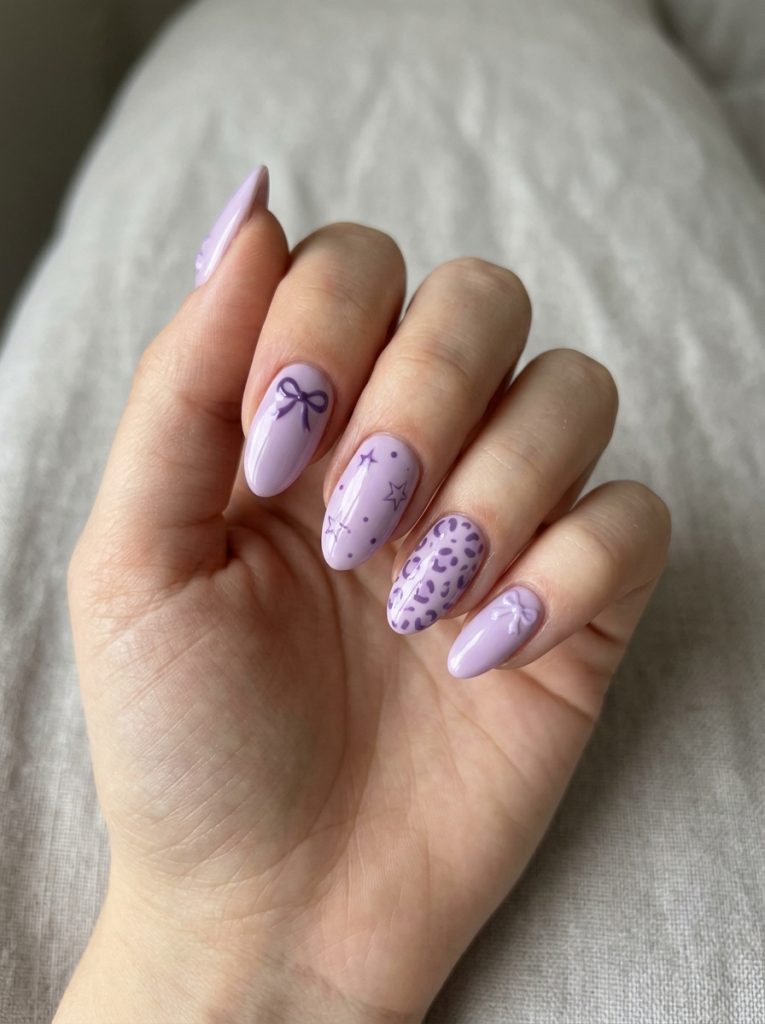
Lavender has been the internet’s comfort pastel for two years and it’s not stepping down. But the 2025 version goes maximalist: tiny bows, star art, and maybe animal print in a deeper purple for tone-on-tone texture. Soft on first glance, genuinely trend-stacked once people look closer.
I love doing this for clients who want to look put together but love a detail moment. The lavender reads gentle and approachable. Then someone looks down at their hand up close and sees the layered bows, stars, and print details, and it becomes this whole discovery. That contrast between first impression and close-up detail is really satisfying to create.
Works on any length. On shorter nails, pick one or two detail elements rather than all three.
How to Create This Nail Look
Step 1 — Base: Two coats of a true lavender gel. Cure.
Step 2 — Details (choose your combination): Using a fine nail art brush and a deeper purple gel, paint tiny bows near the cuticle on some nails, star outlines on others, or loose animal print strokes on one or two accent nails.
Step 3 — Top coat: Glossy or satin finish. Cure.
Skill level: Intermediate. The detail work requires a fine brush and a steady hand.
Occasions to Wear
Everyday wear, casual events, coffee dates, low-key summer occasions. Also works for work if your office tolerates a hint of personality.
Why This Nail Trend Is Popular
June nails are having a moment because summer finally gives people permission to be bold. After months of playing it safe with nudes and neutrals, everyone suddenly wants color, texture, and a little personality. What I keep noticing on NailTok and Pinterest is that the trending looks aren’t just one aesthetic — it’s a whole spectrum. You’ve got the minimalist crowd obsessing over milky glazed finishes, and then right next to them, someone’s sporting mismatched rainbow tips with 3D jelly cherries. Both are having equal moments right now, and that’s what makes June nails so fun to work with.
The fruit-core trend especially caught me off guard. I thought it was going to be a quick Pinterest phase, but clients kept coming in asking for strawberries and kiwis and cherries, and honestly? The sets looked incredible. Chrome finishes are also refusing to quit — I’ve been doing more chrome French tips in the past month than ever before.
Tools & Accessories Needed
Before we get into the designs, here’s what you’ll actually need on hand to pull most of these off:
Nail tools: A fine nail art brush (size 00 or 000 for detailed work), a dotting tool or the unfolded end of a bobby pin for polka dots, a UV/LED lamp if you’re working with gel, a nail file and buffer for shape prep, and a cuticle pusher.
Nail accessories: Flat-back rhinestones, micro pearl beads, nail charms (bows, stars, flowers), gold chrome powder, and 3D gel flower supplies if you’re going maximalist.
Products: Sheer jelly gel polish, chrome powder, matte topcoat, glossy topcoat, gel base and top coat, white gel for French tips, and a magnetic wand if you’re attempting cat-eye.
✨ Nail Care Tips for Summer Sets
Summer heat, chlorine, saltwater, and constant sunscreen application are genuinely rough on nails. A few things I always tell clients before they leave the chair for June:
Apply cuticle oil daily — heat dries out the nail bed fast and cuticle oil keeps lifting at bay. Wear gloves when you can while doing dishes or cleaning. Reapply top coat every three to four days if you’re doing a gel-polish-style DIY set — it adds weeks to the wear time. And for anyone going into pools frequently: rinse your hands immediately after, because chlorine breaks down gel bonds faster than almost anything else.
🔚 Closing Nail Note
Honestly, if I had to pick one set from this whole list to wear right now, it would be the iced French or the glazed peach chrome — both manage to feel fresh and current without demanding too much from you stylistically. But if you’ve been playing it safe all spring, June is the perfect excuse to go for the fruity mani or the rainbow French tips. Something about summer just gives everyone permission to have a little more fun with their nails.
Whatever you pick, make sure the base prep is solid. The most beautiful nail art falls apart on a poorly prepped nail. That part is never glamorous, but it’s where good nail sets actually start.